
Digital banking tutorials

How to add a contact and send an Interac e-Transfer® payment
Learn how to transfer money quickly, easily and securely with Interac e-Transfer on CIBC Online Banking® or the CIBC Mobile Banking App®.
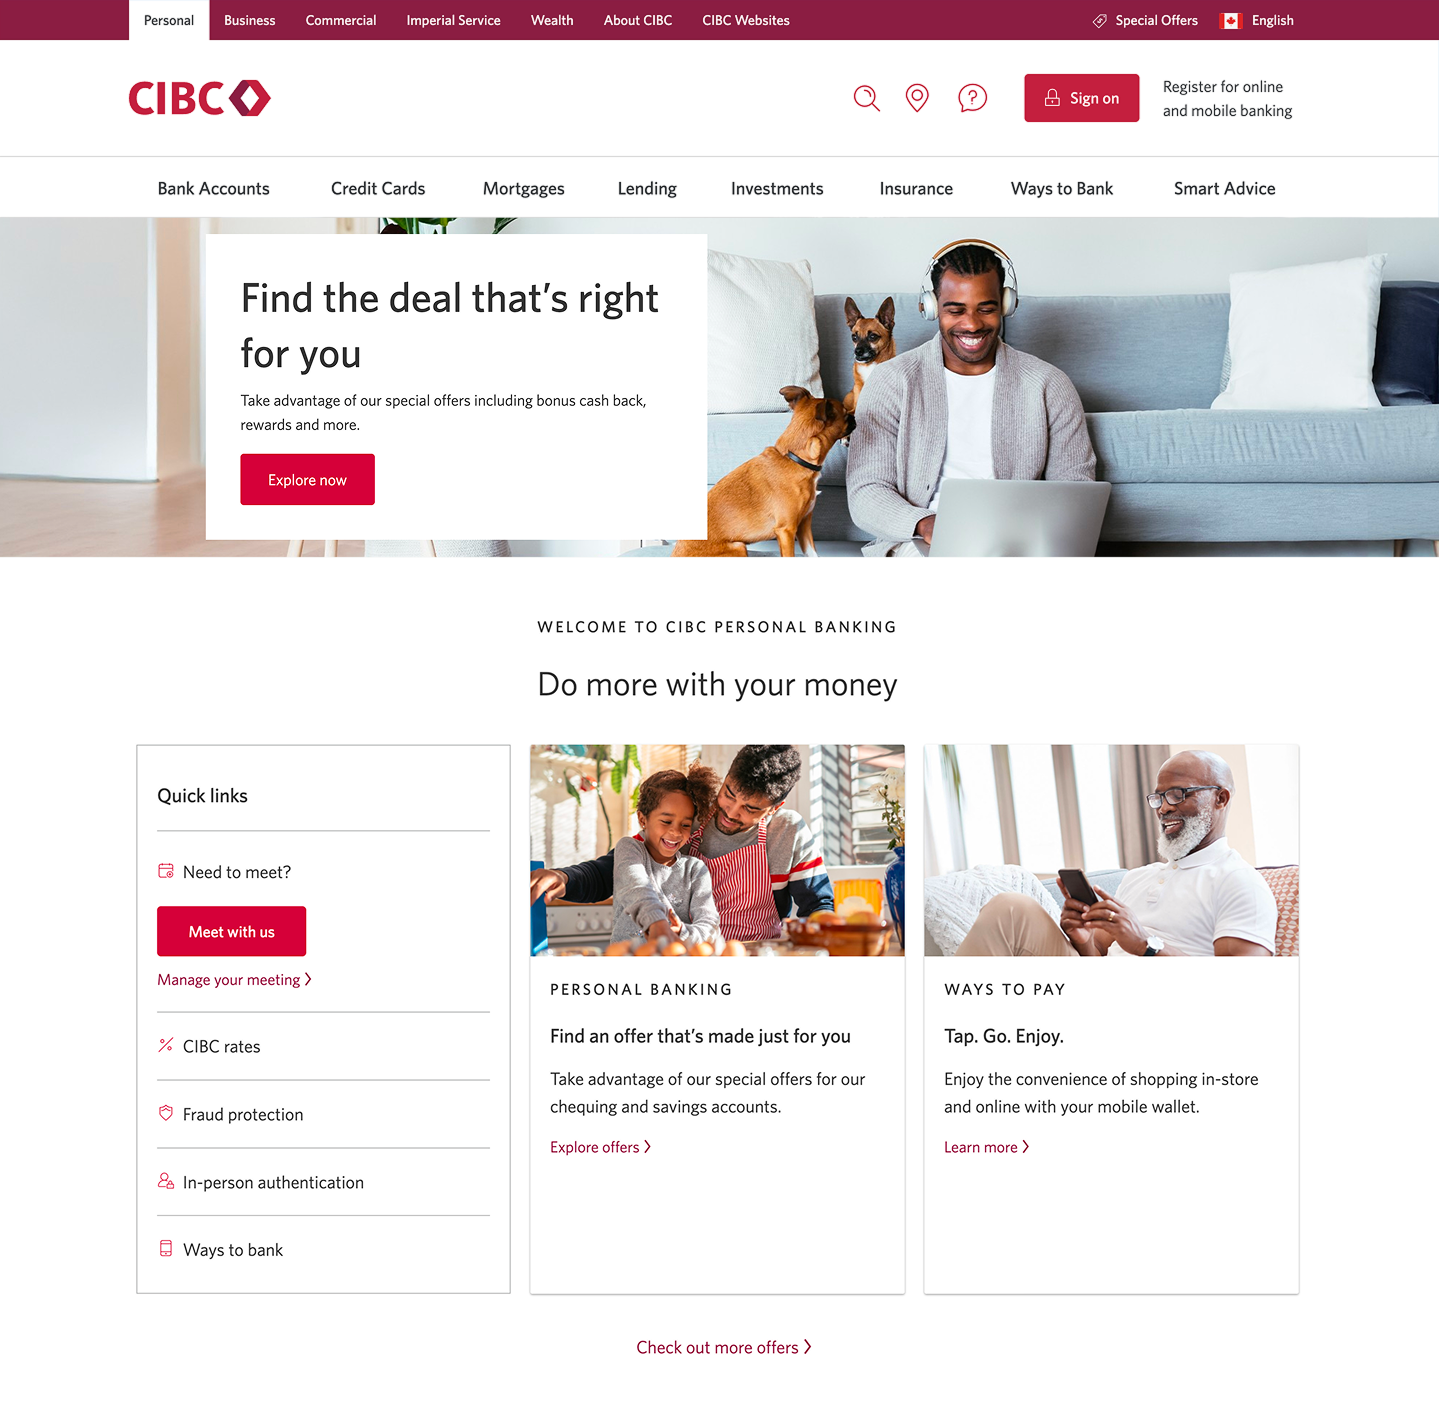
Demo screen 1: CIBC homepage. A pulsing animation highlights the "Sign on" button.
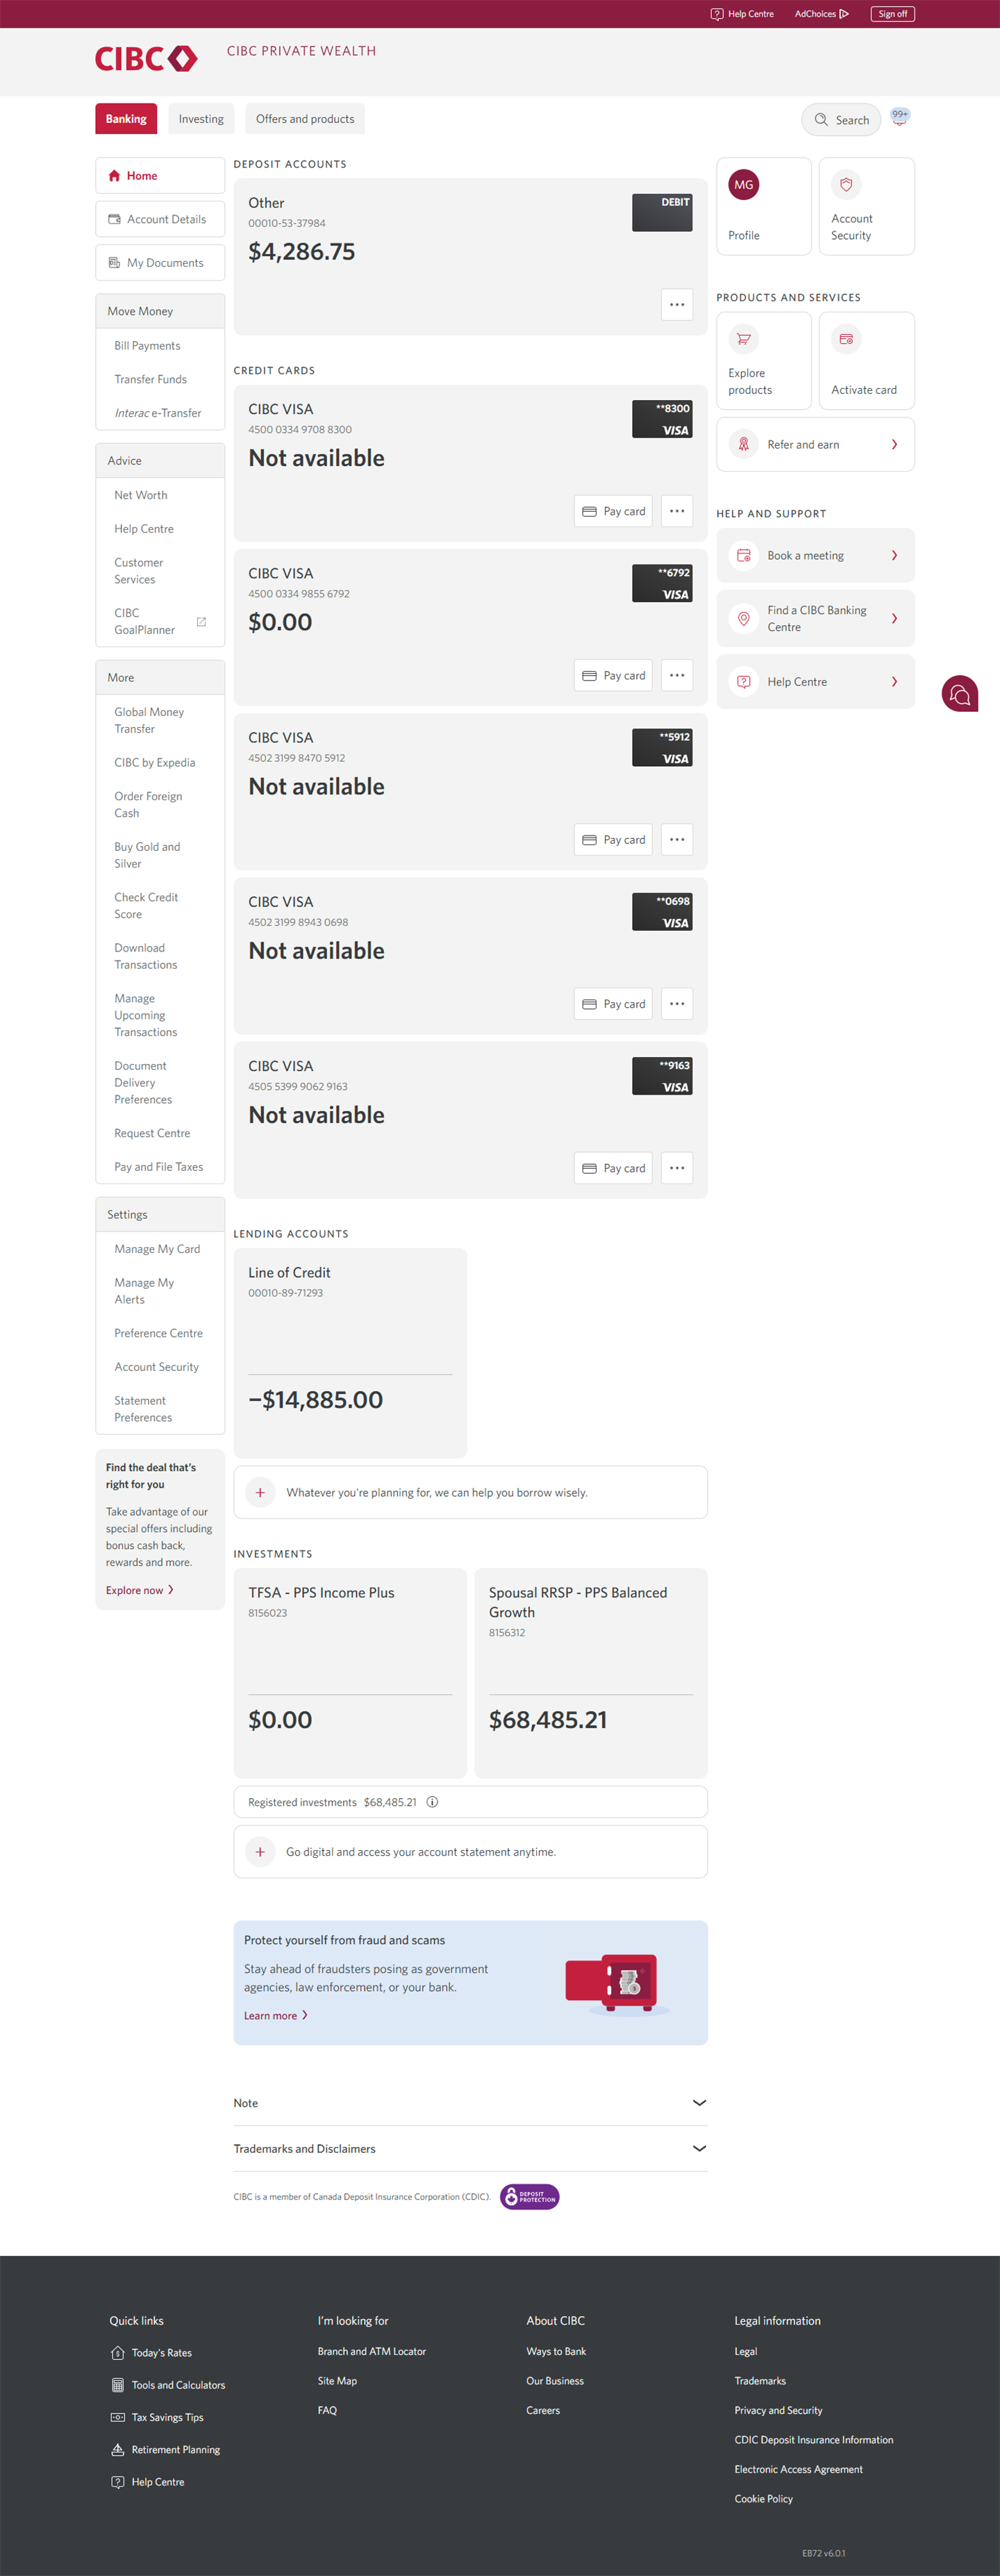
Demo screen 2: CIBC Online Banking homepage. A pulsing animation highlights the "Interac e-Transfer" link.
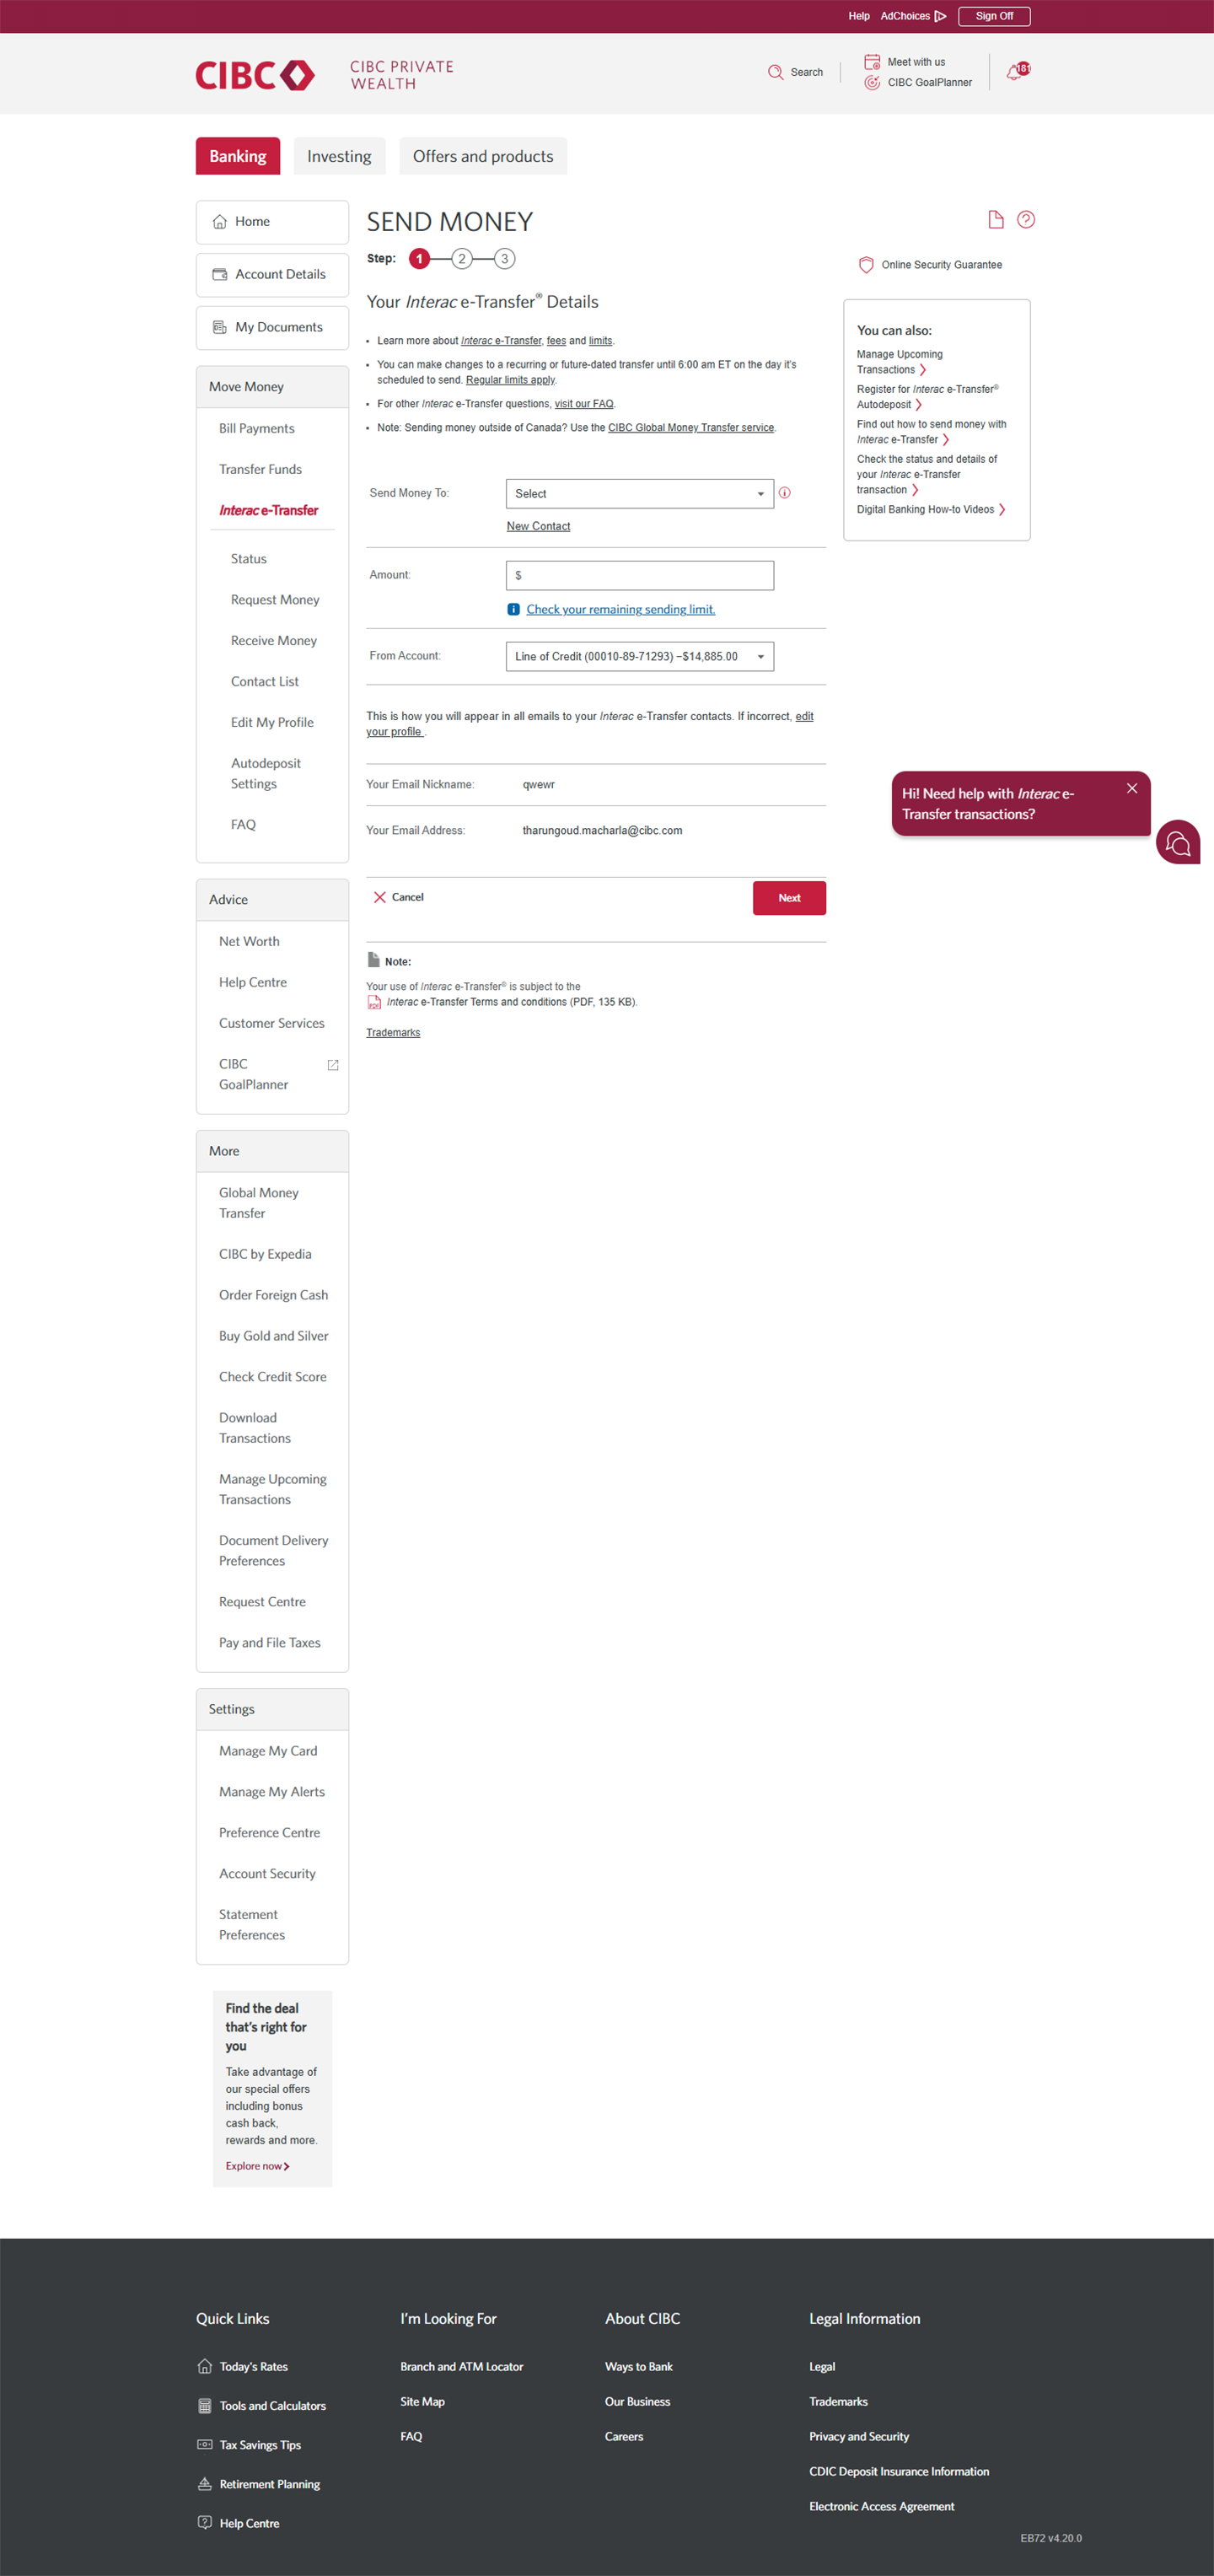
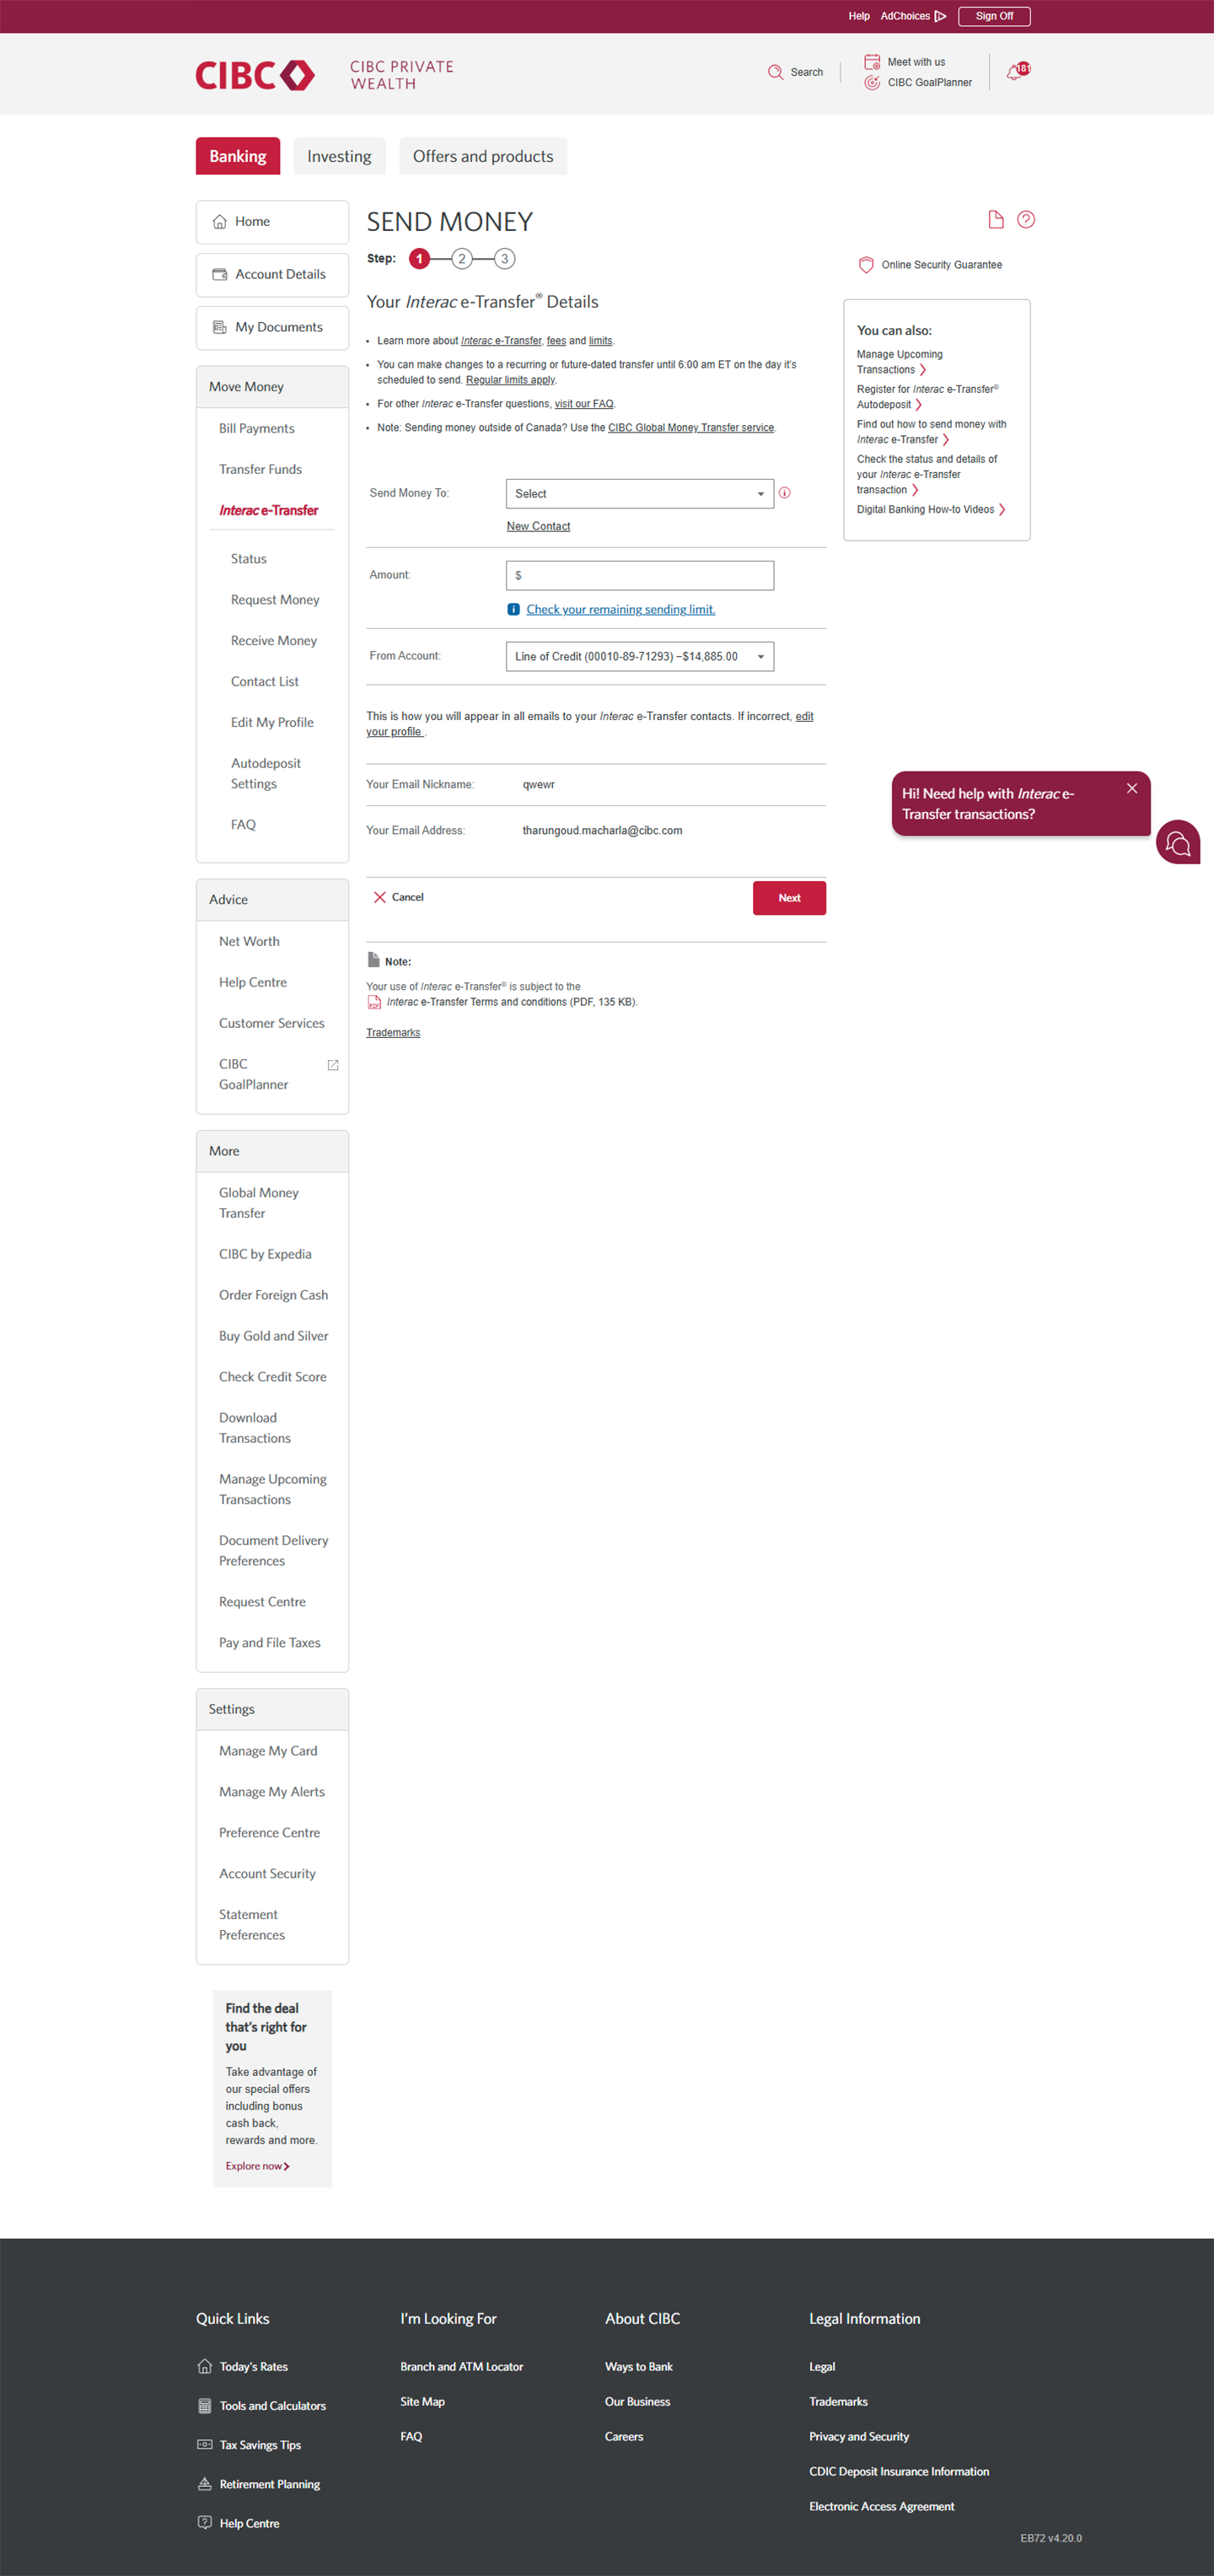
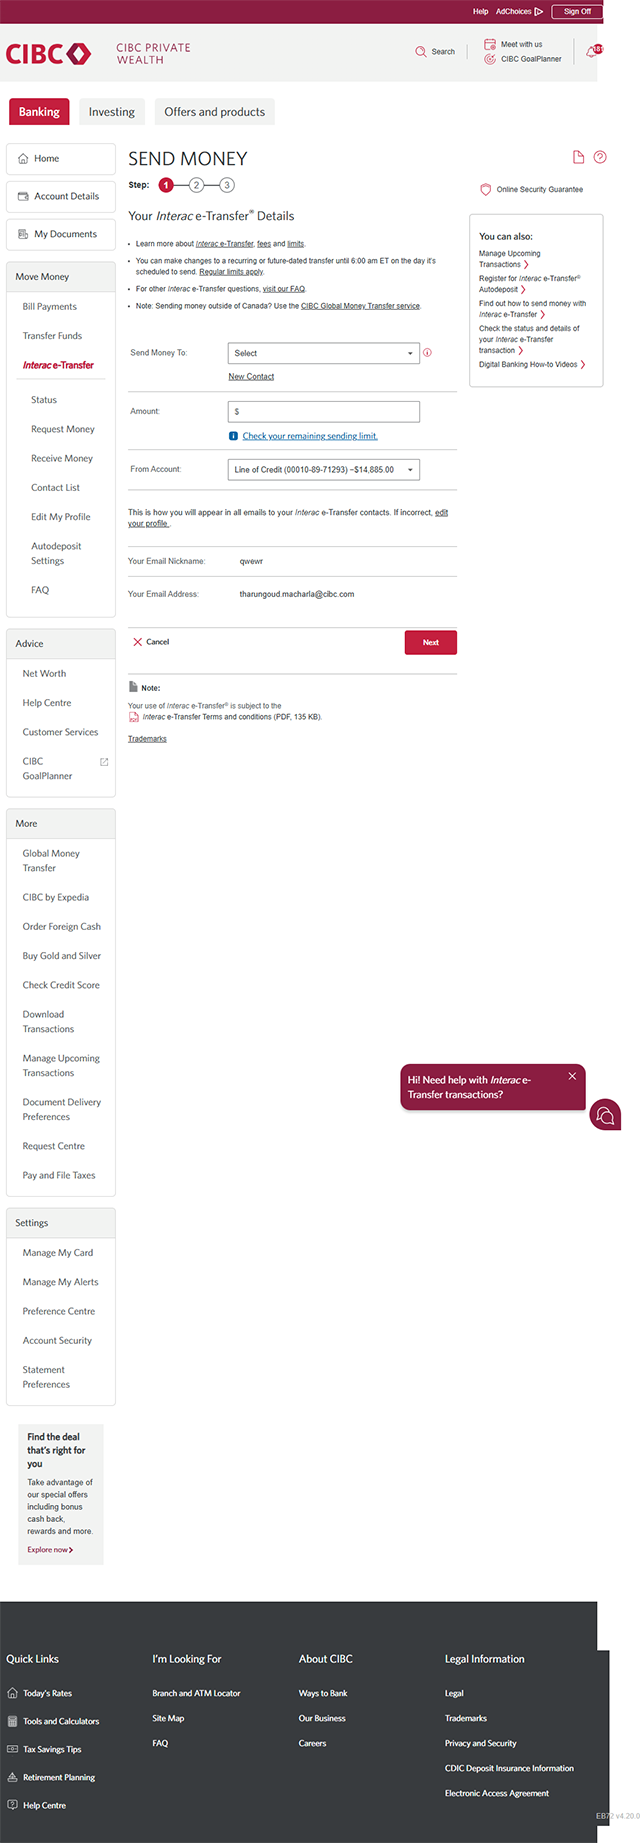
Demo screen 3: CIBC Online Banking send money step 1. A pulsing animation highlights the "New Contact" link.
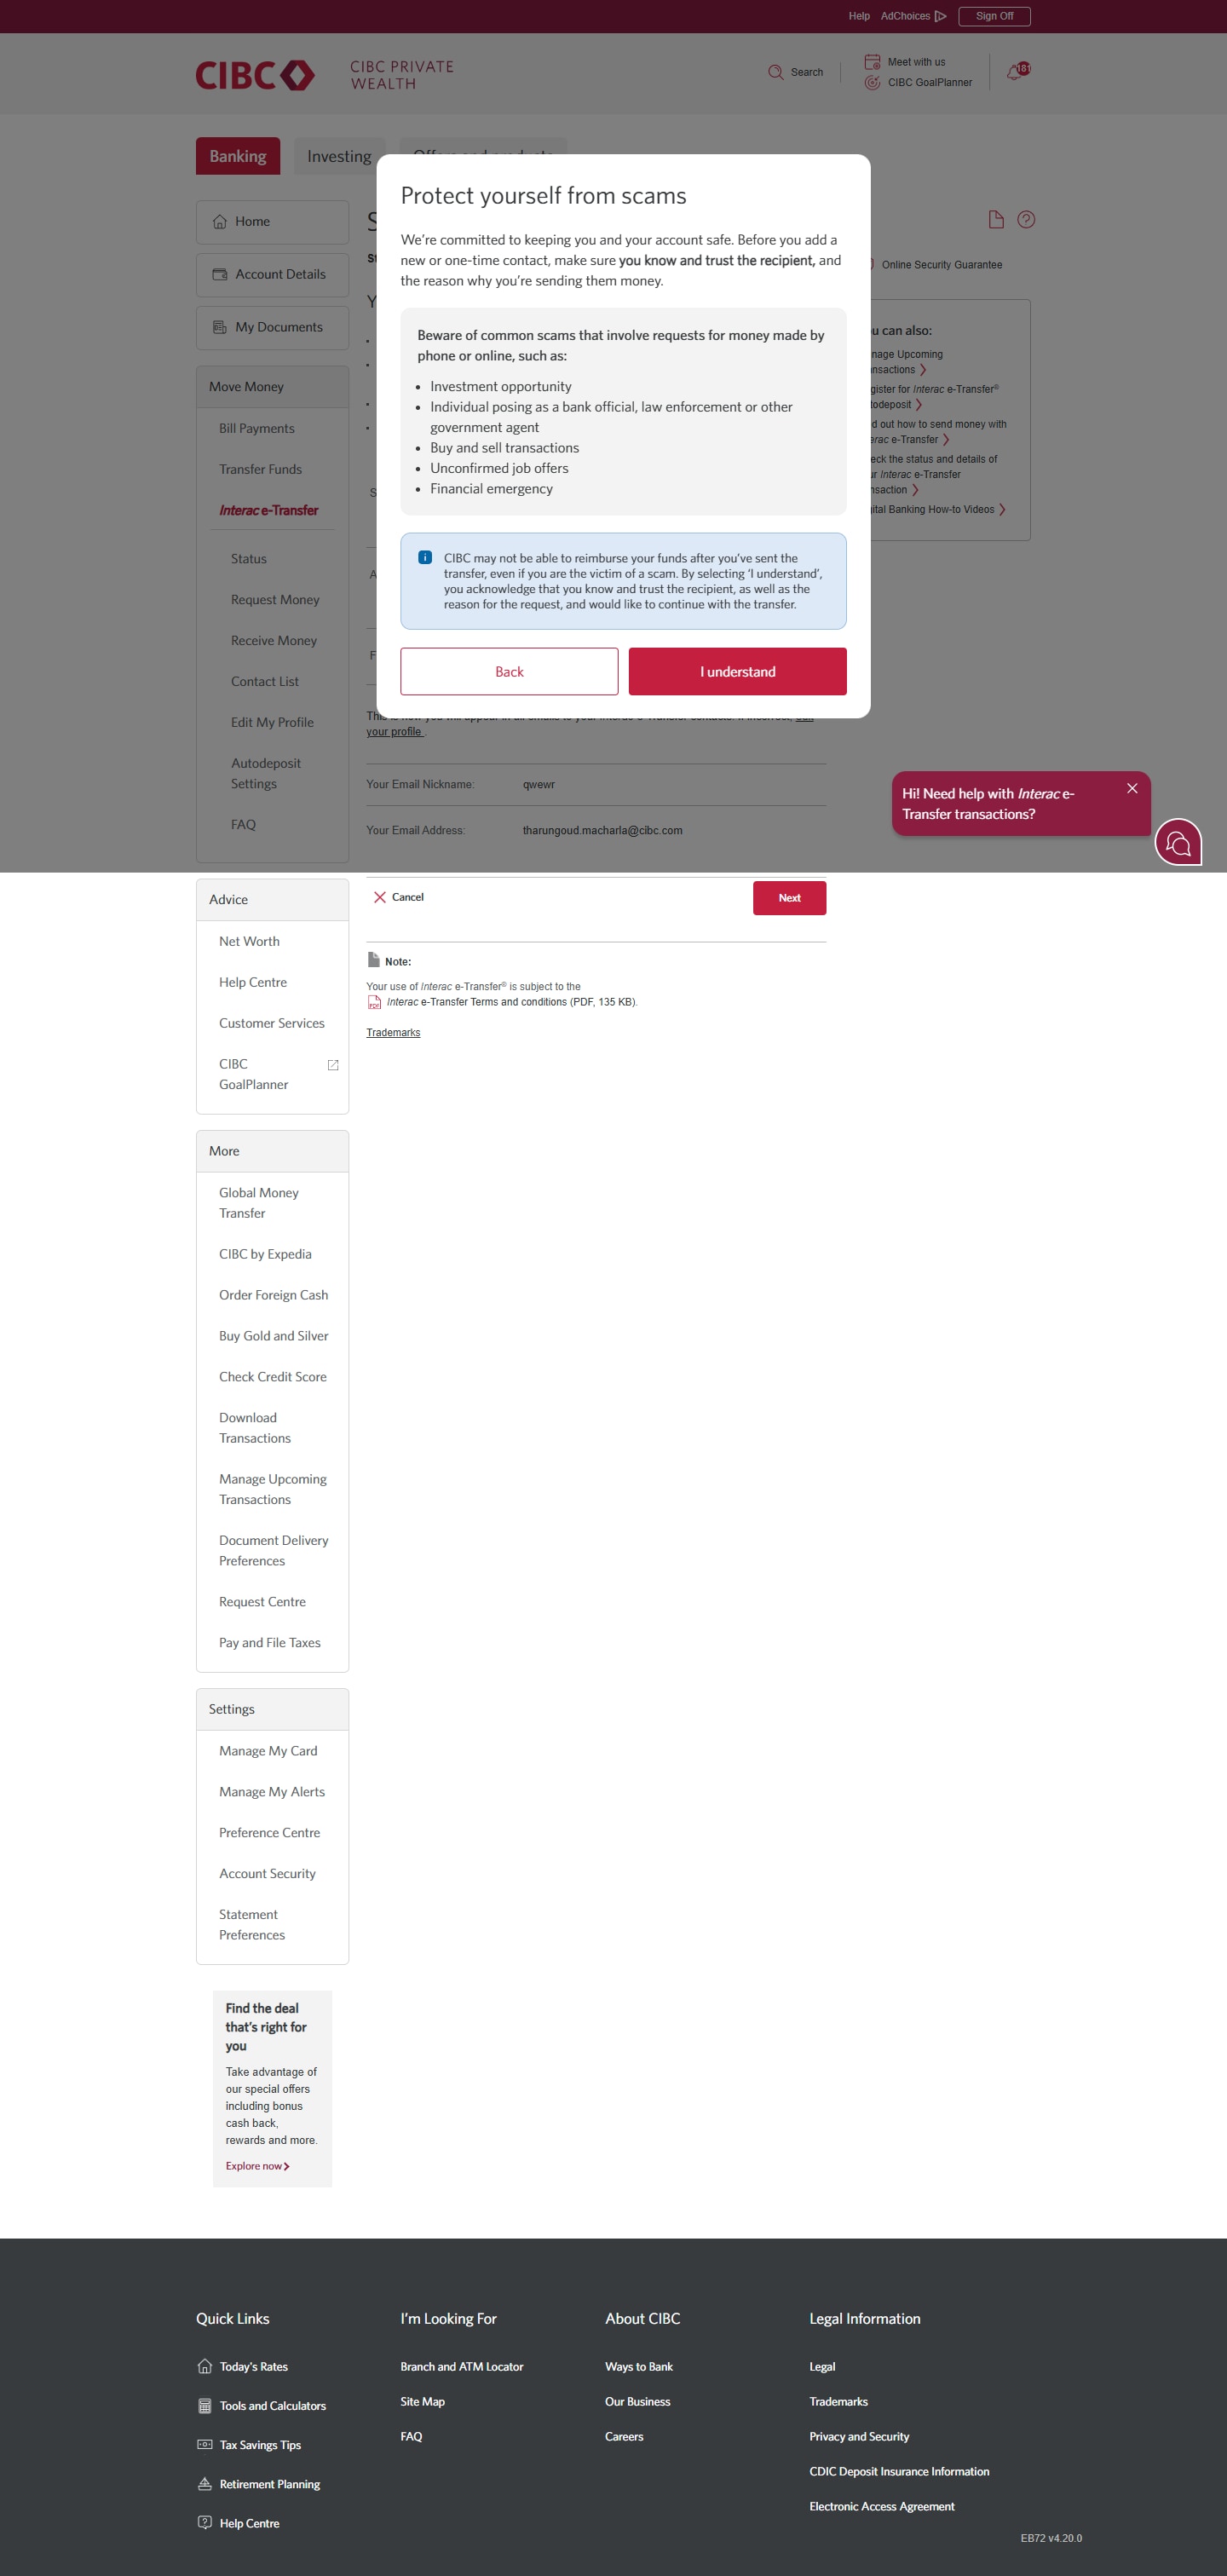
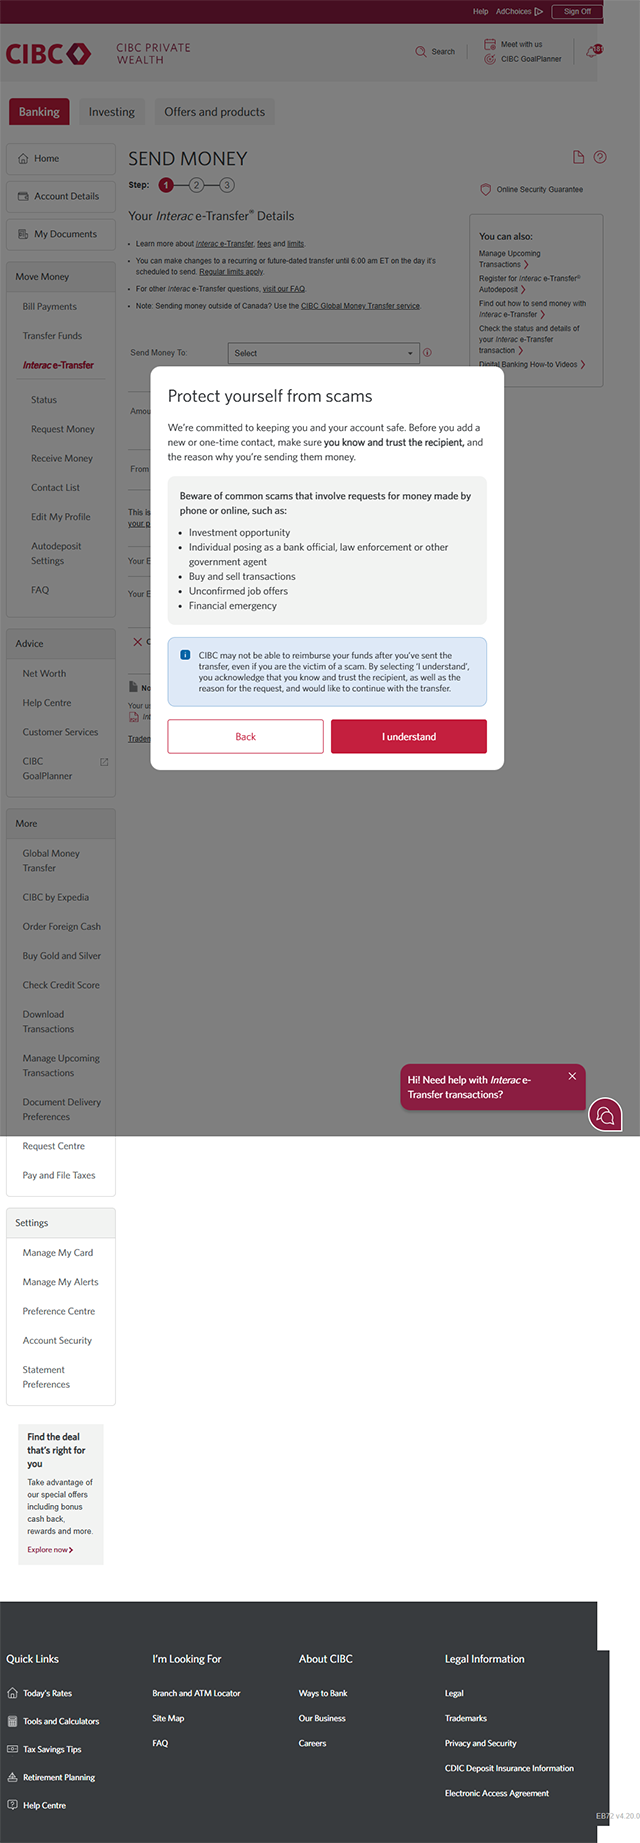
Demo screen 4: CIBC Online Banking protect yourself from scams modal. A pulsing animation highlights the "I understand" button.
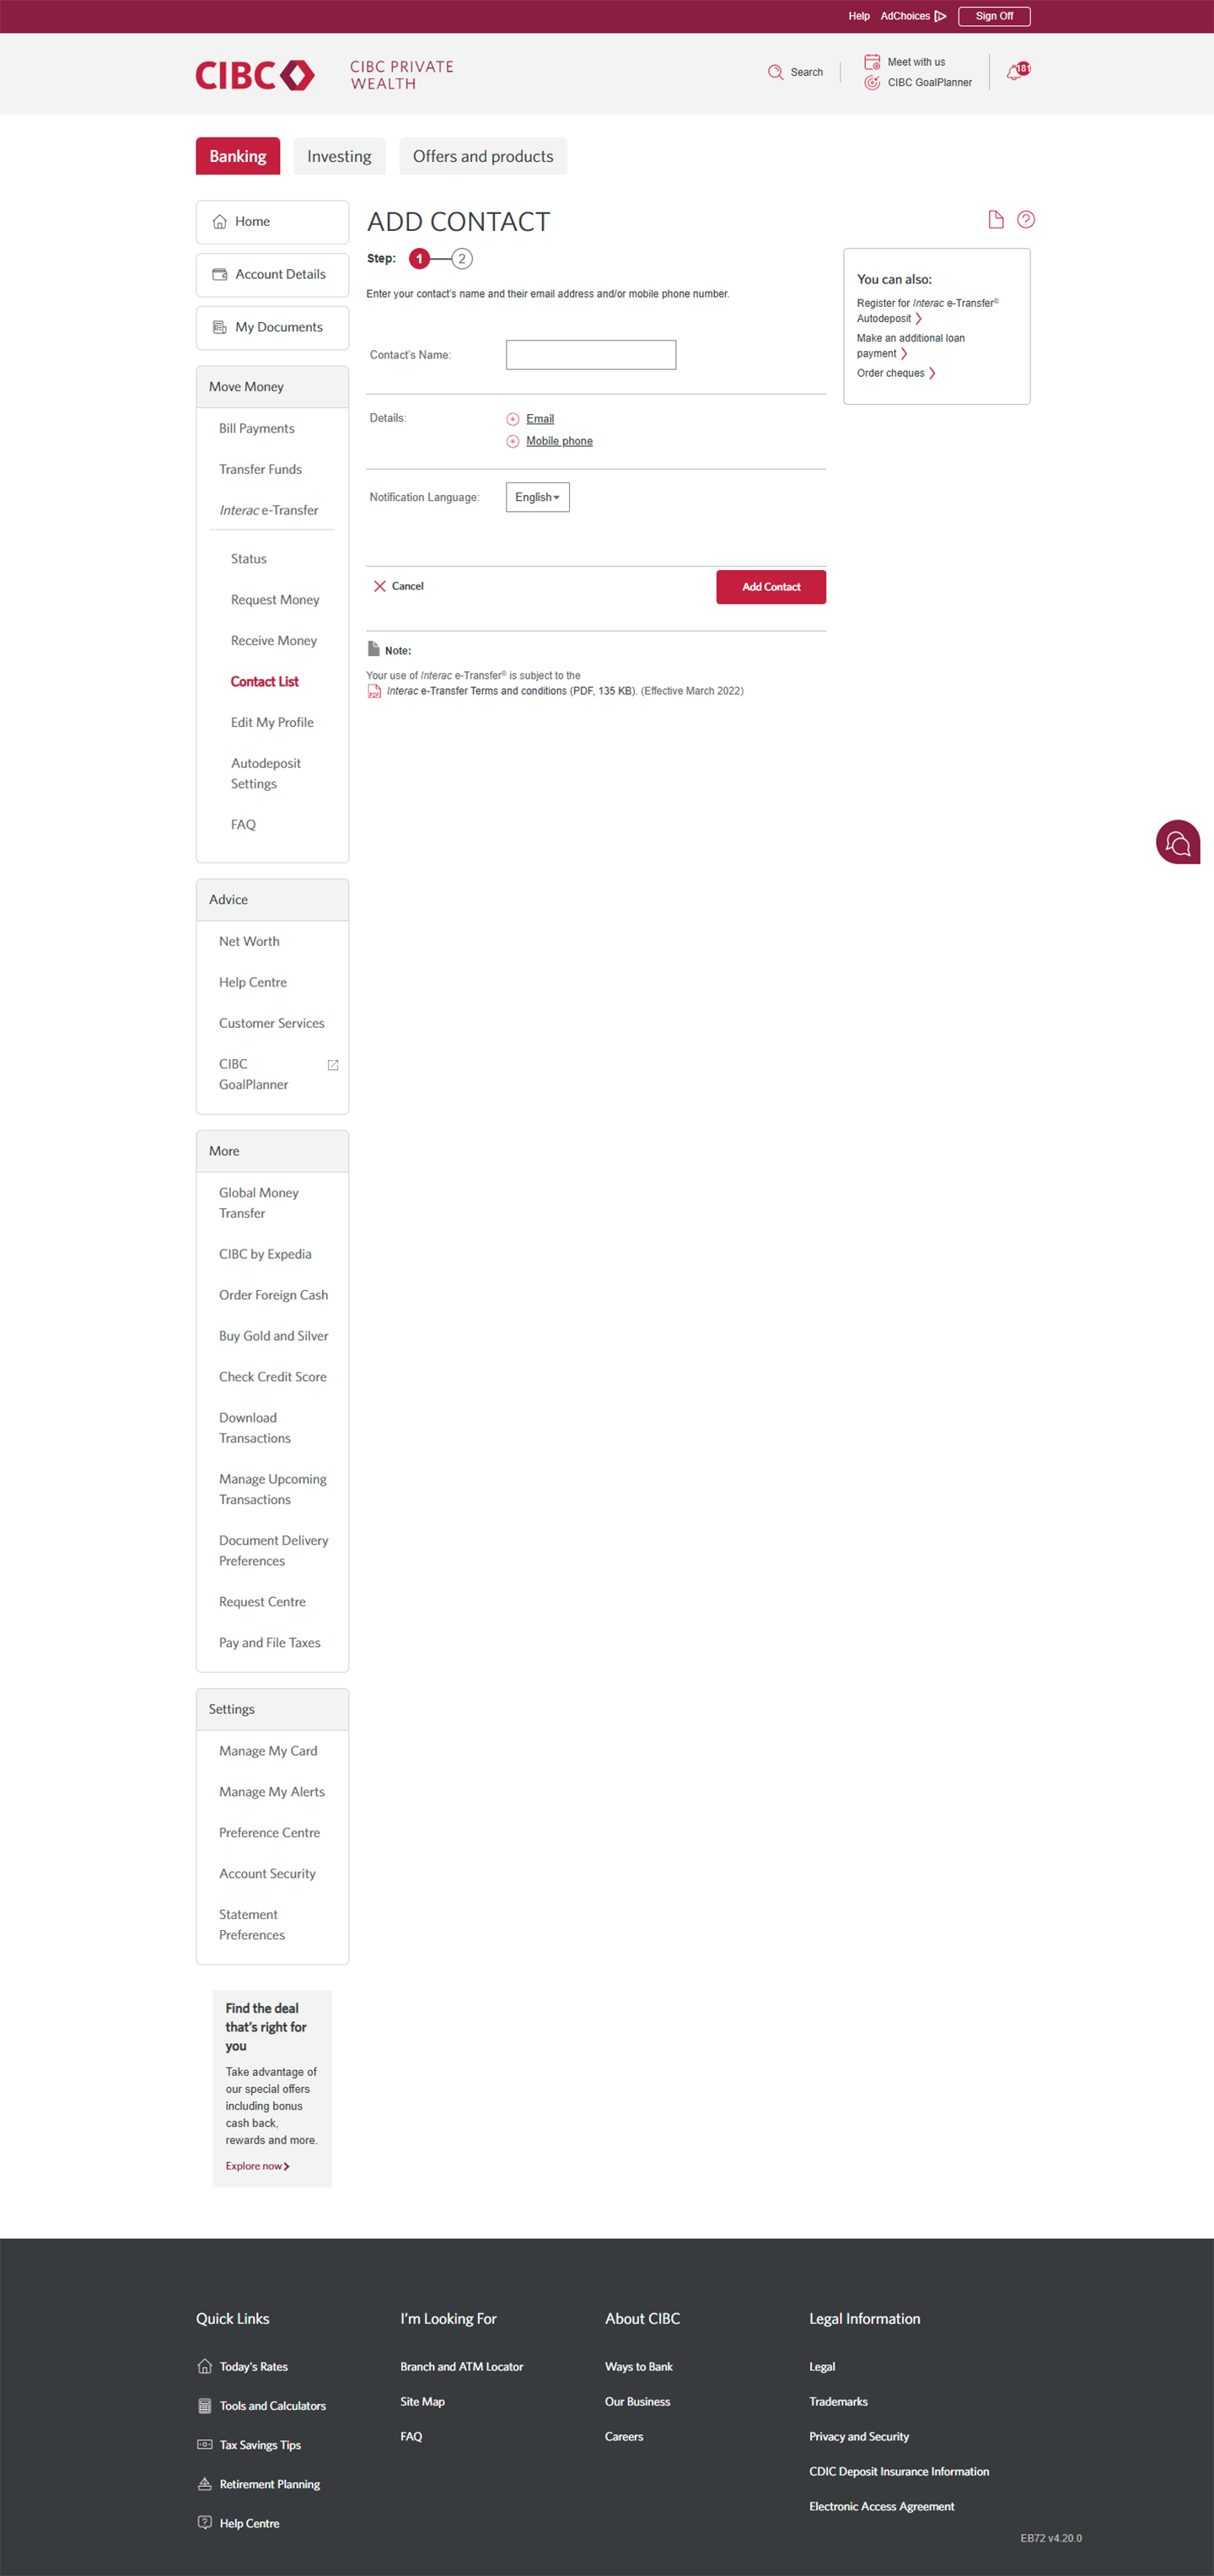
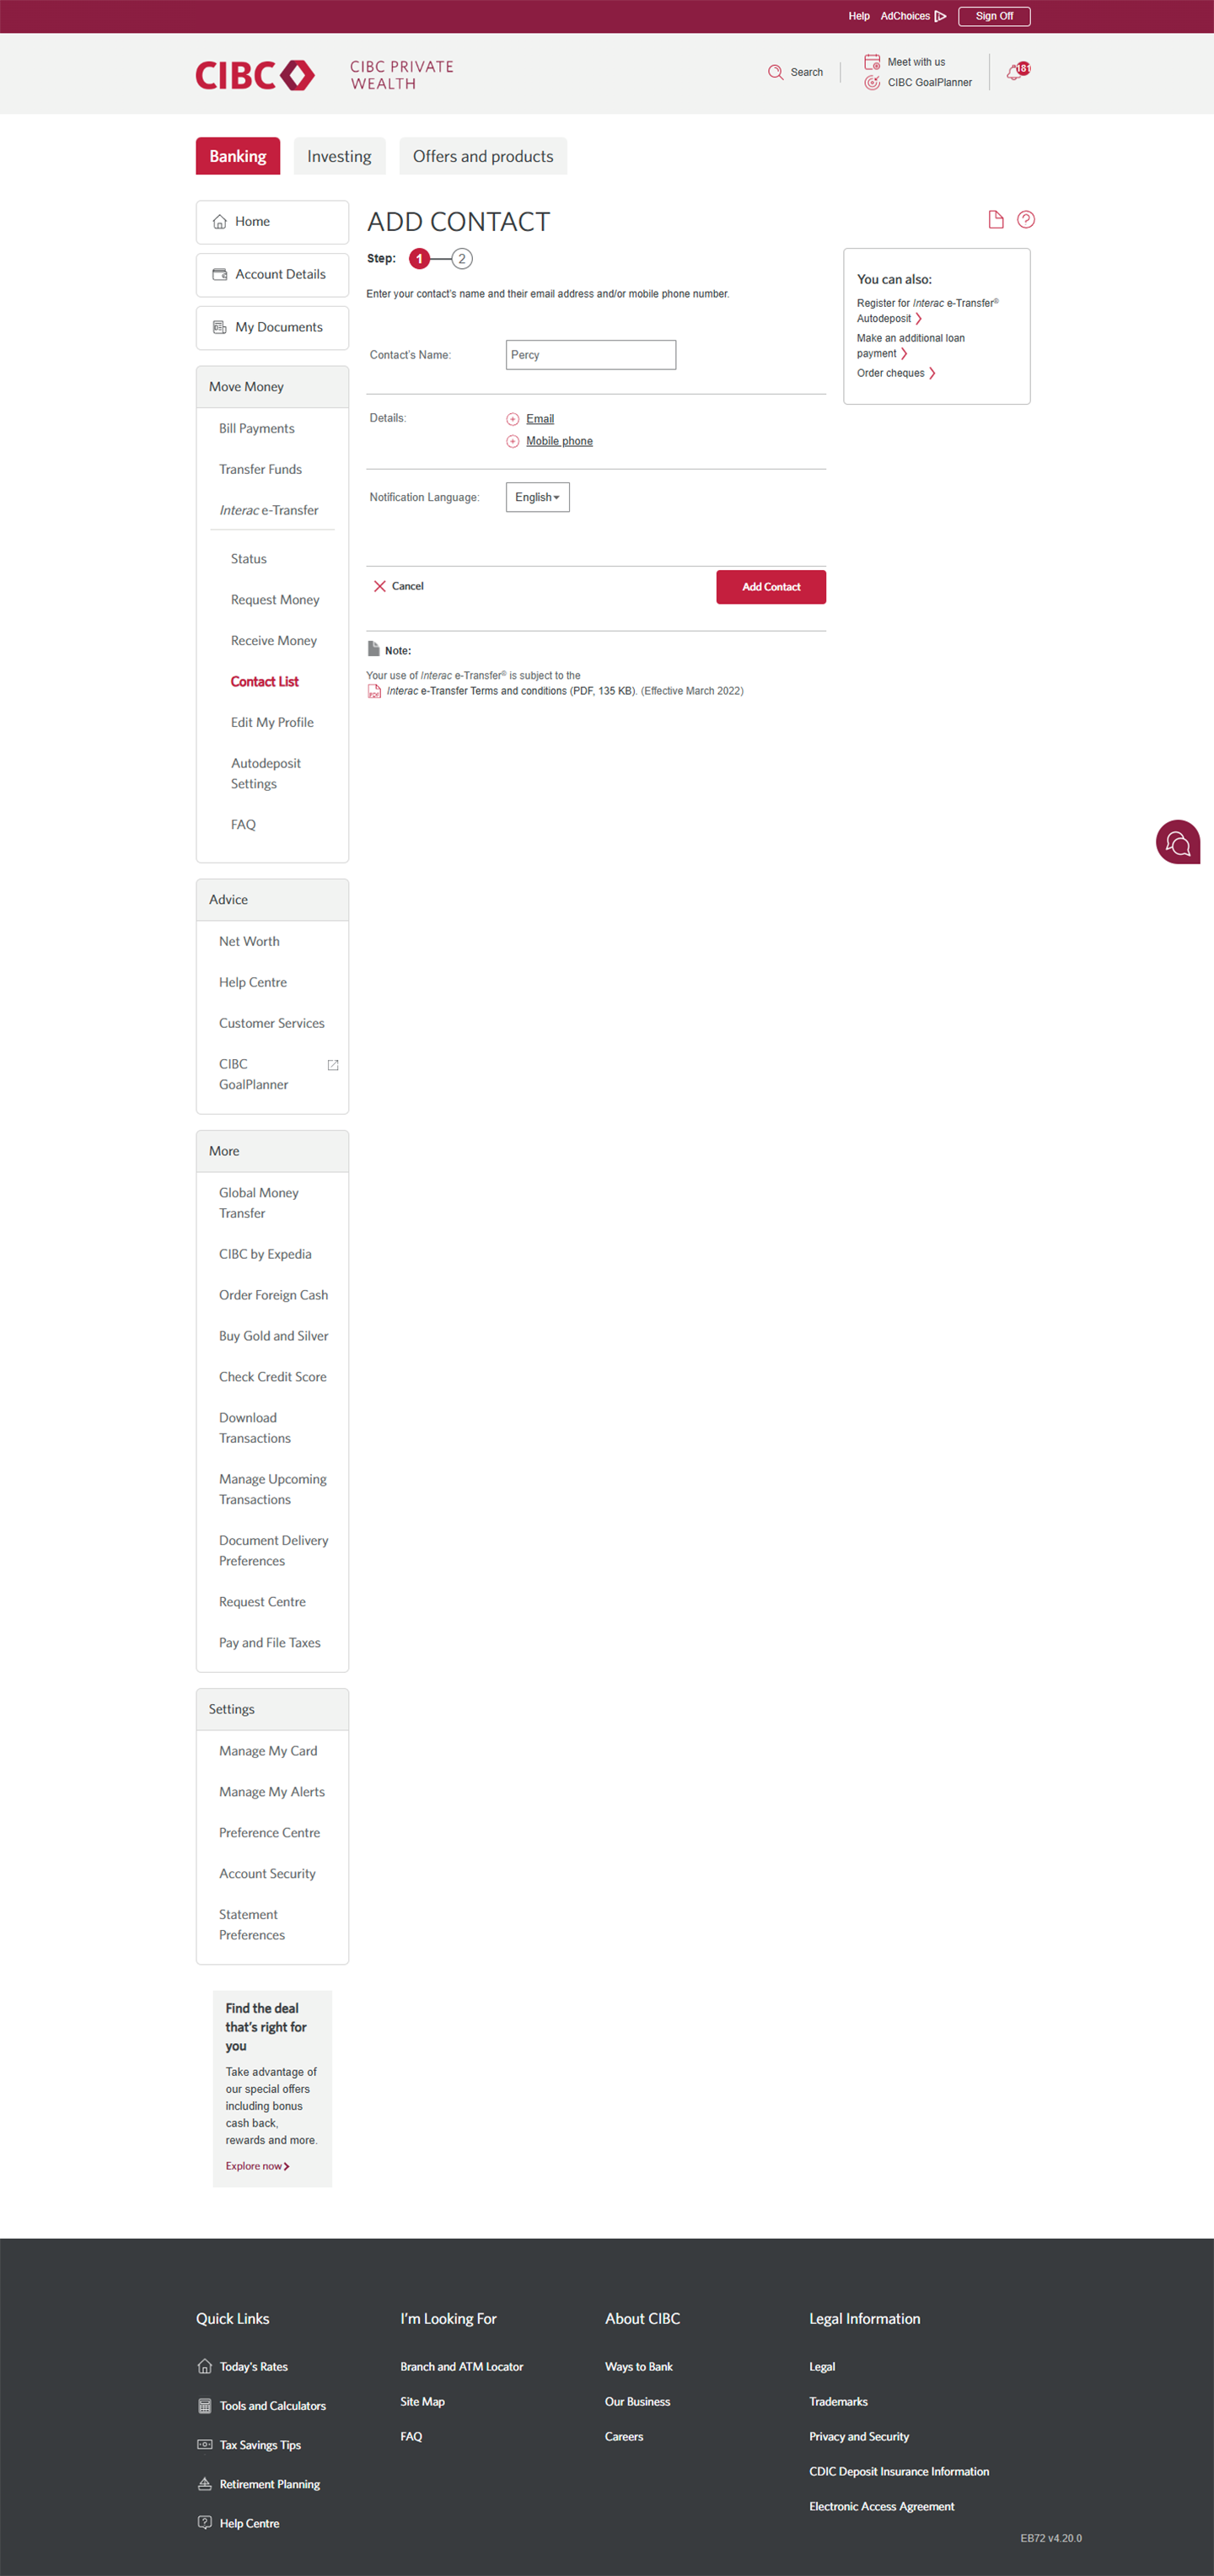
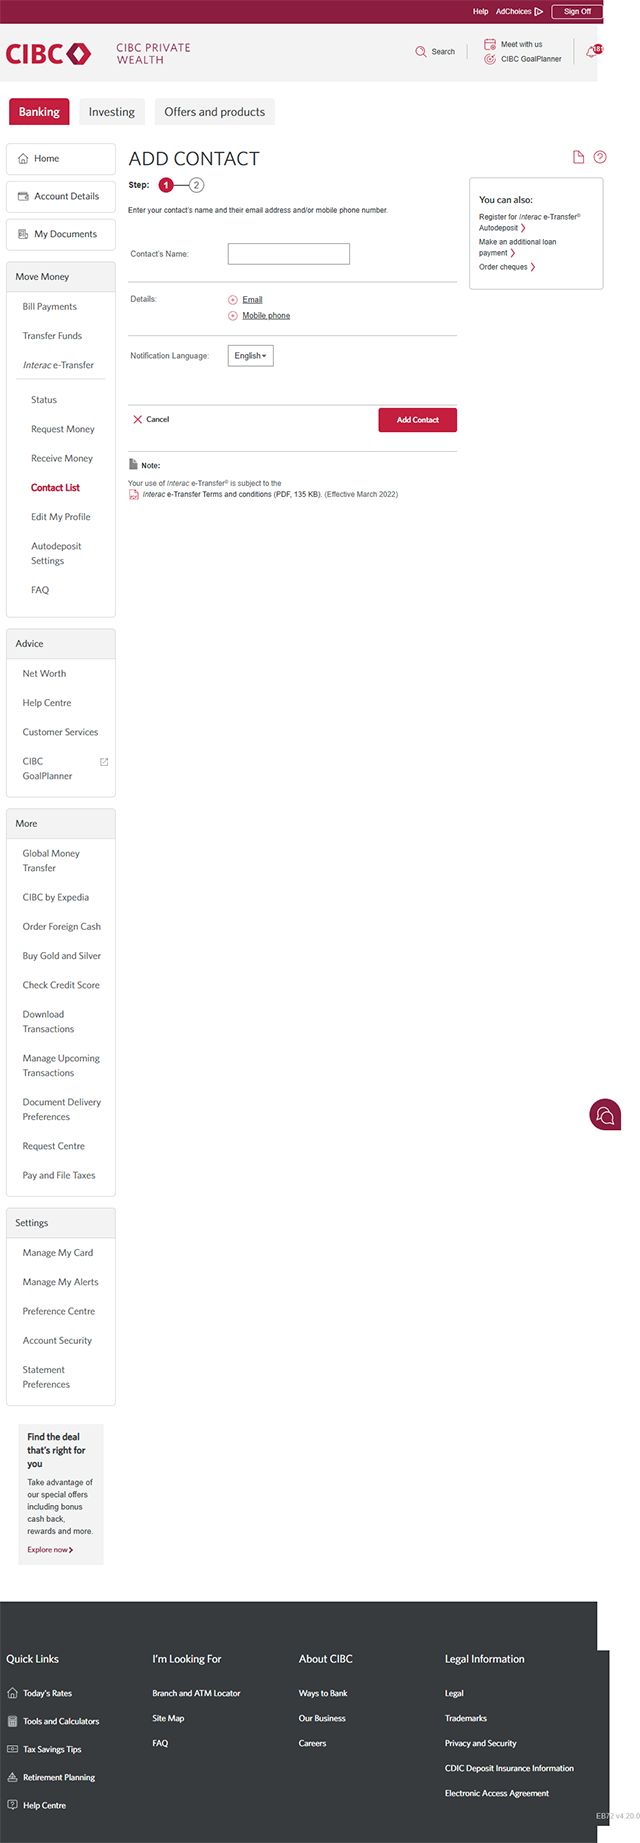
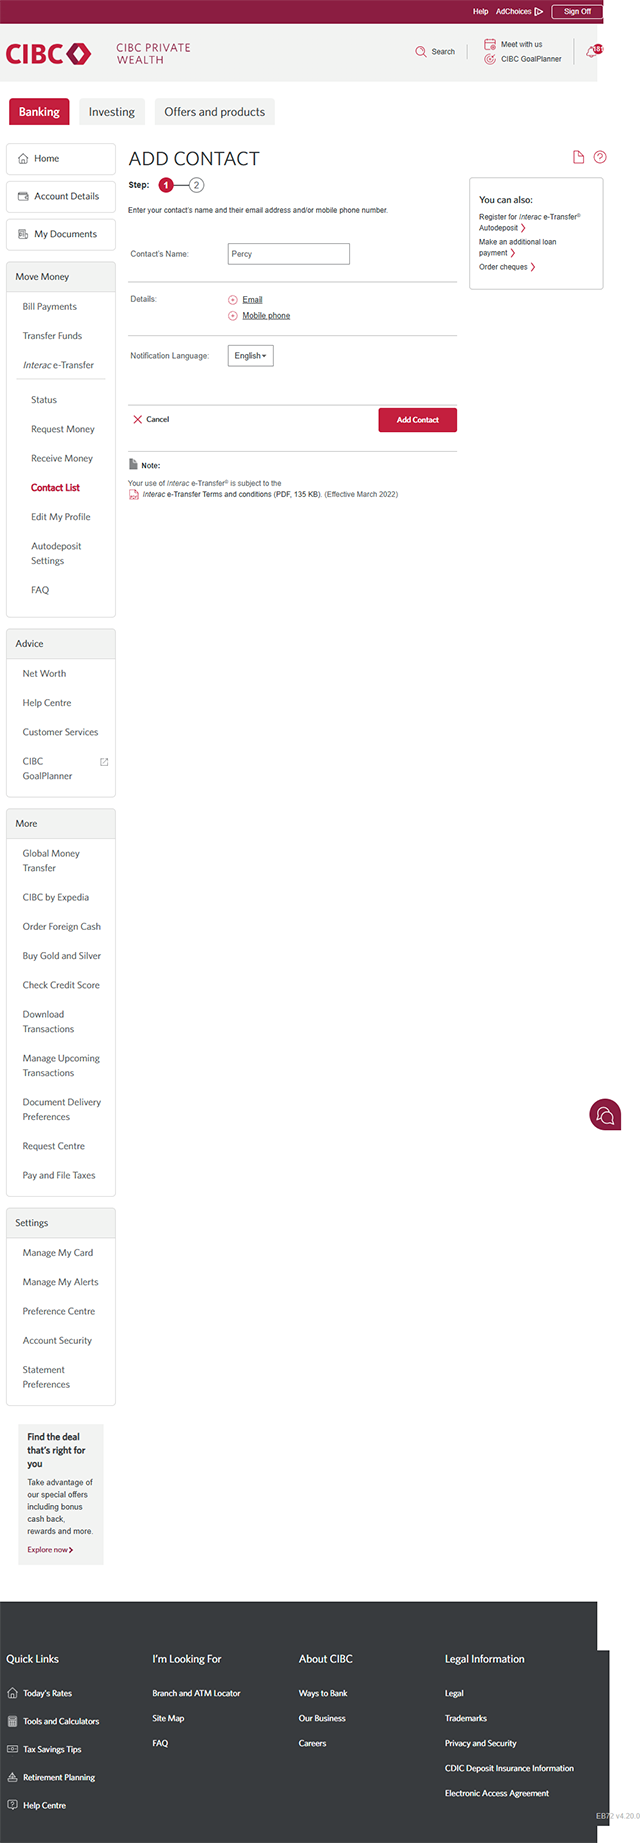
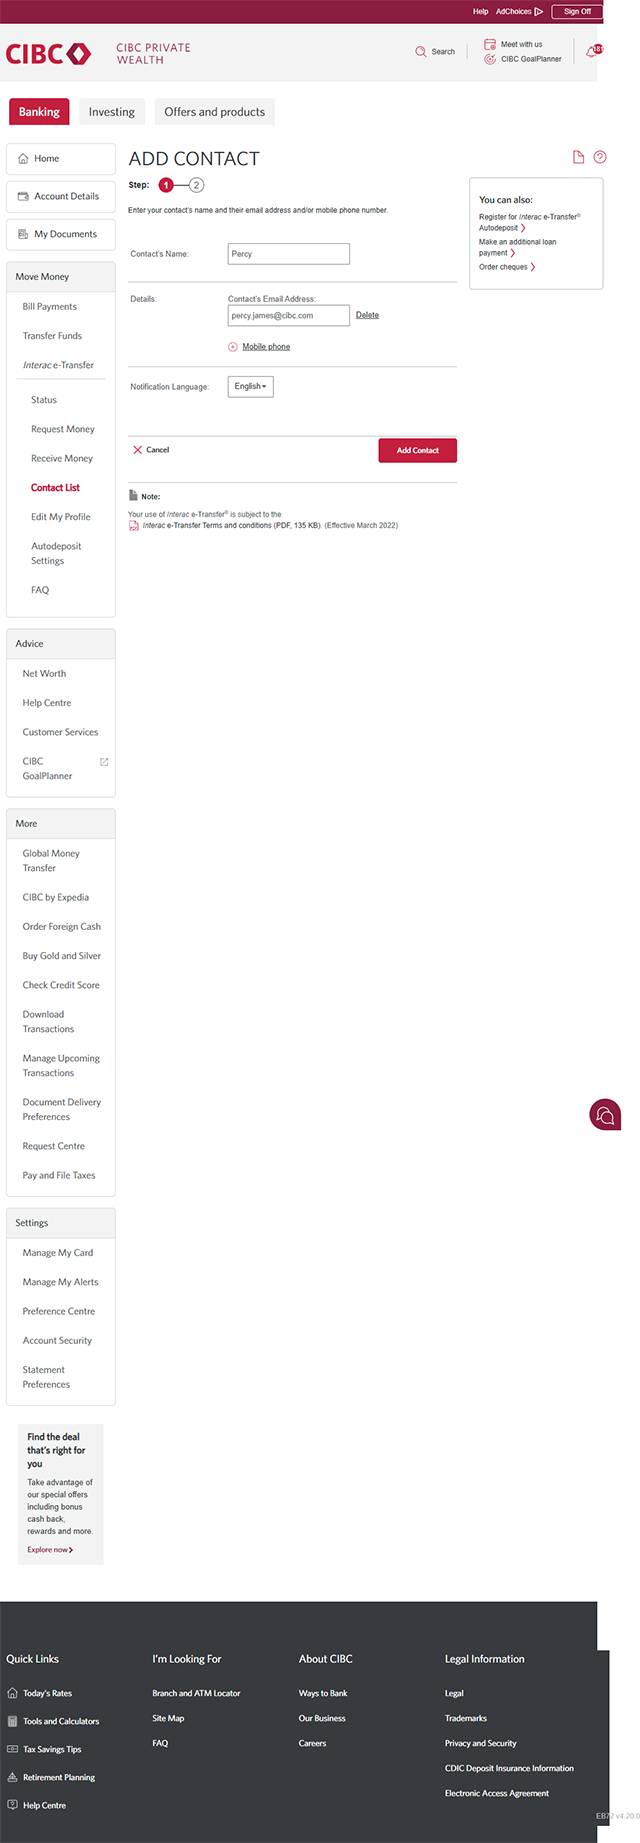
Demo screen 5: CIBC Online Banking add contact step 1. A pulsing animation highlights the Contact's Name field.
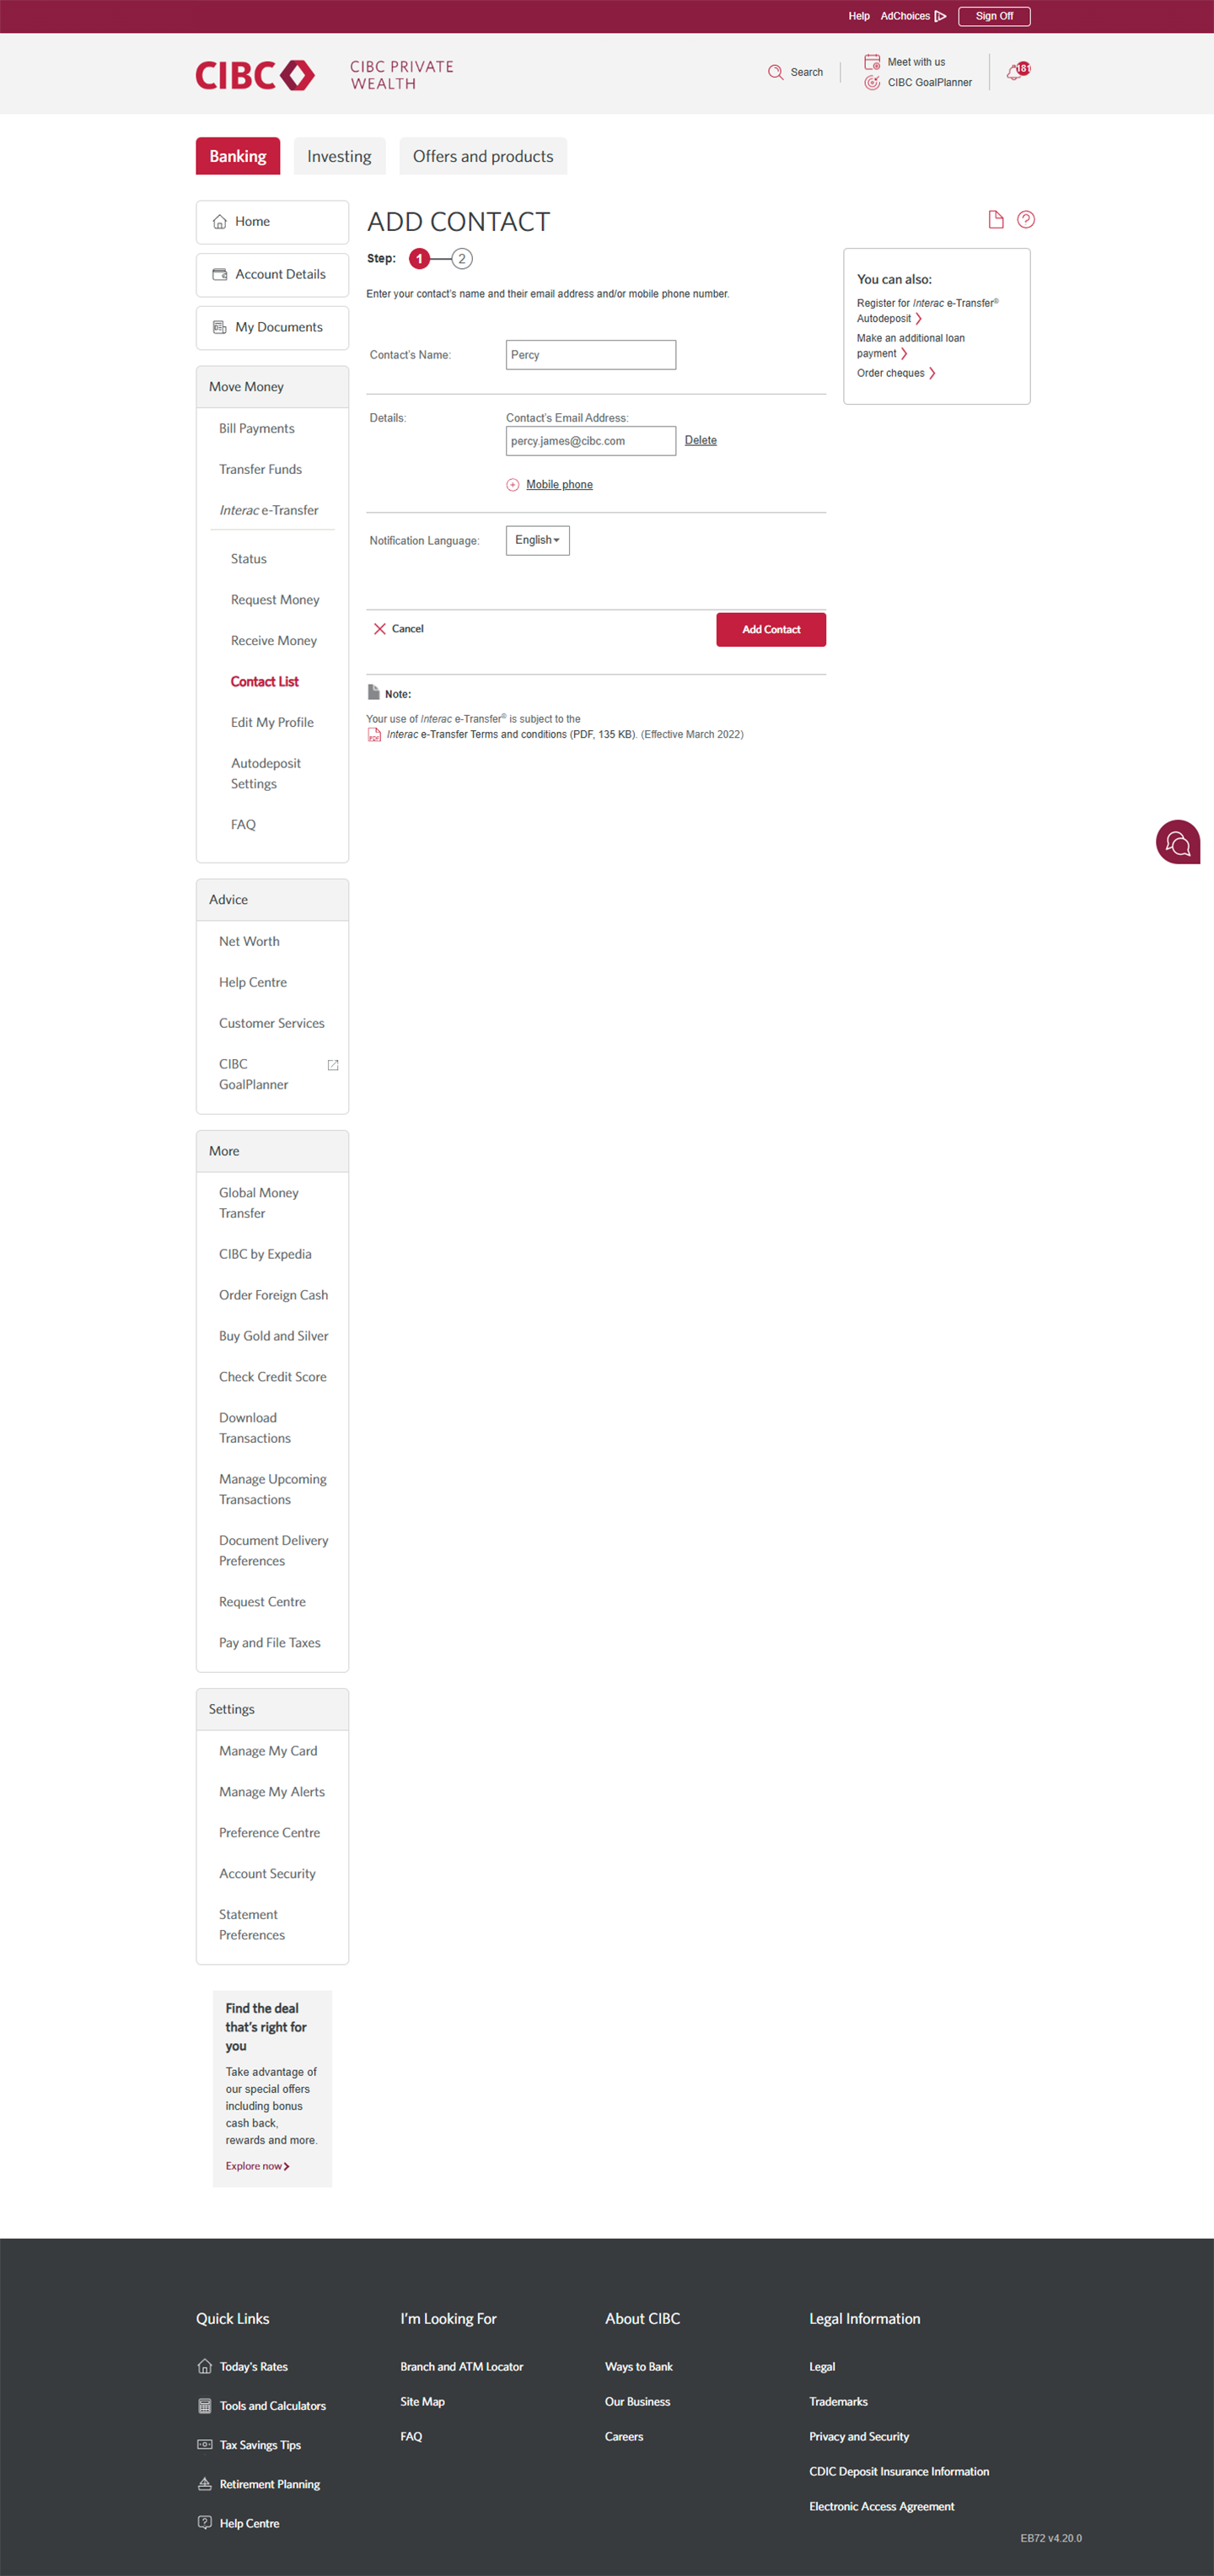
Demo screen 6: CIBC Online Banking add contact step 1. A pulsing animation highlights the contact details options buttons.
Demo screen 7: CIBC Online Banking add contact step 1. A pulsing animation highlights the "Add Contact" button.
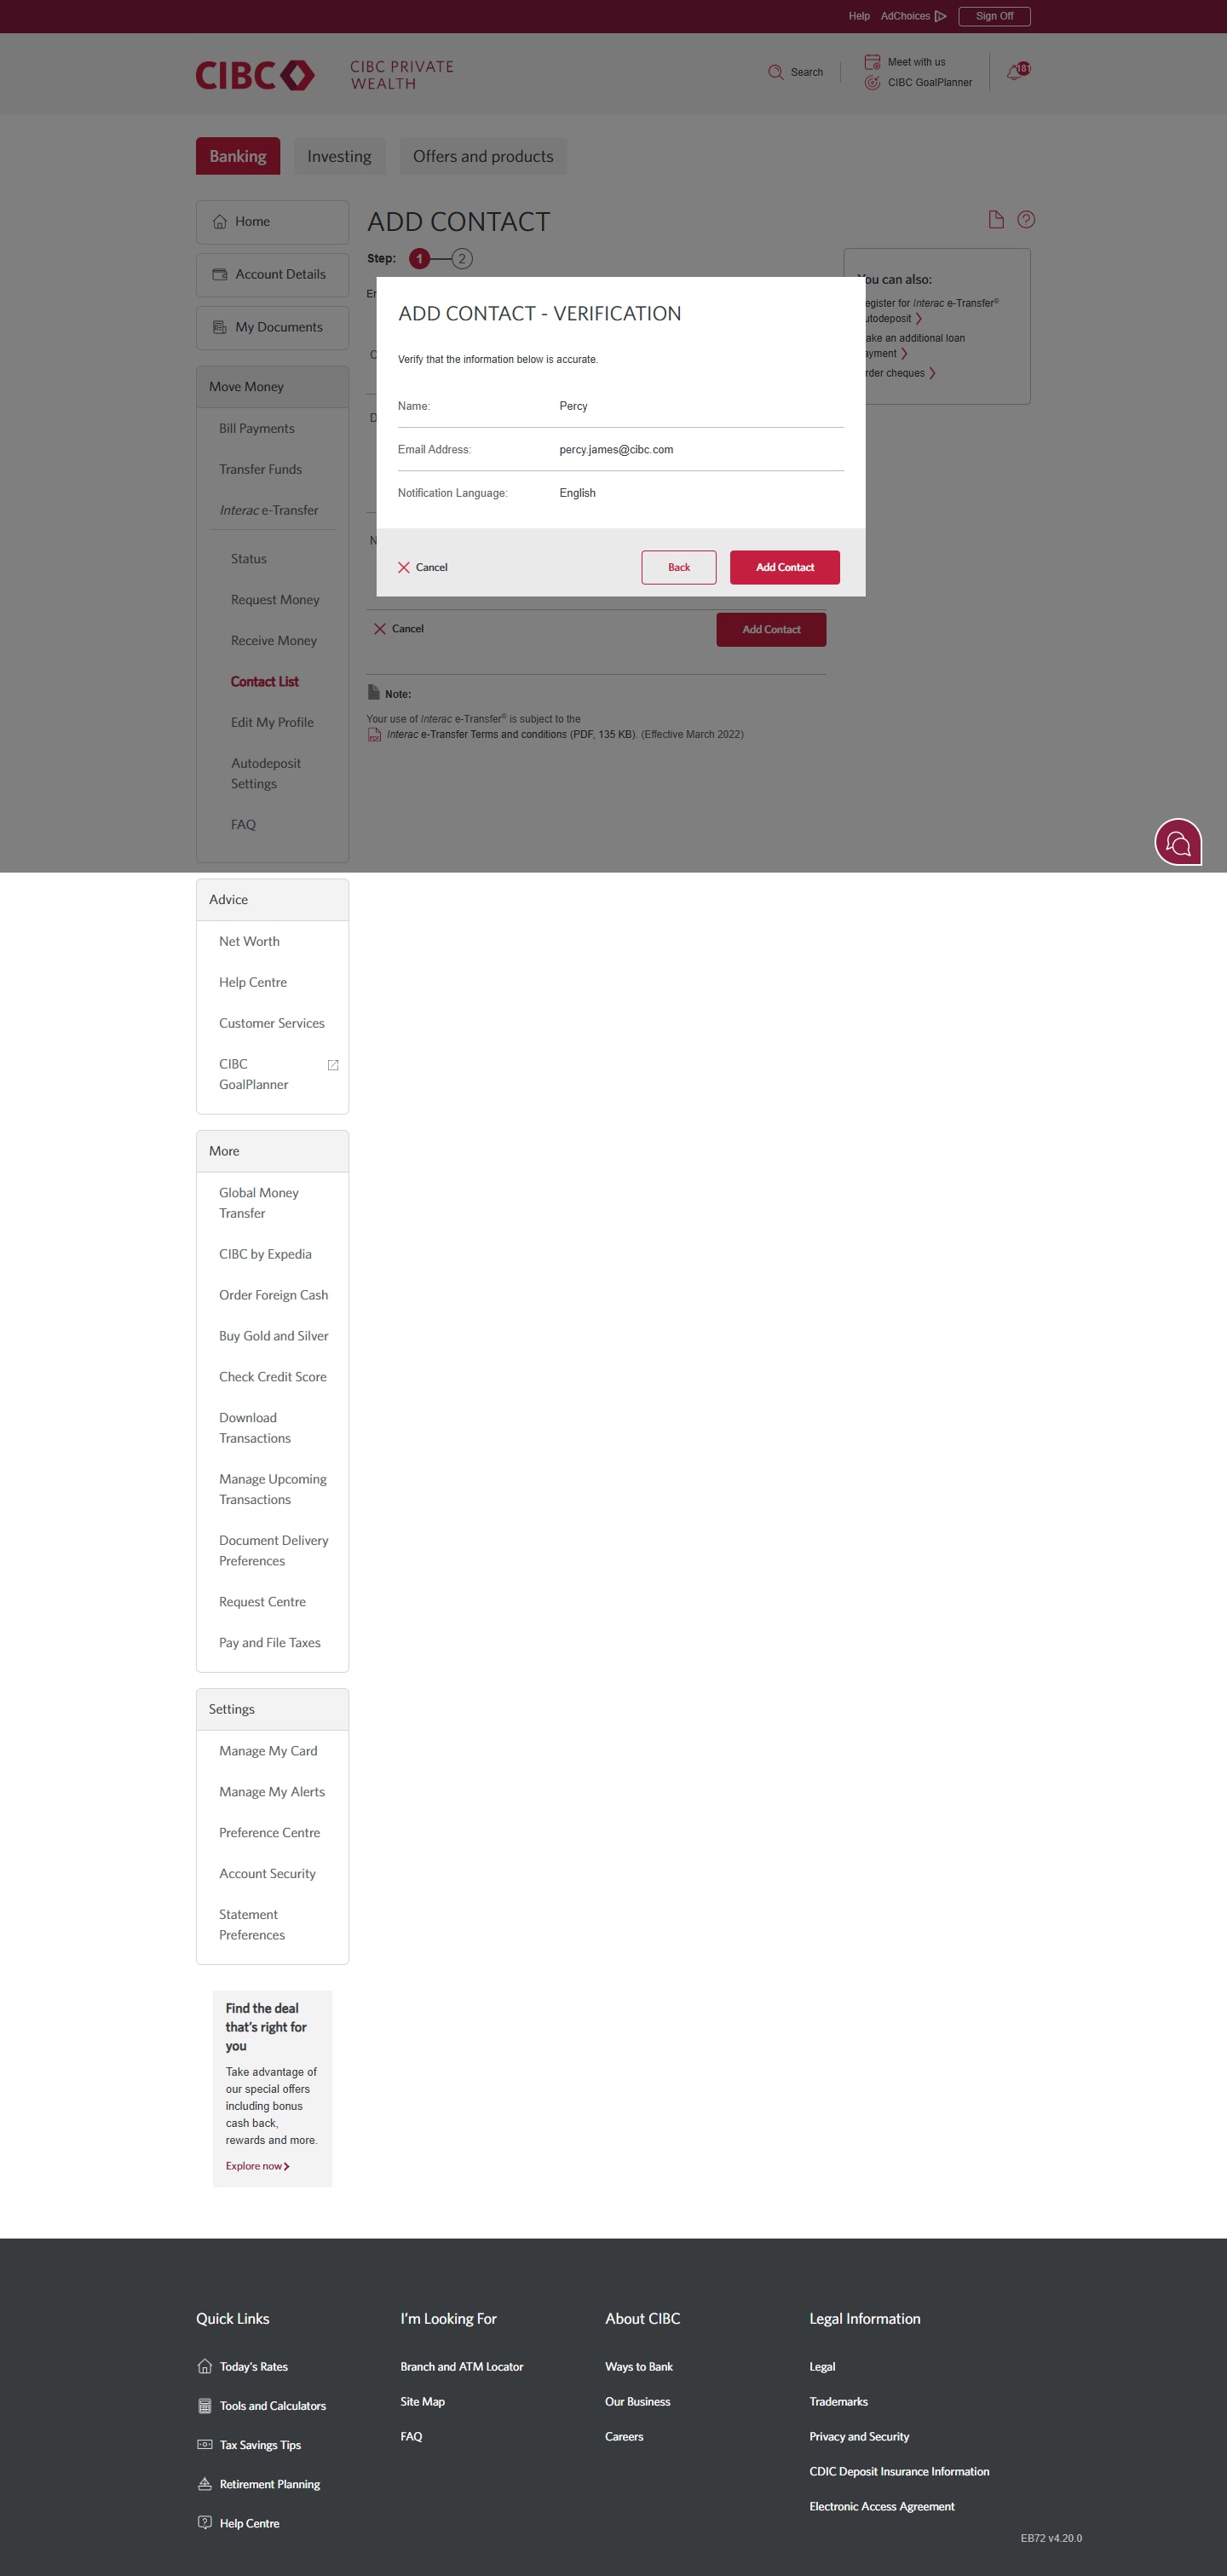
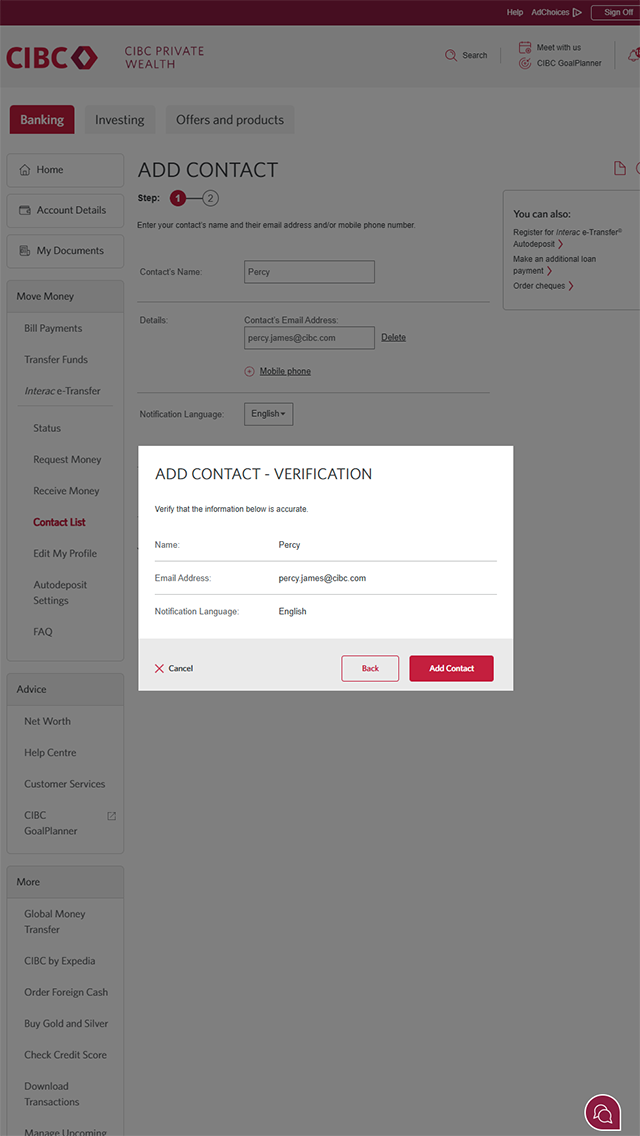
Demo screen 8: CIBC Online Banking add contact step 1. A pulsing animation highlights the "Add Contact" button.
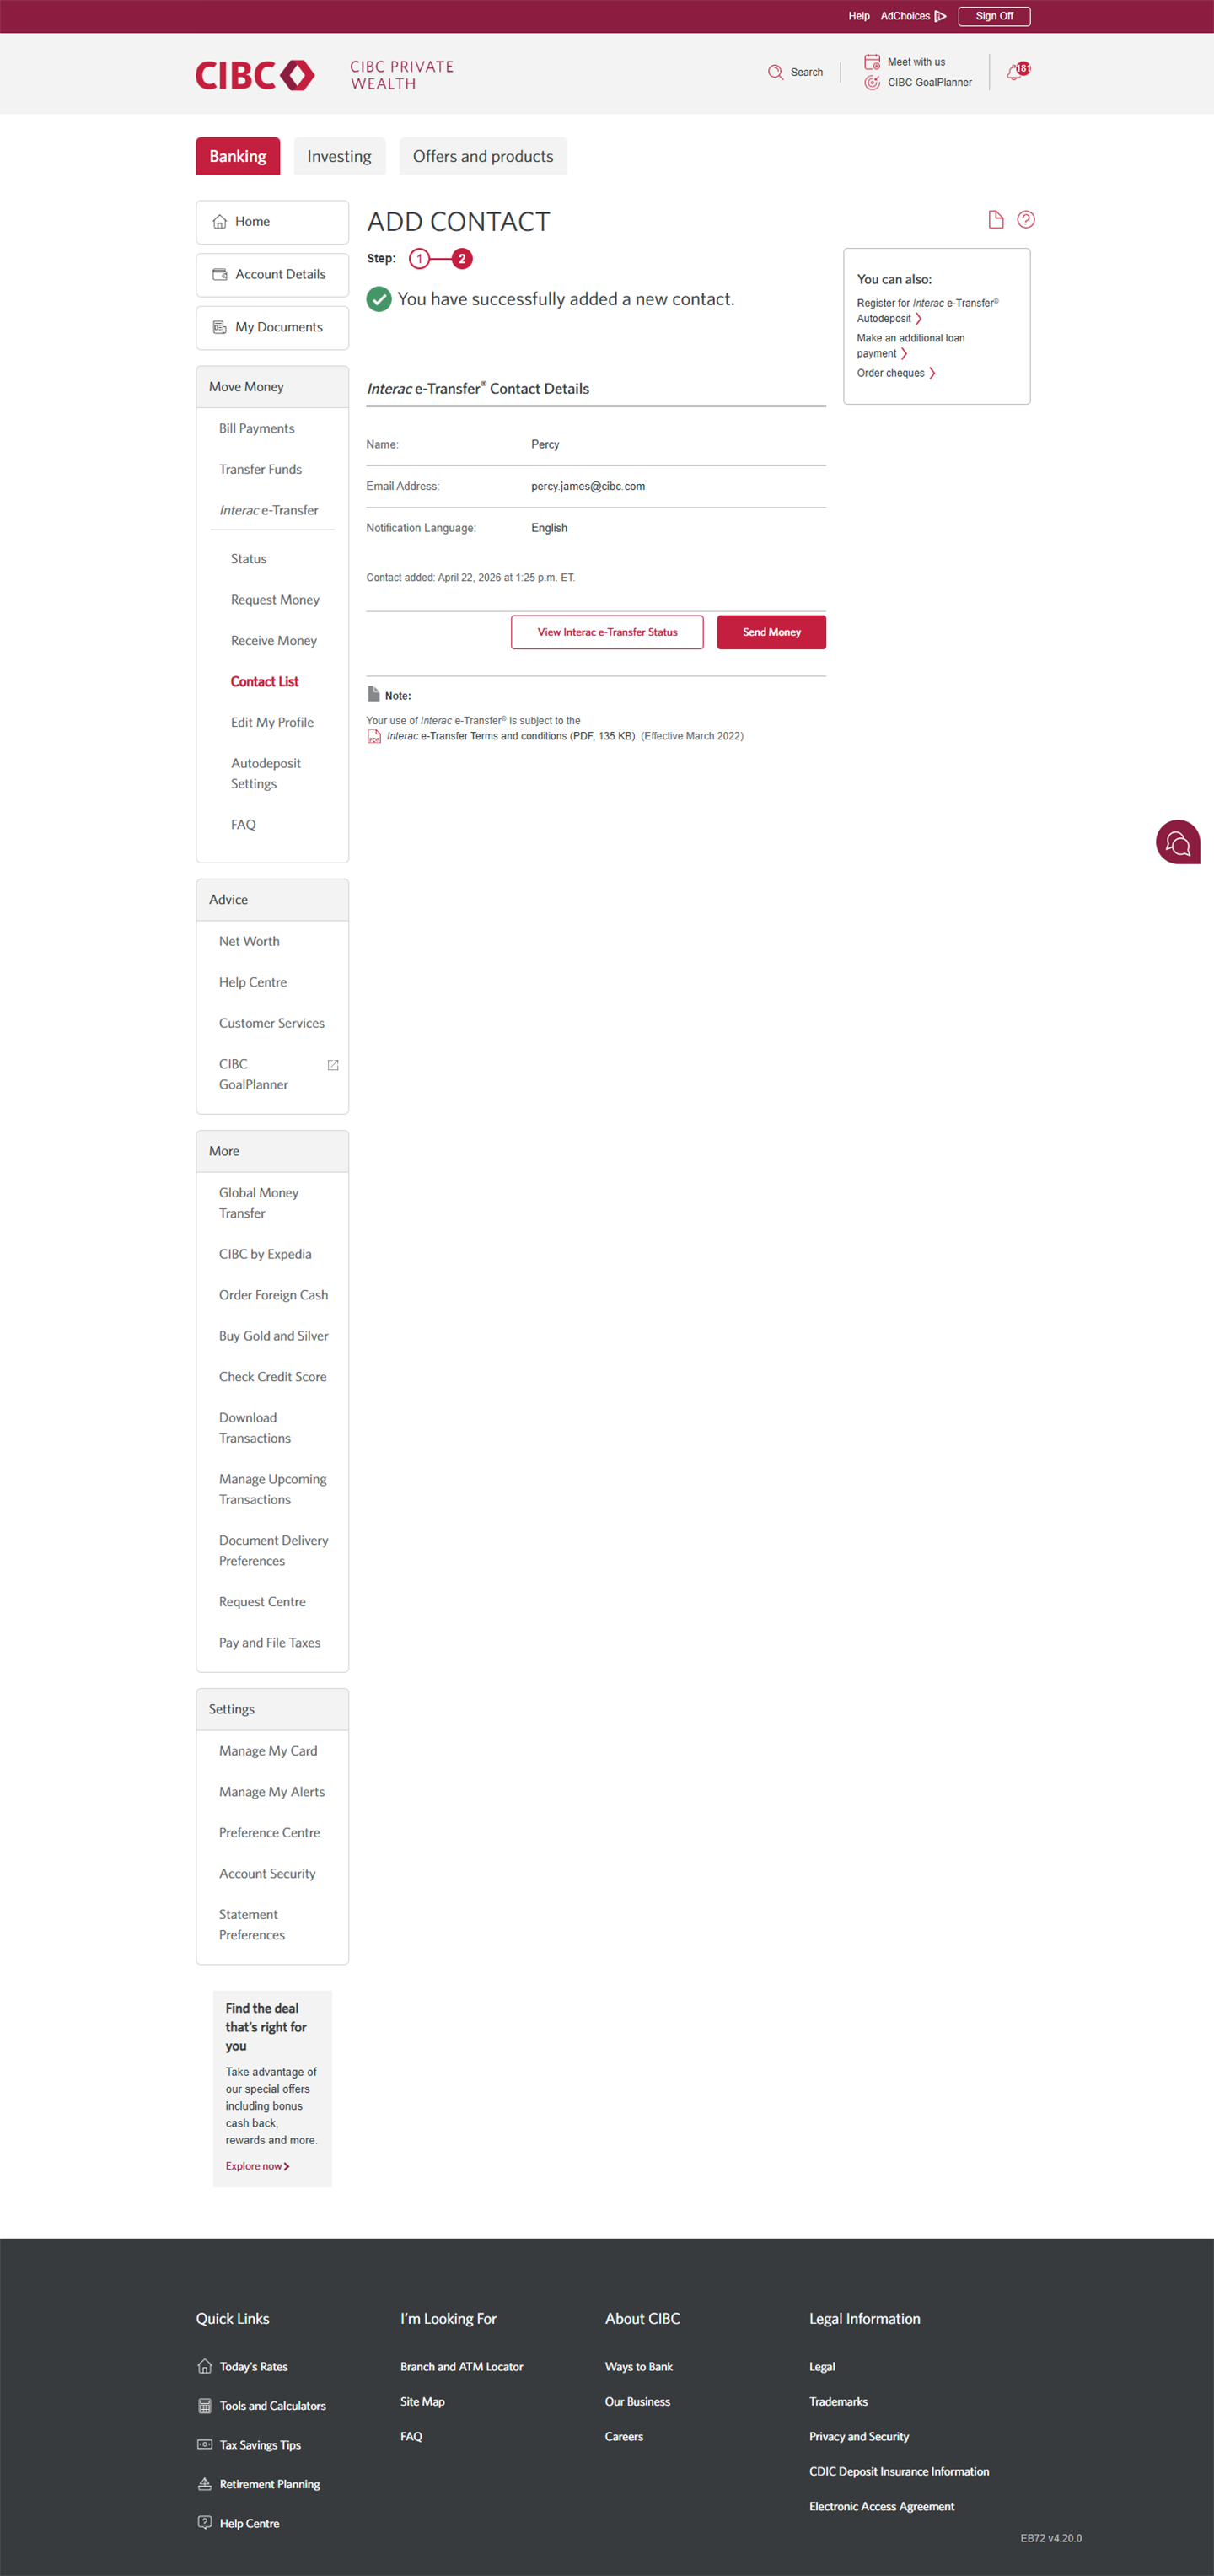
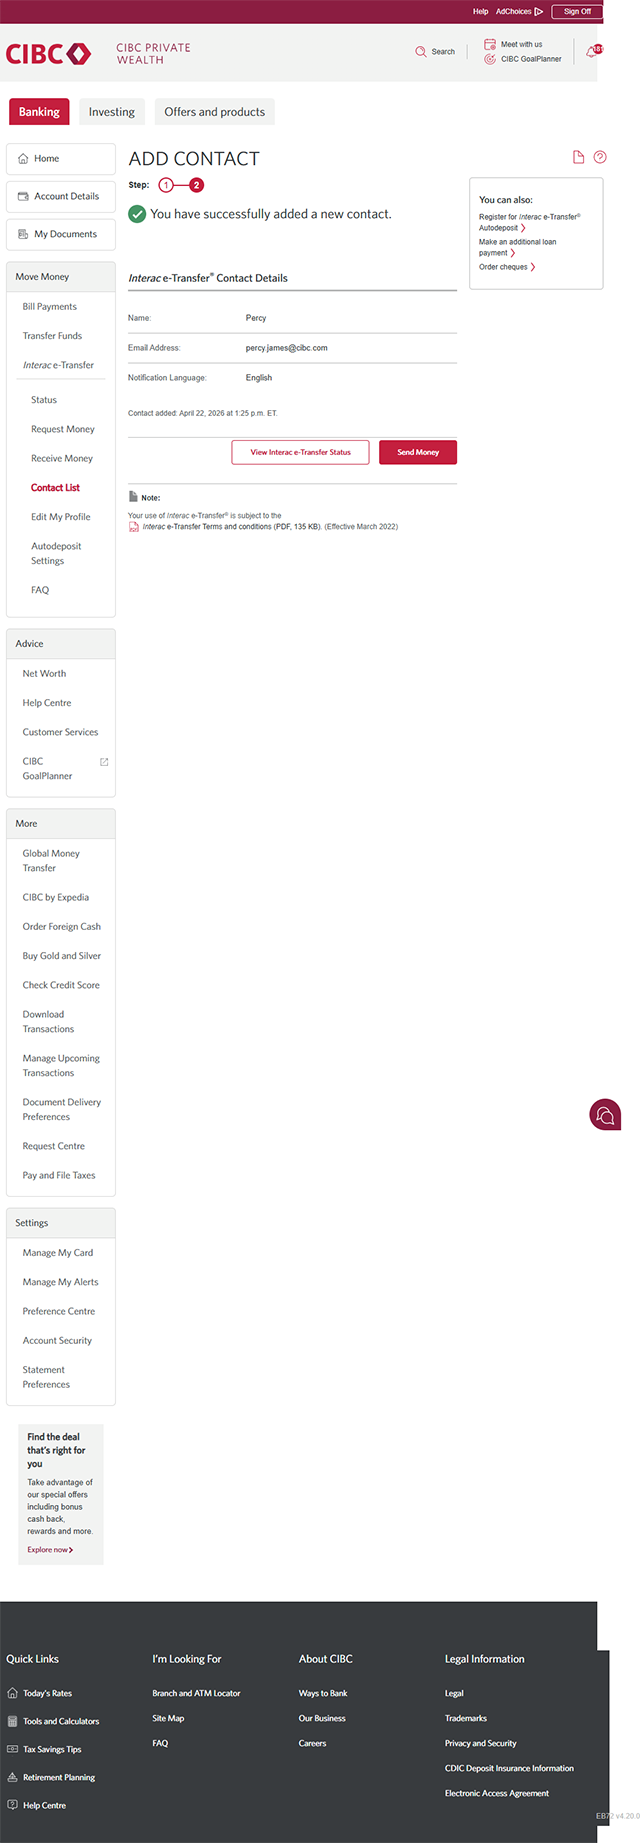
Demo screen 9: CIBC Online Banking add contact step 2. A pulsing animation highlights the "Send Money" button.
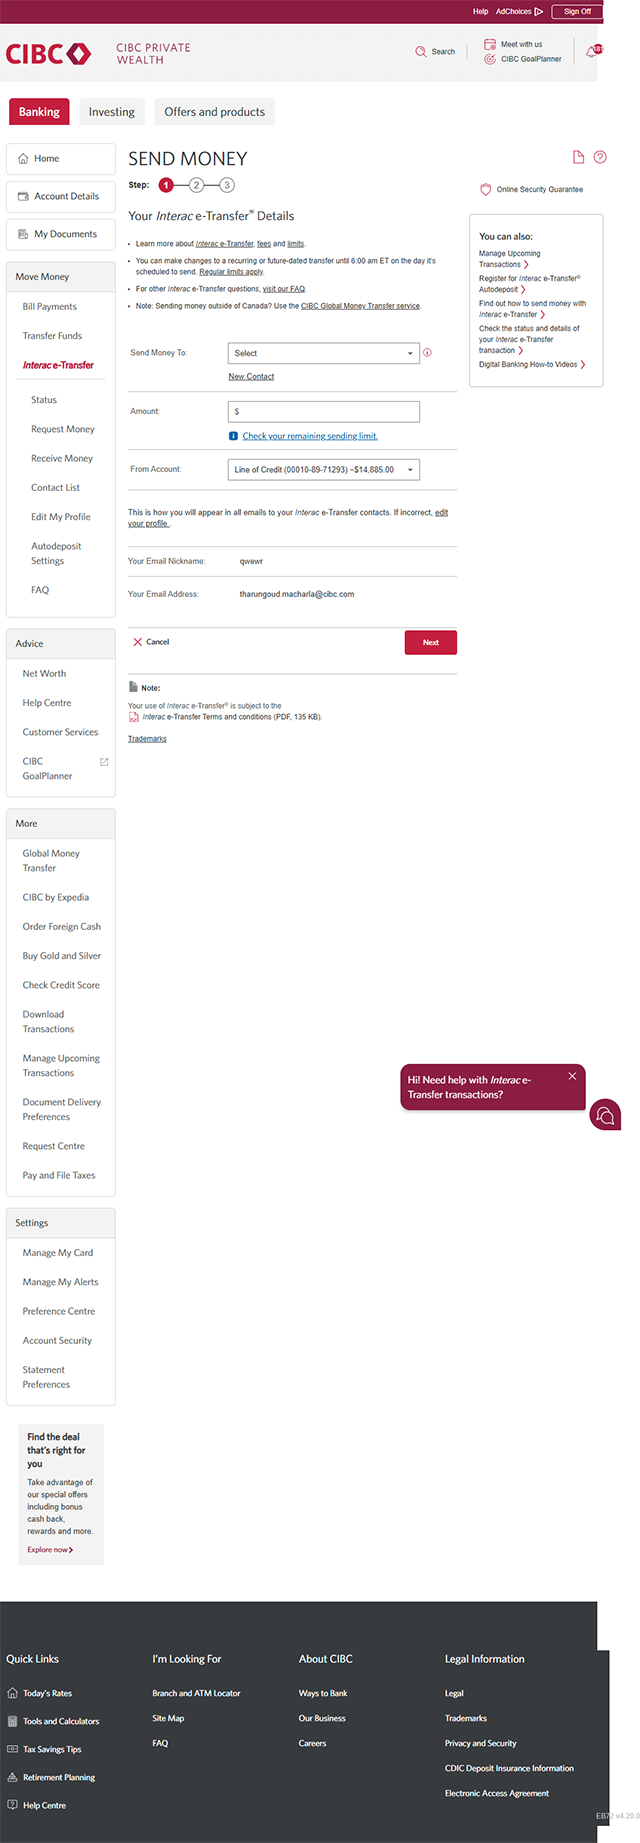
Demo screen 10: CIBC Online Banking send money step 1. A pulsing animation highlights the "Send Money To" combo box.
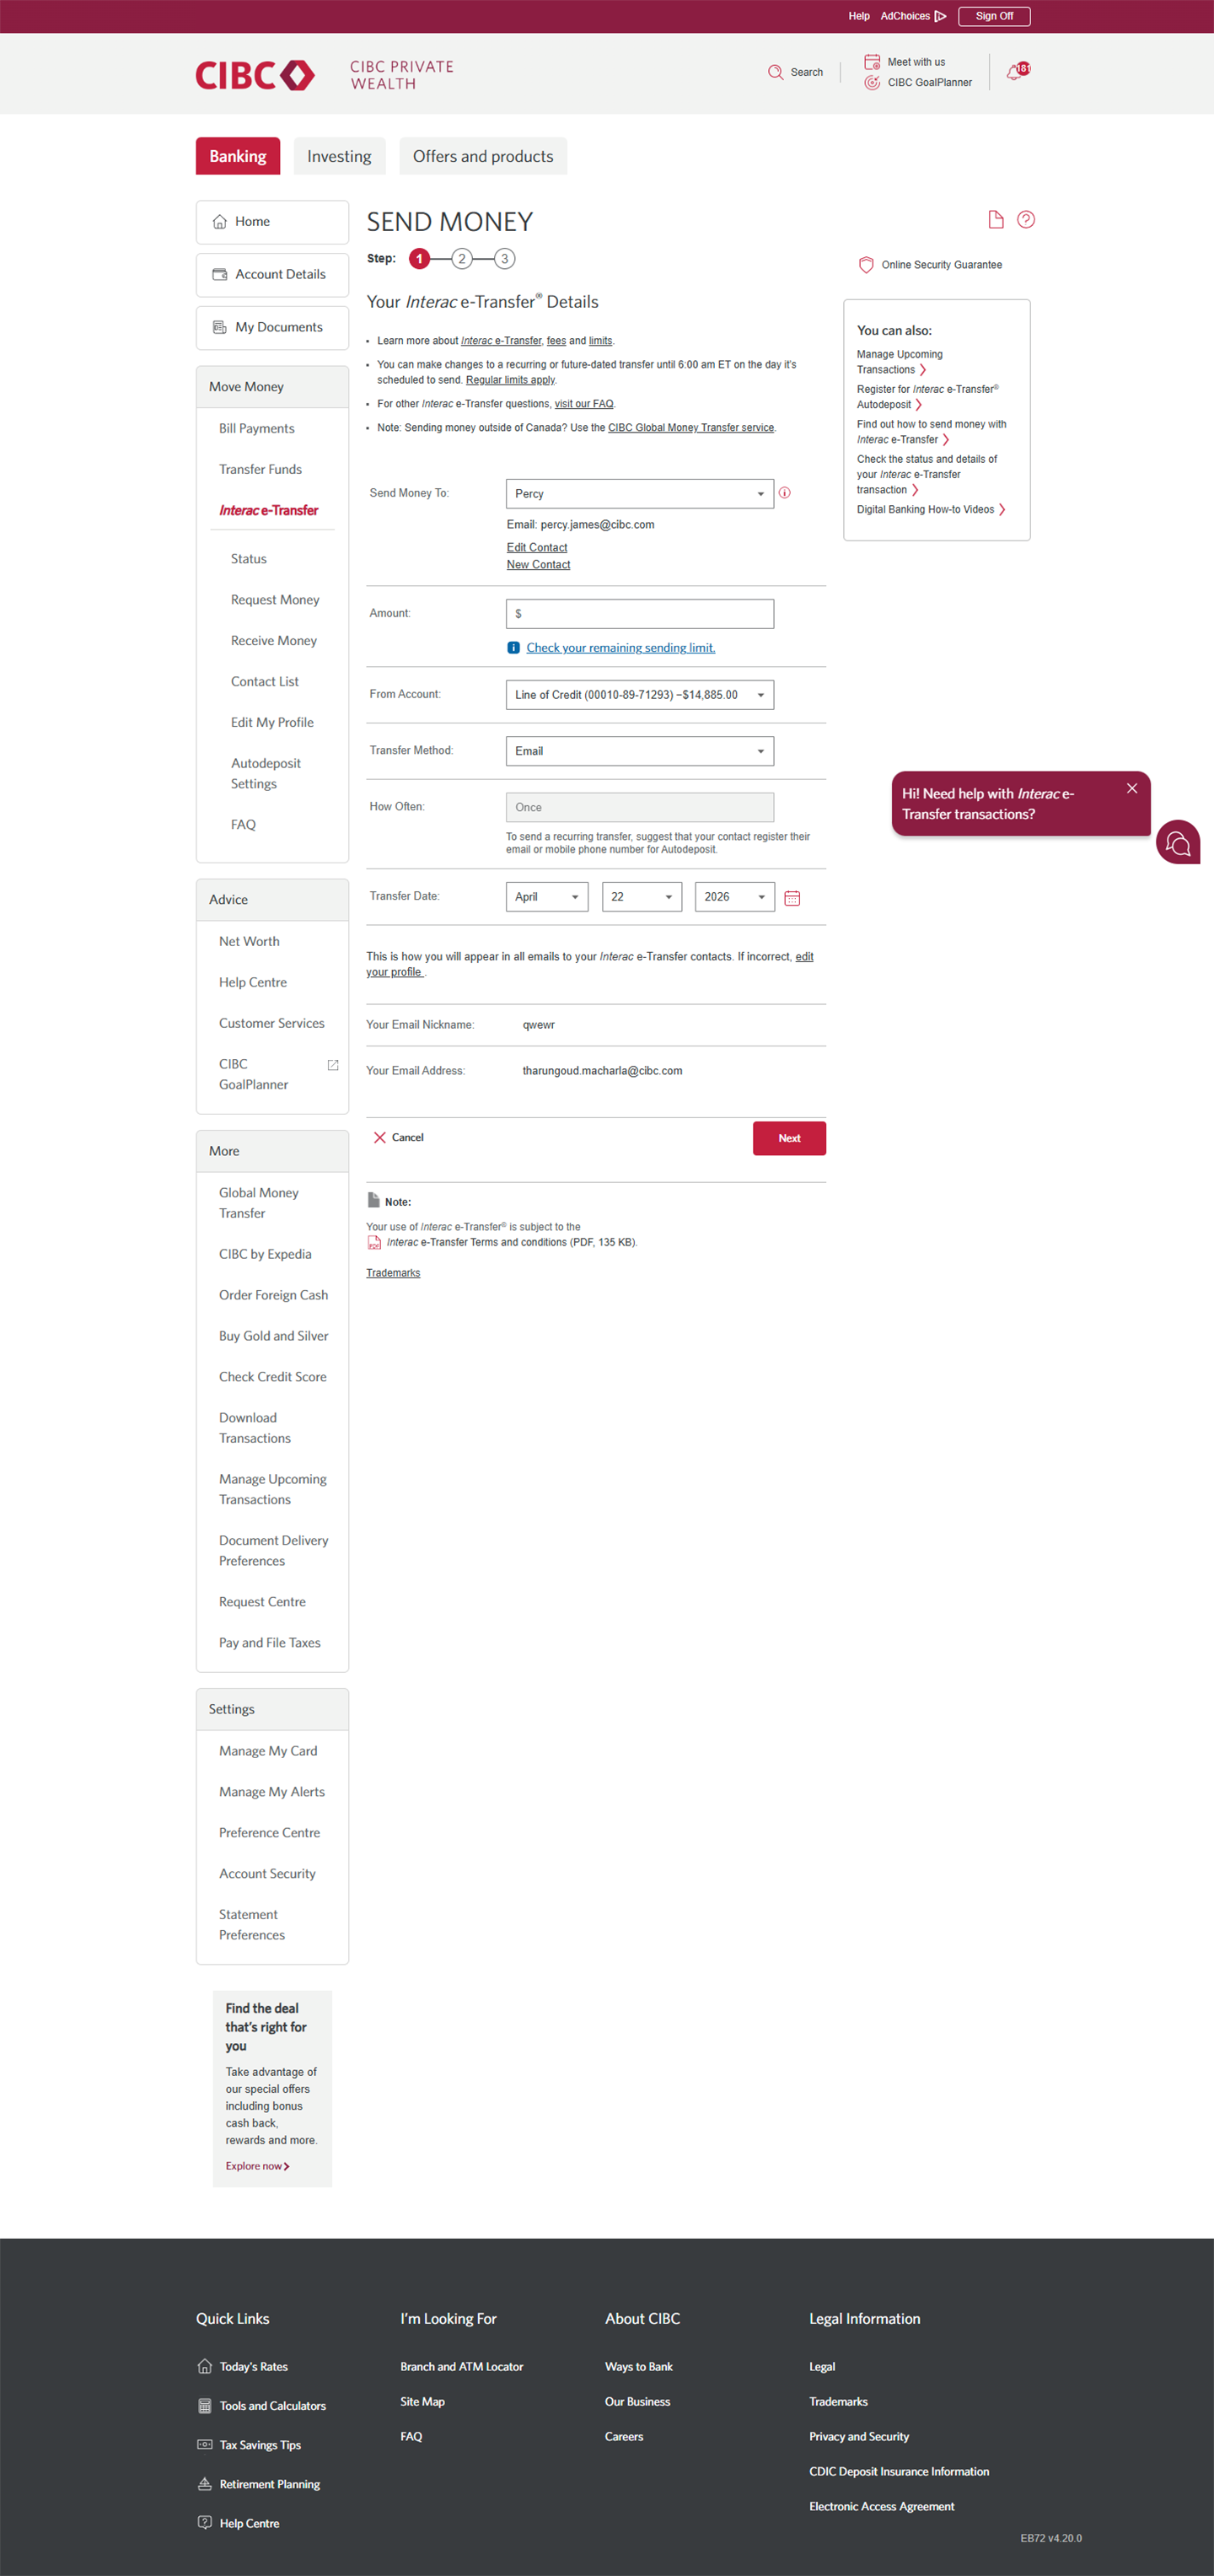
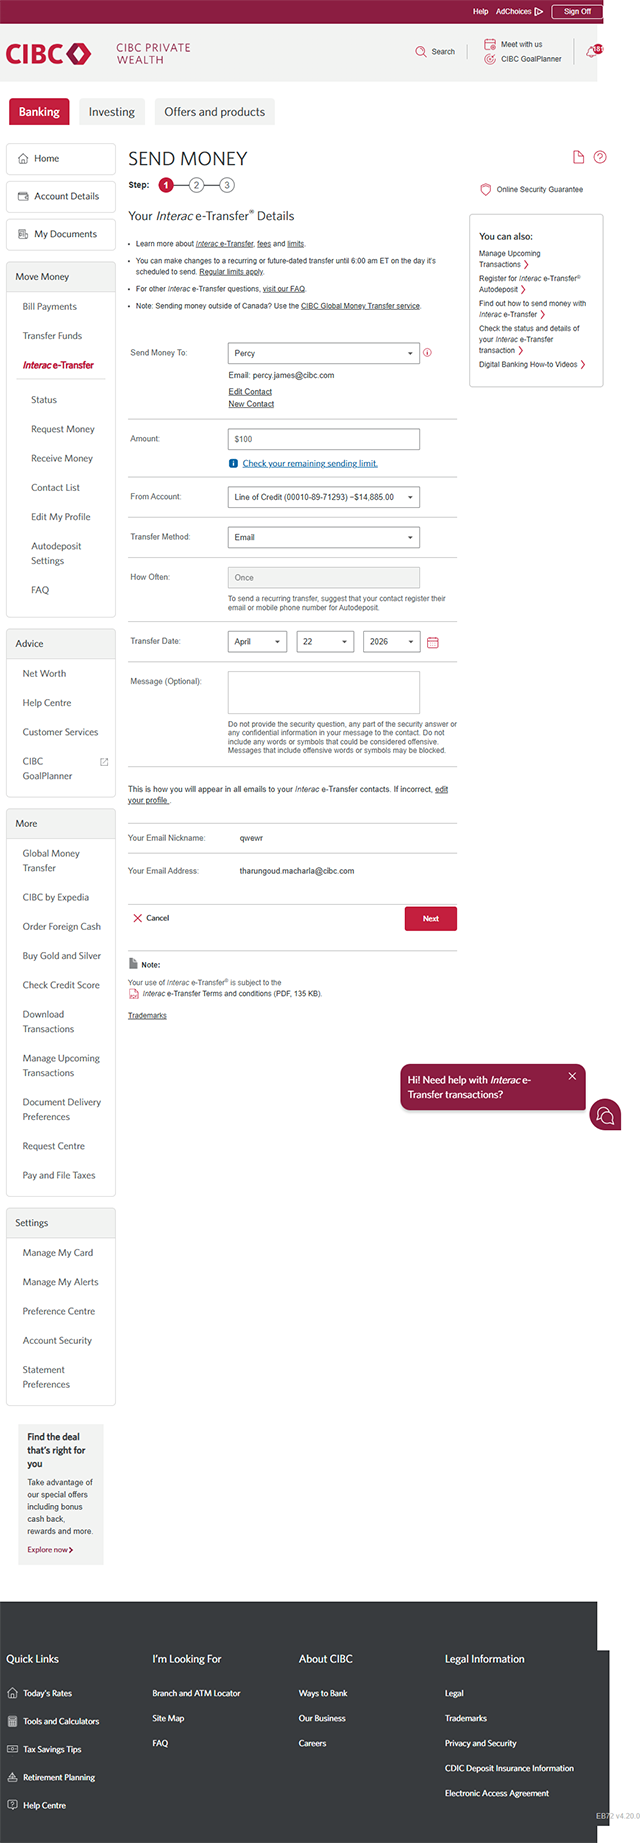
Demo screen 11: CIBC Online Banking send money step 1. A pulsing animation highlights the "amount" field.
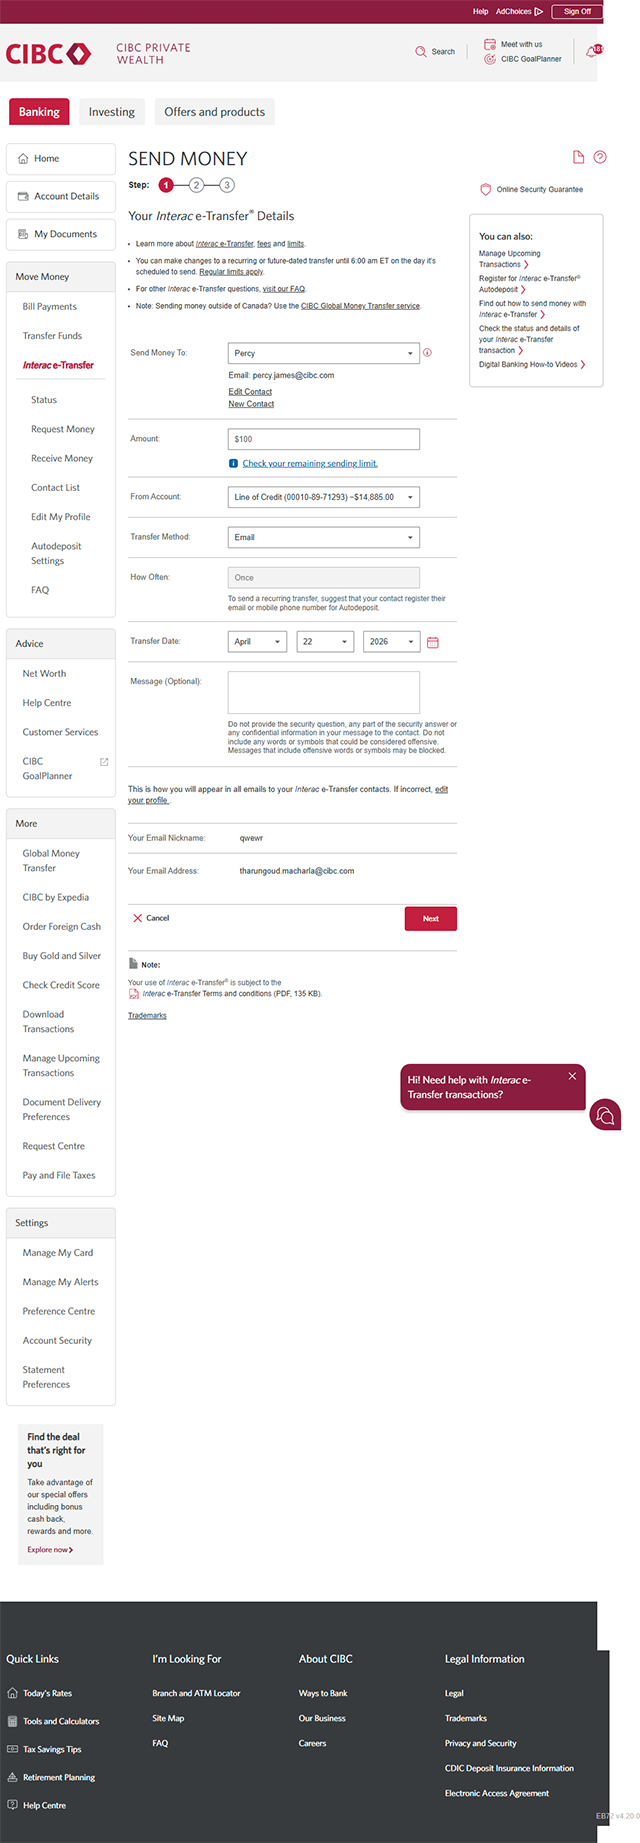
Demo screen 12: CIBC Online Banking send money step 1. A pulsing animation highlights the "From Account" combo box.
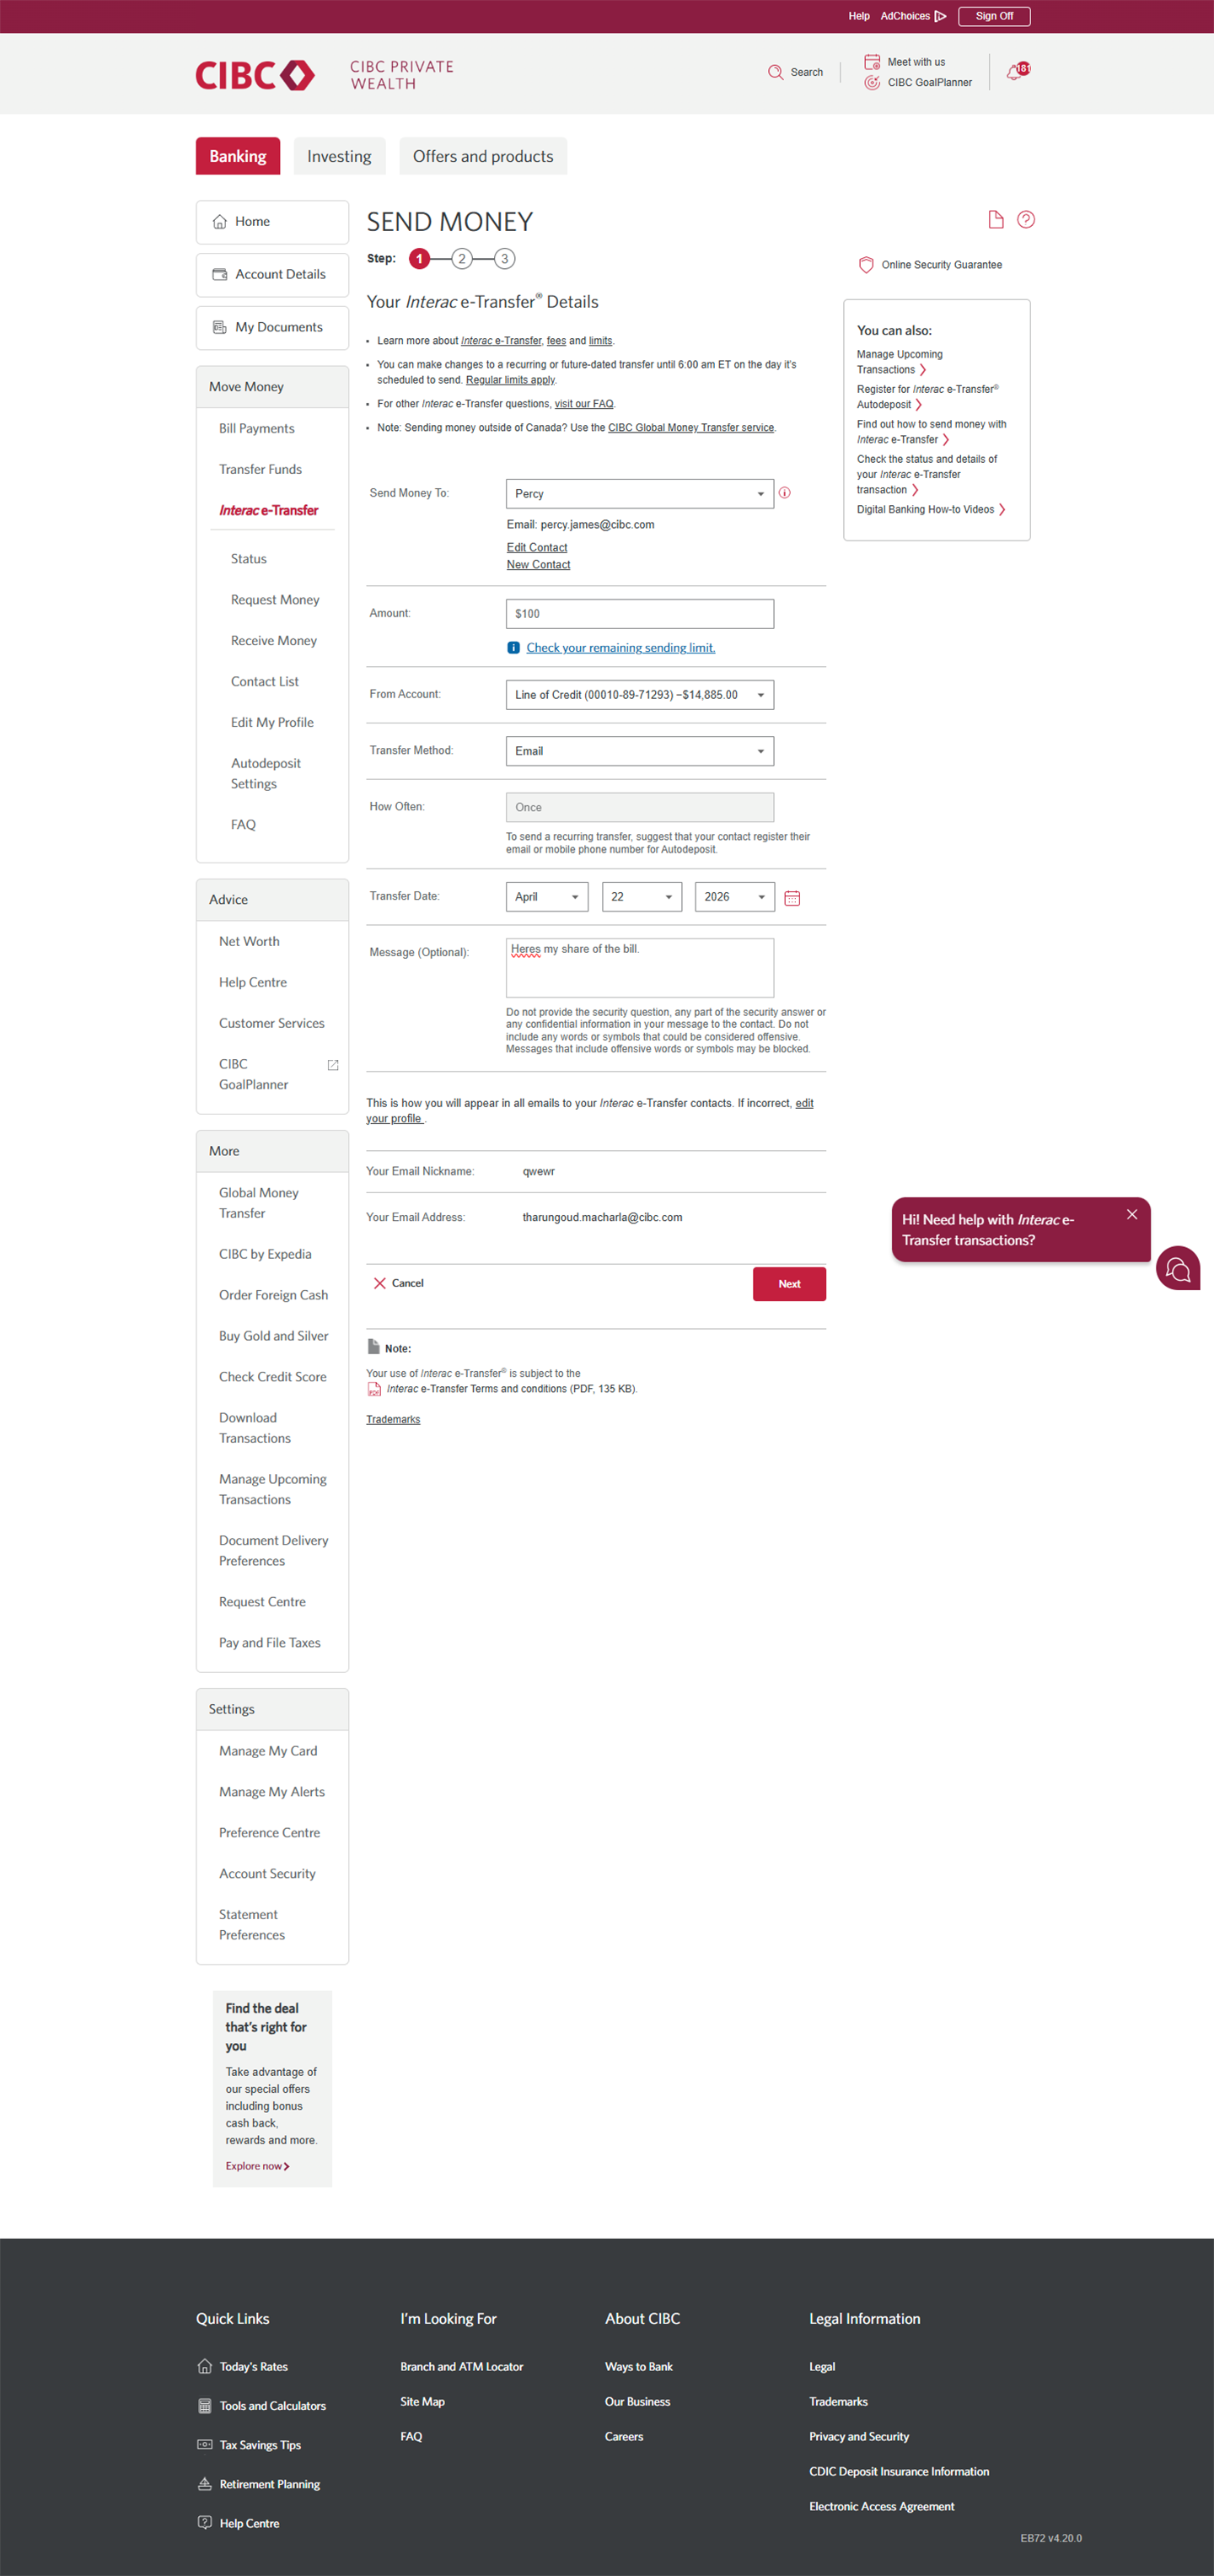
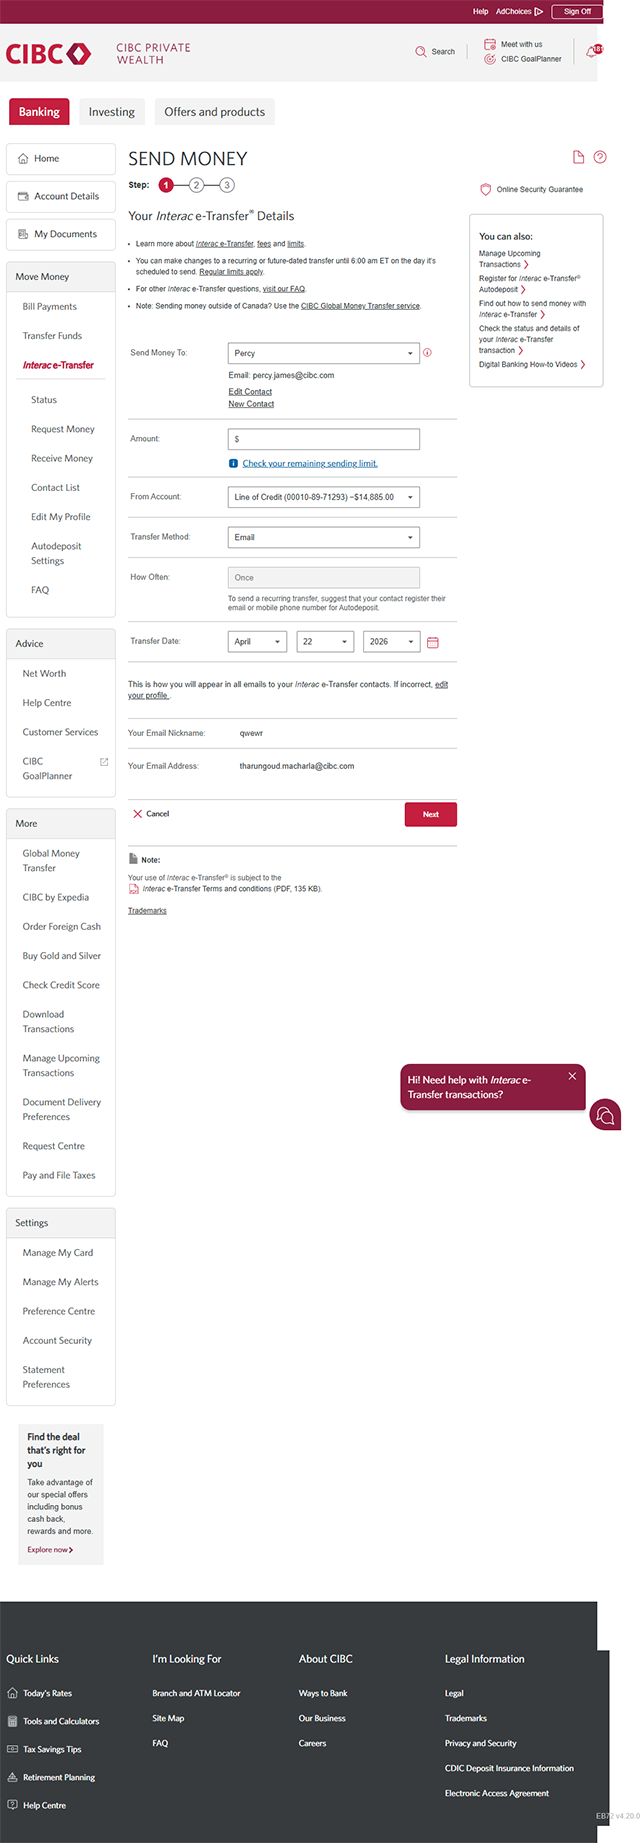
Demo screen 13: CIBC Online Banking send money step 1. A pulsing animation highlights the "Transfer Date" combo box.
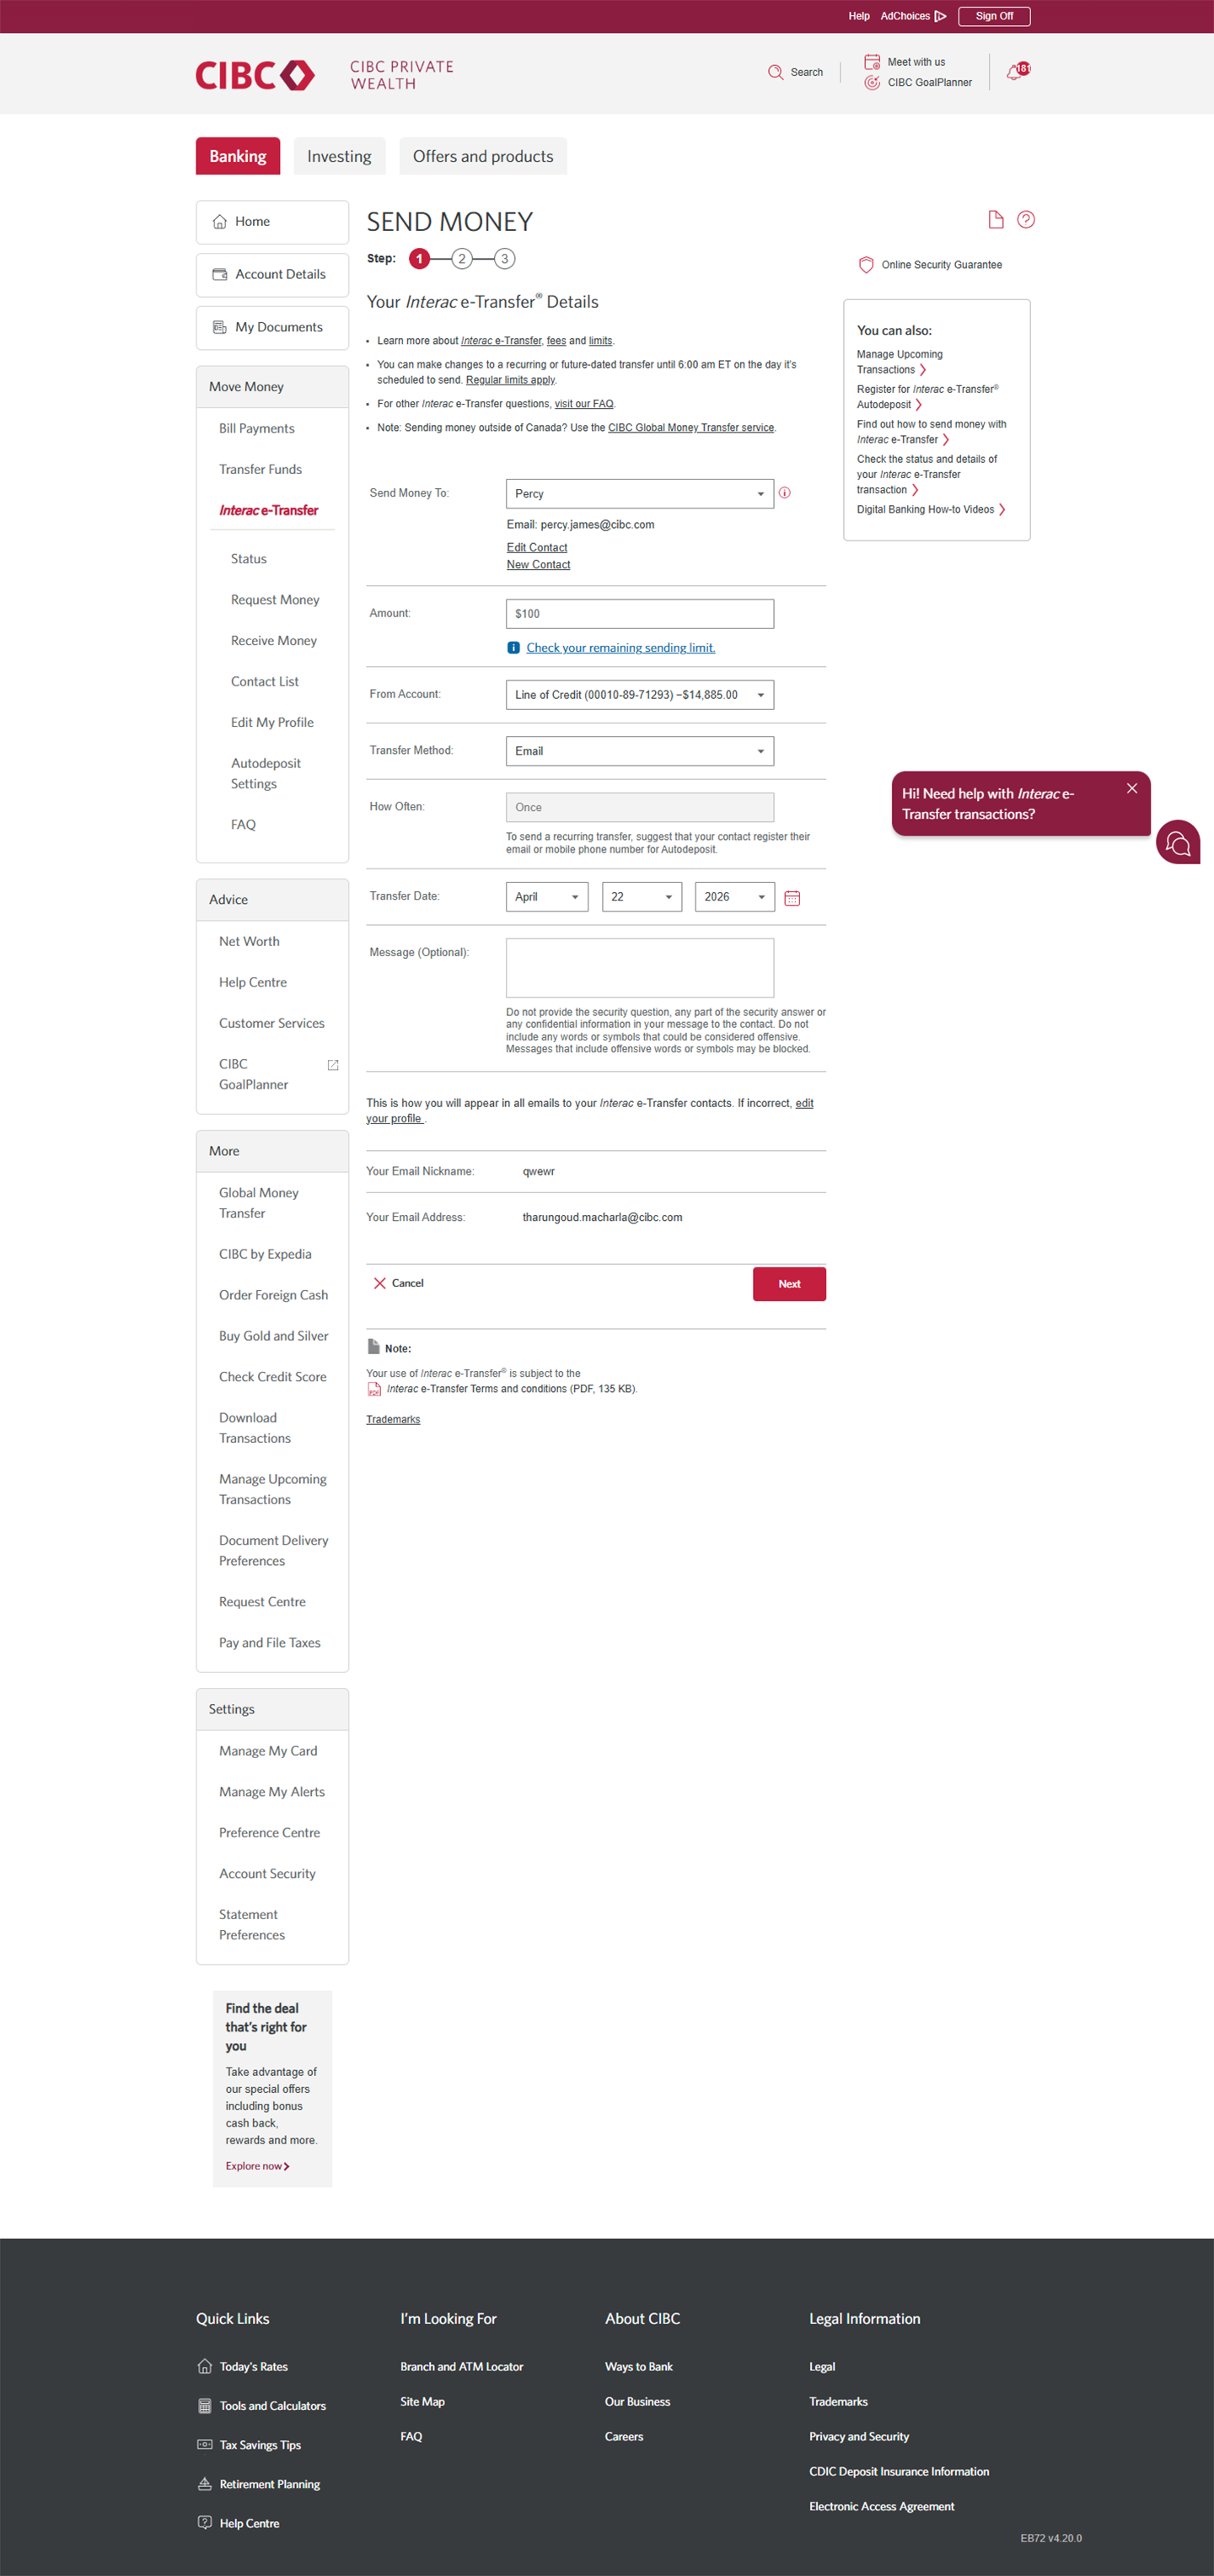
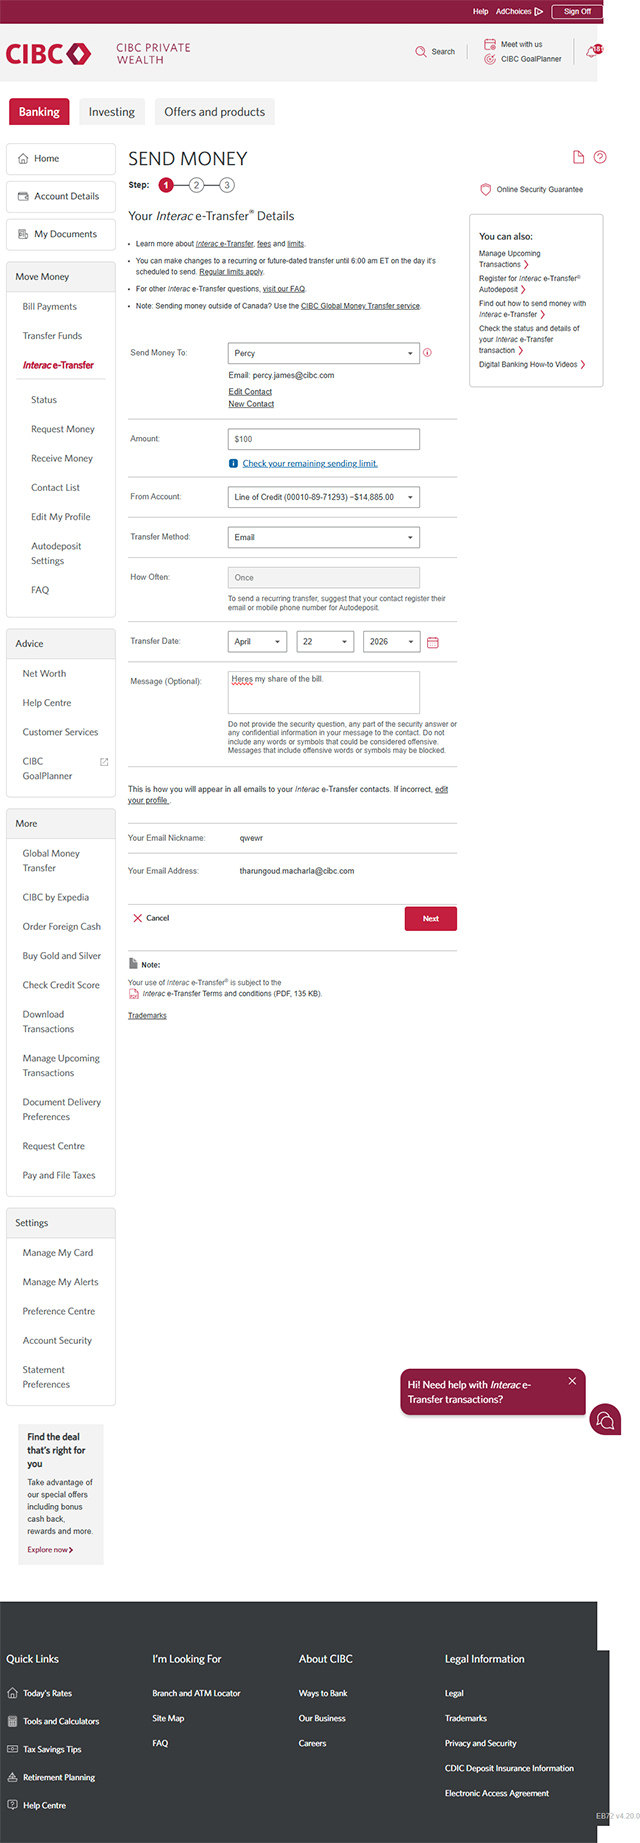
Demo screen 14: CIBC Online Banking send money step 1. A pulsing animation highlights the message field.
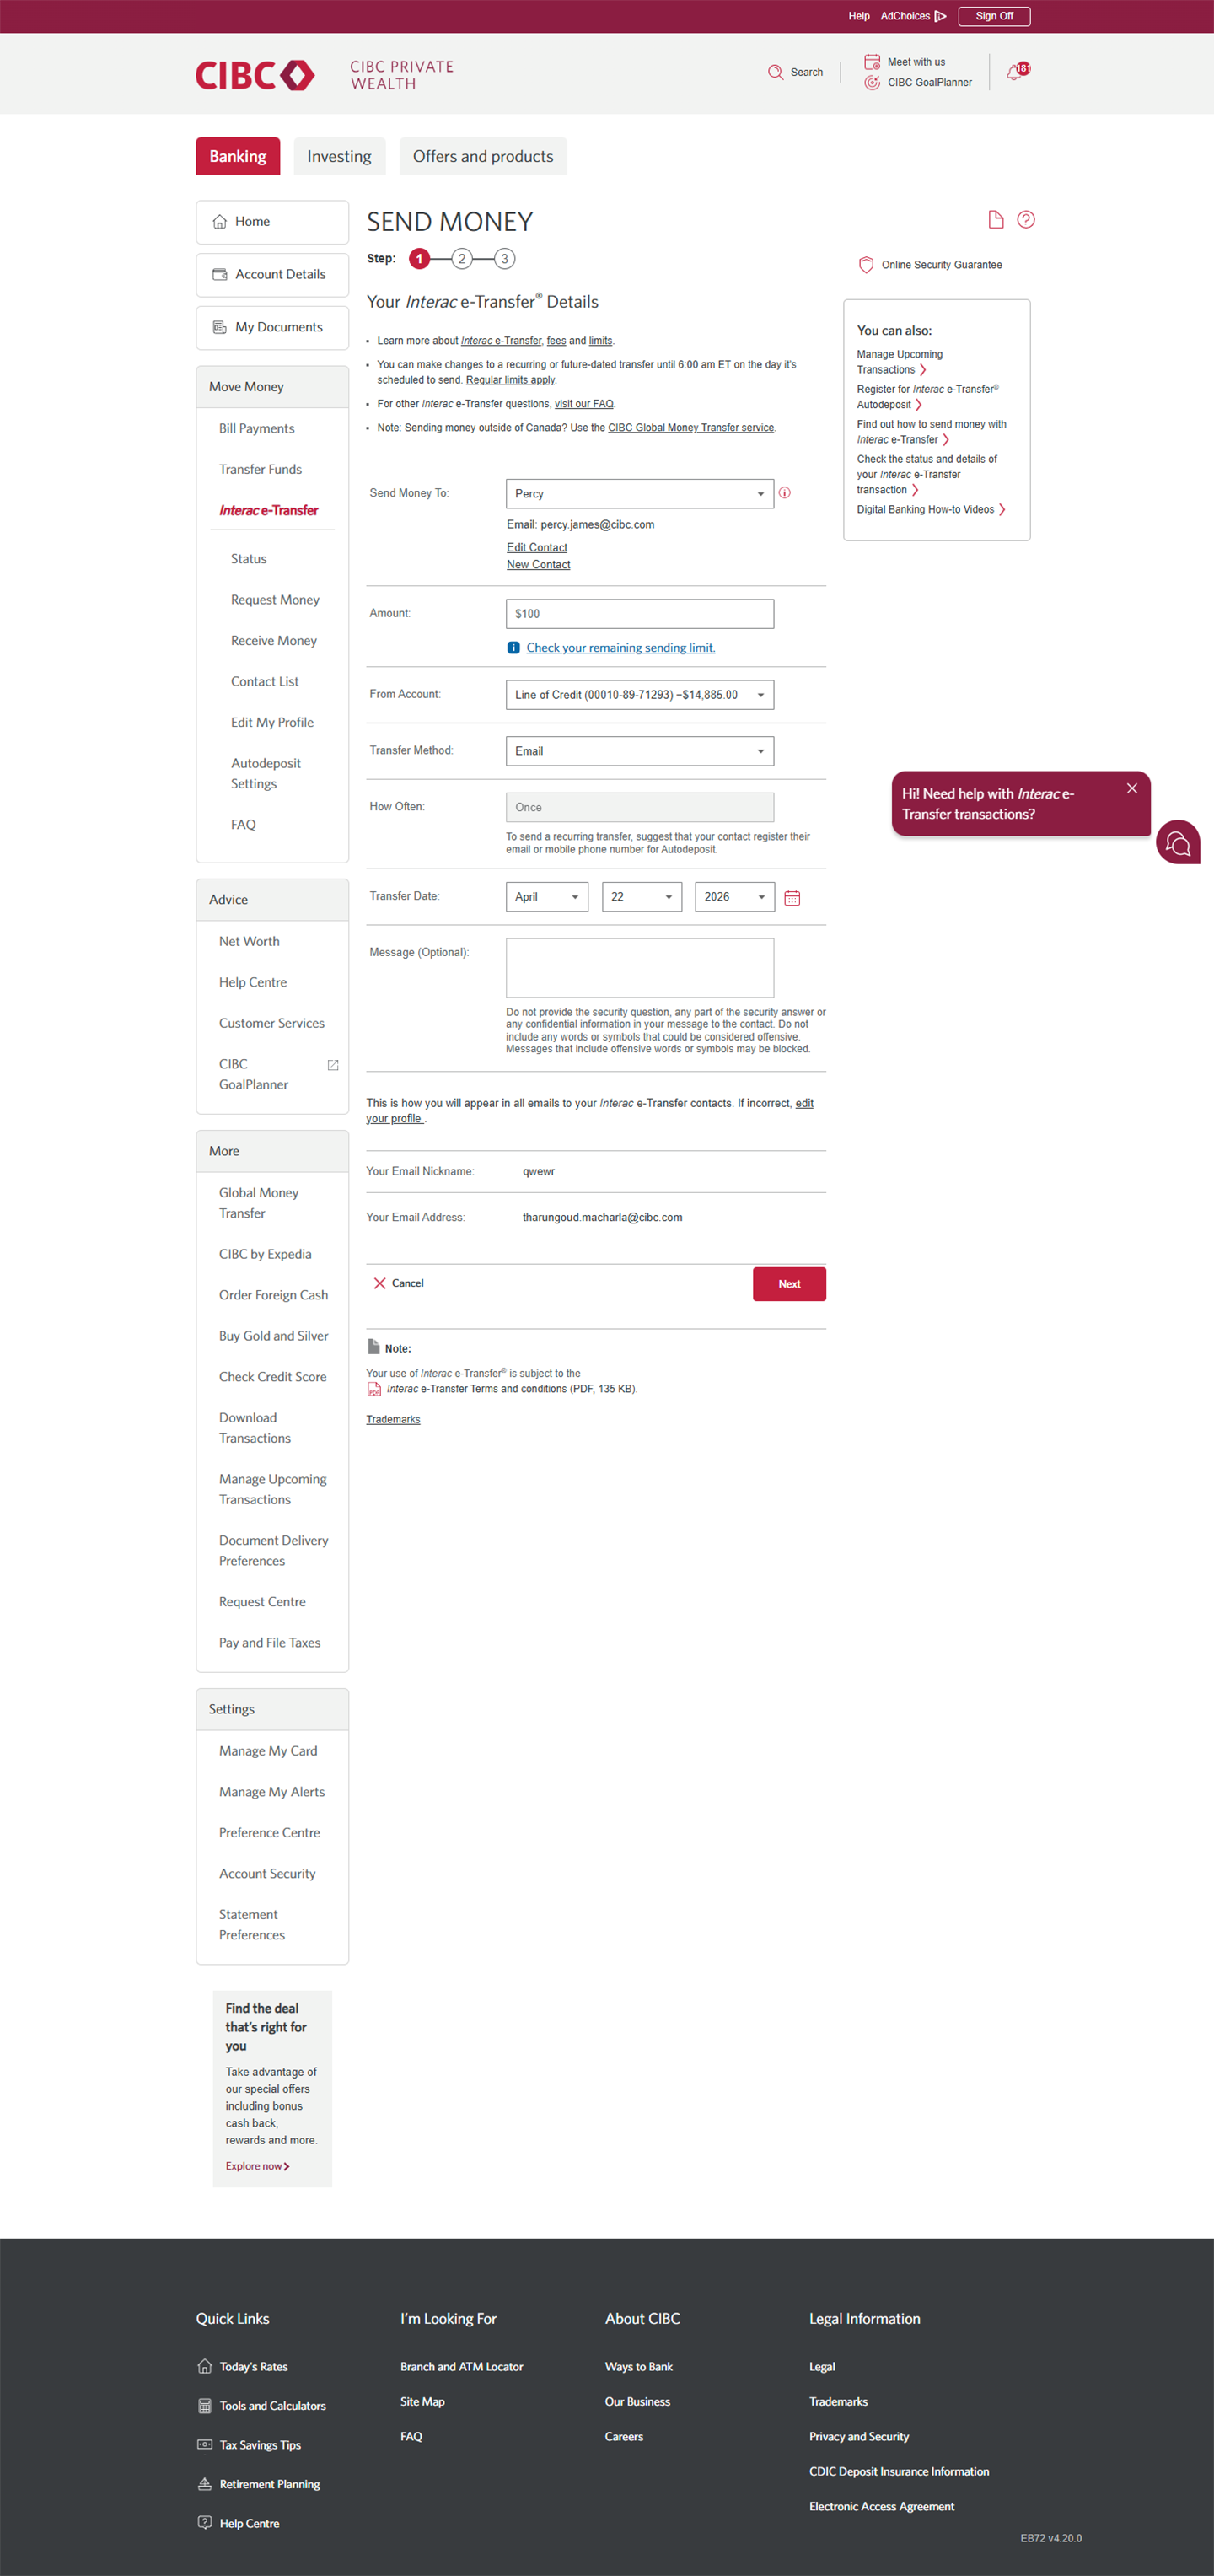
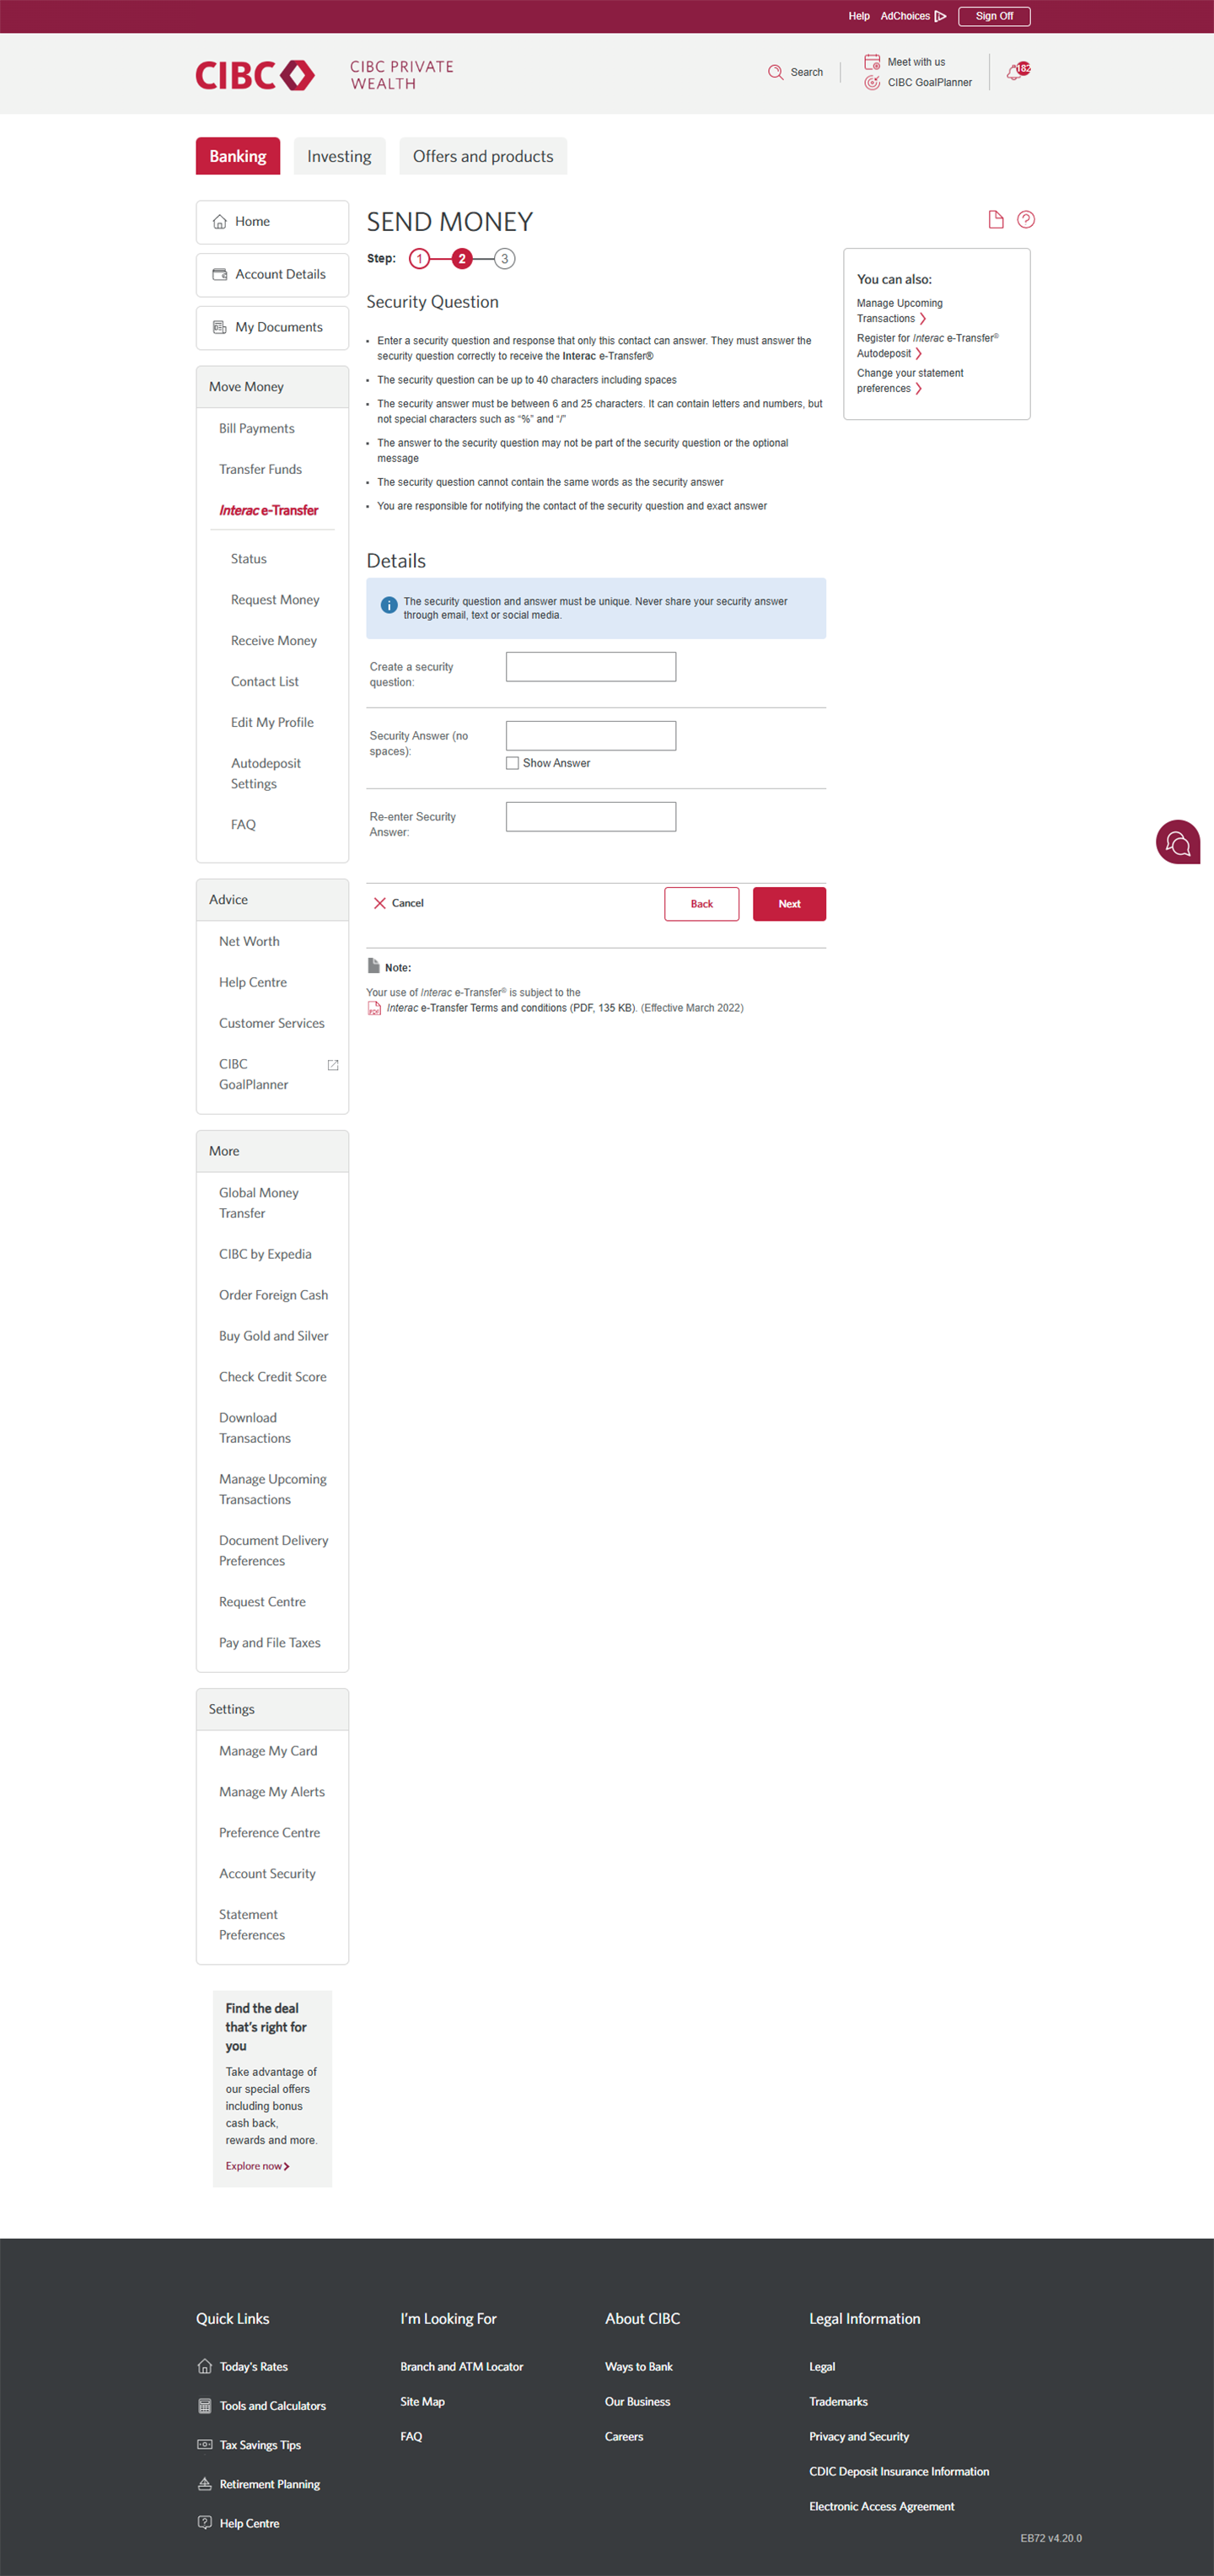
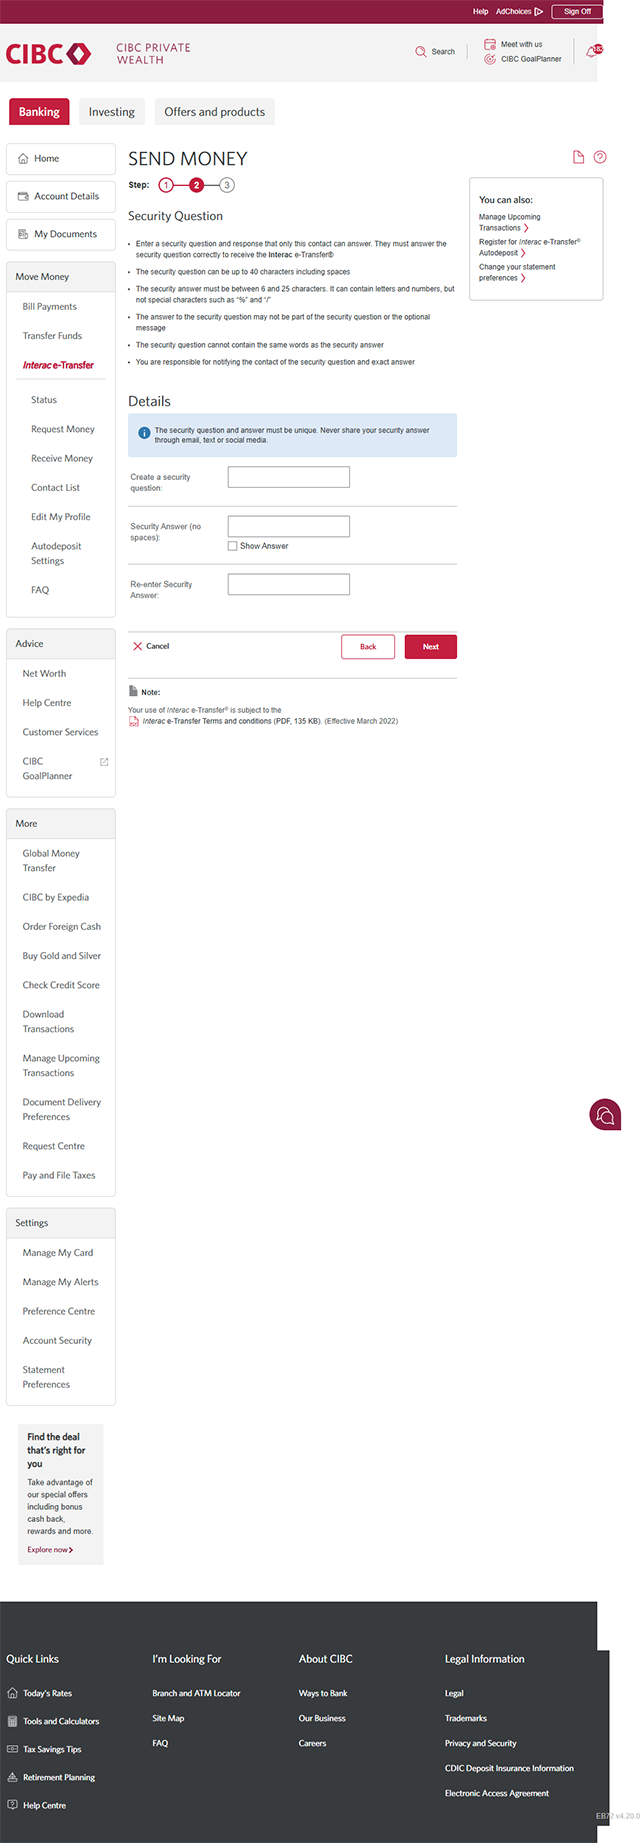
Demo screen 15: CIBC Online Banking send money step 1. A pulsing animation highlights the "Create a security question" button.
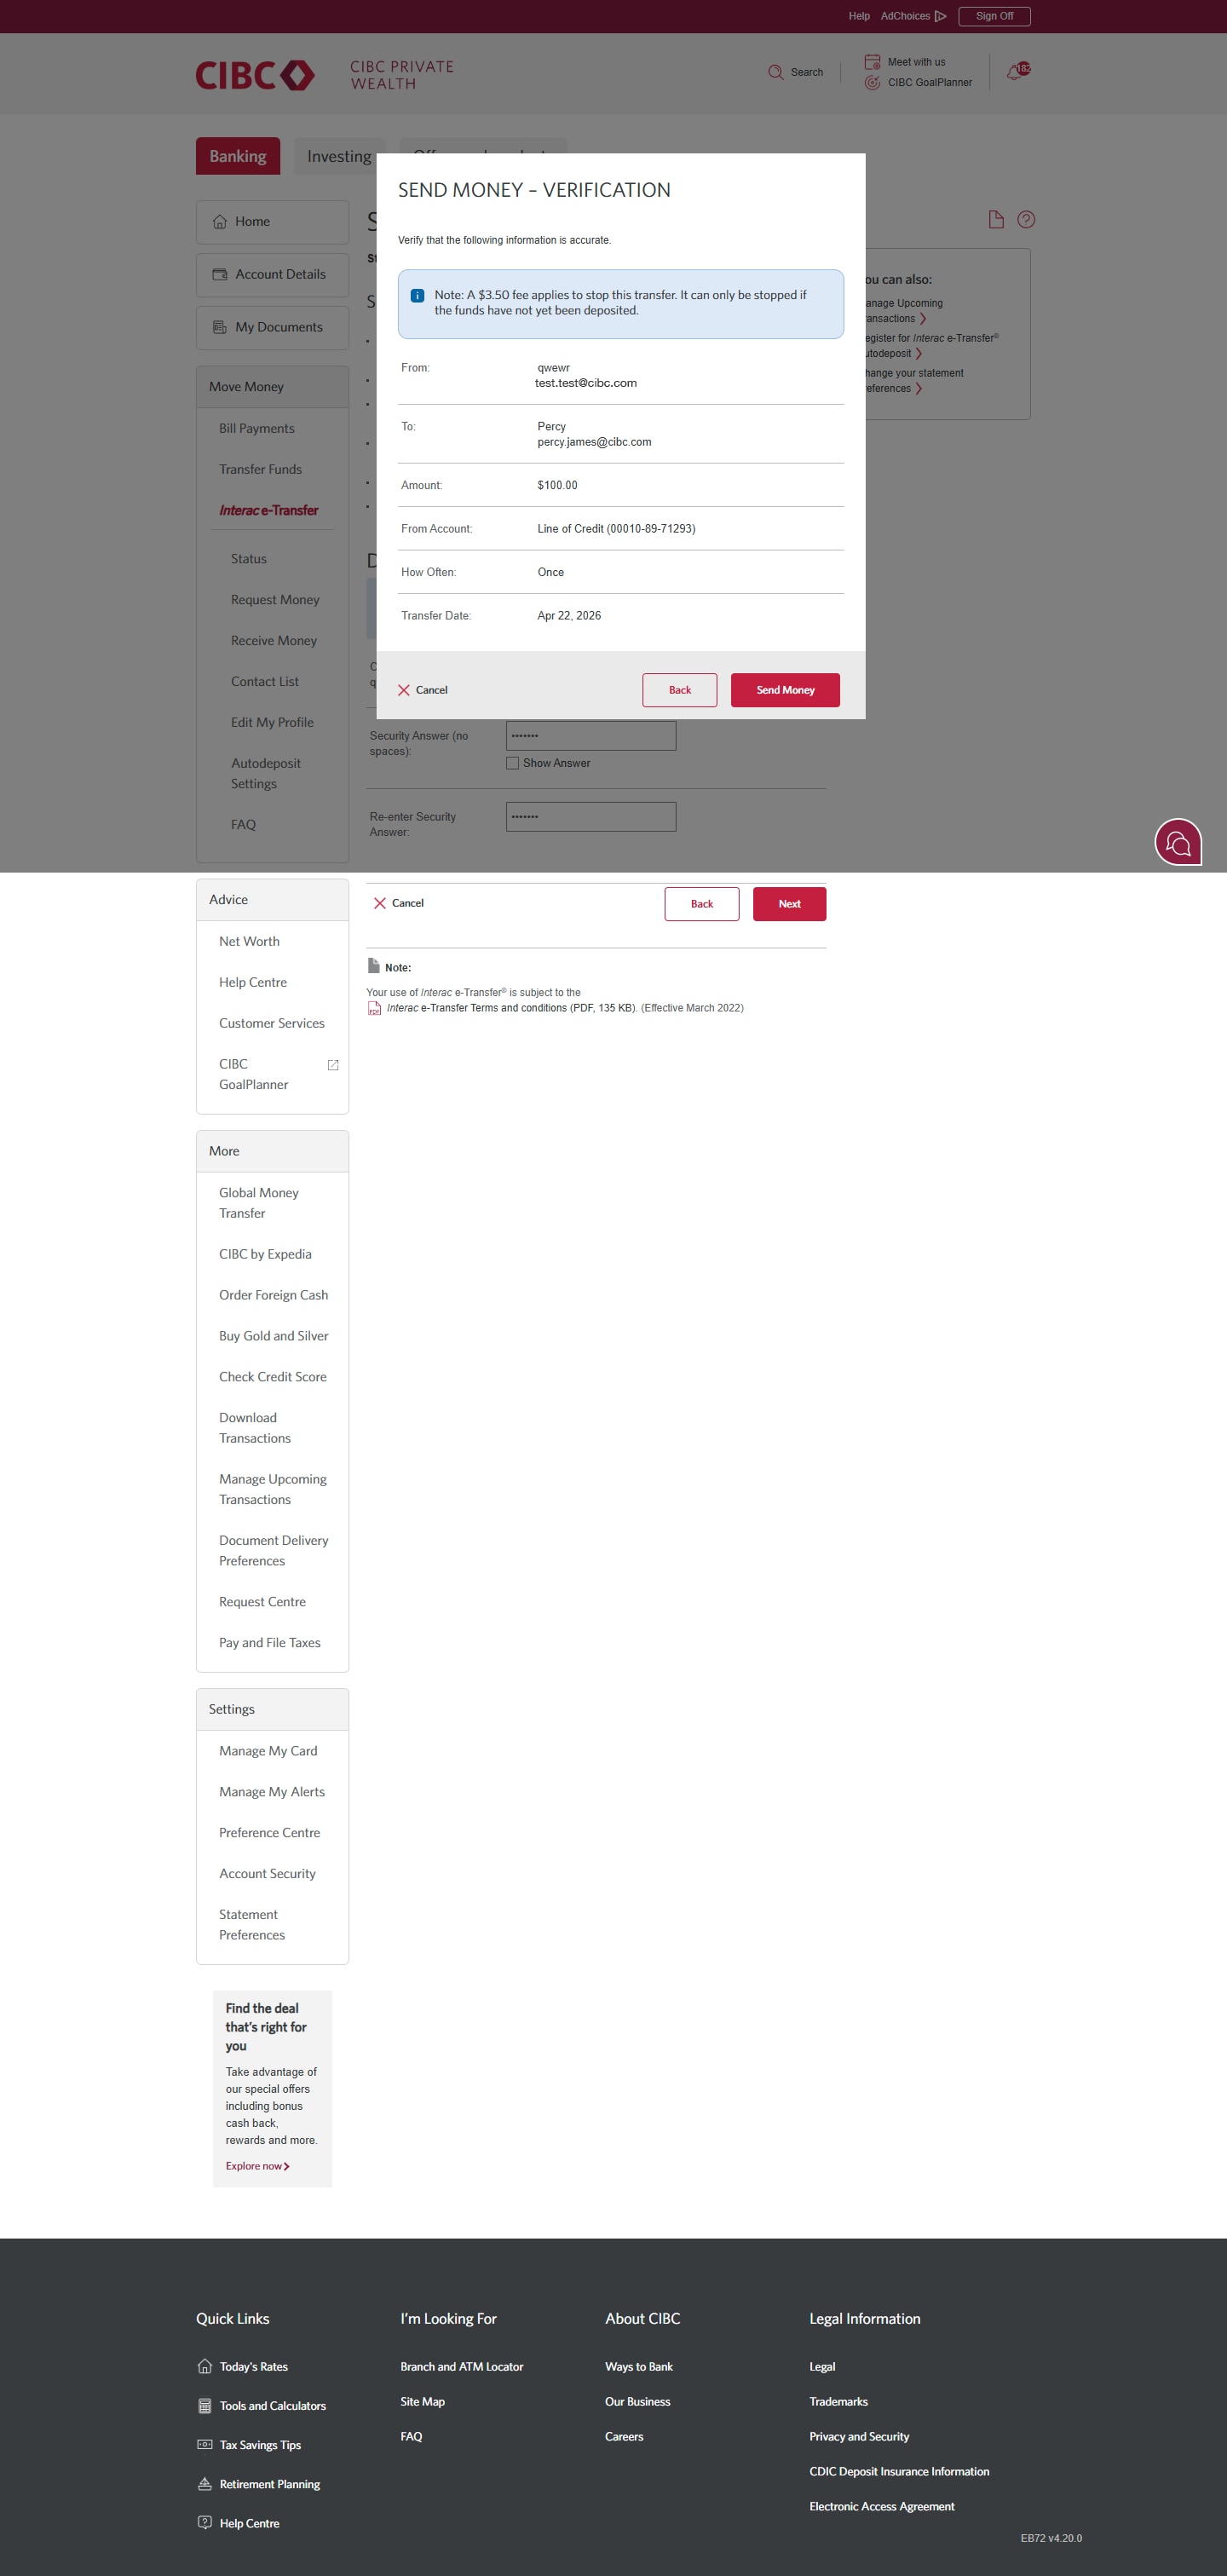
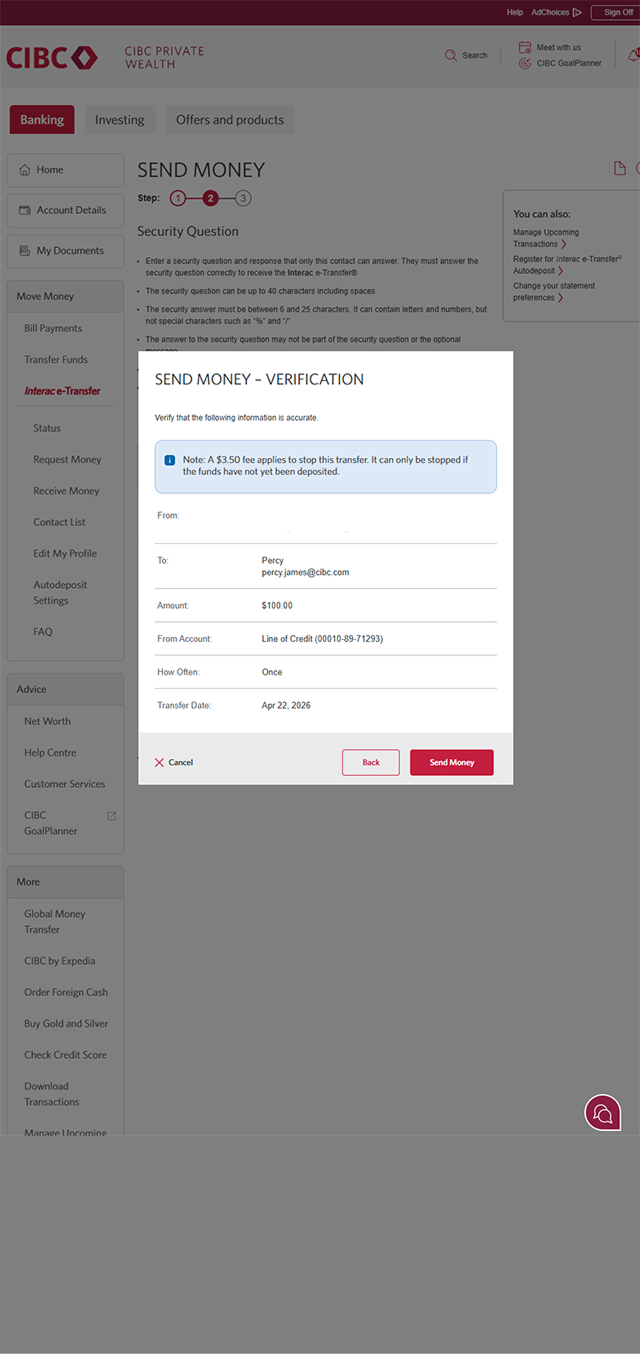
Demo screen 16: CIBC Online Banking send money verification. A pulsing animation highlights the "Send Money" button.
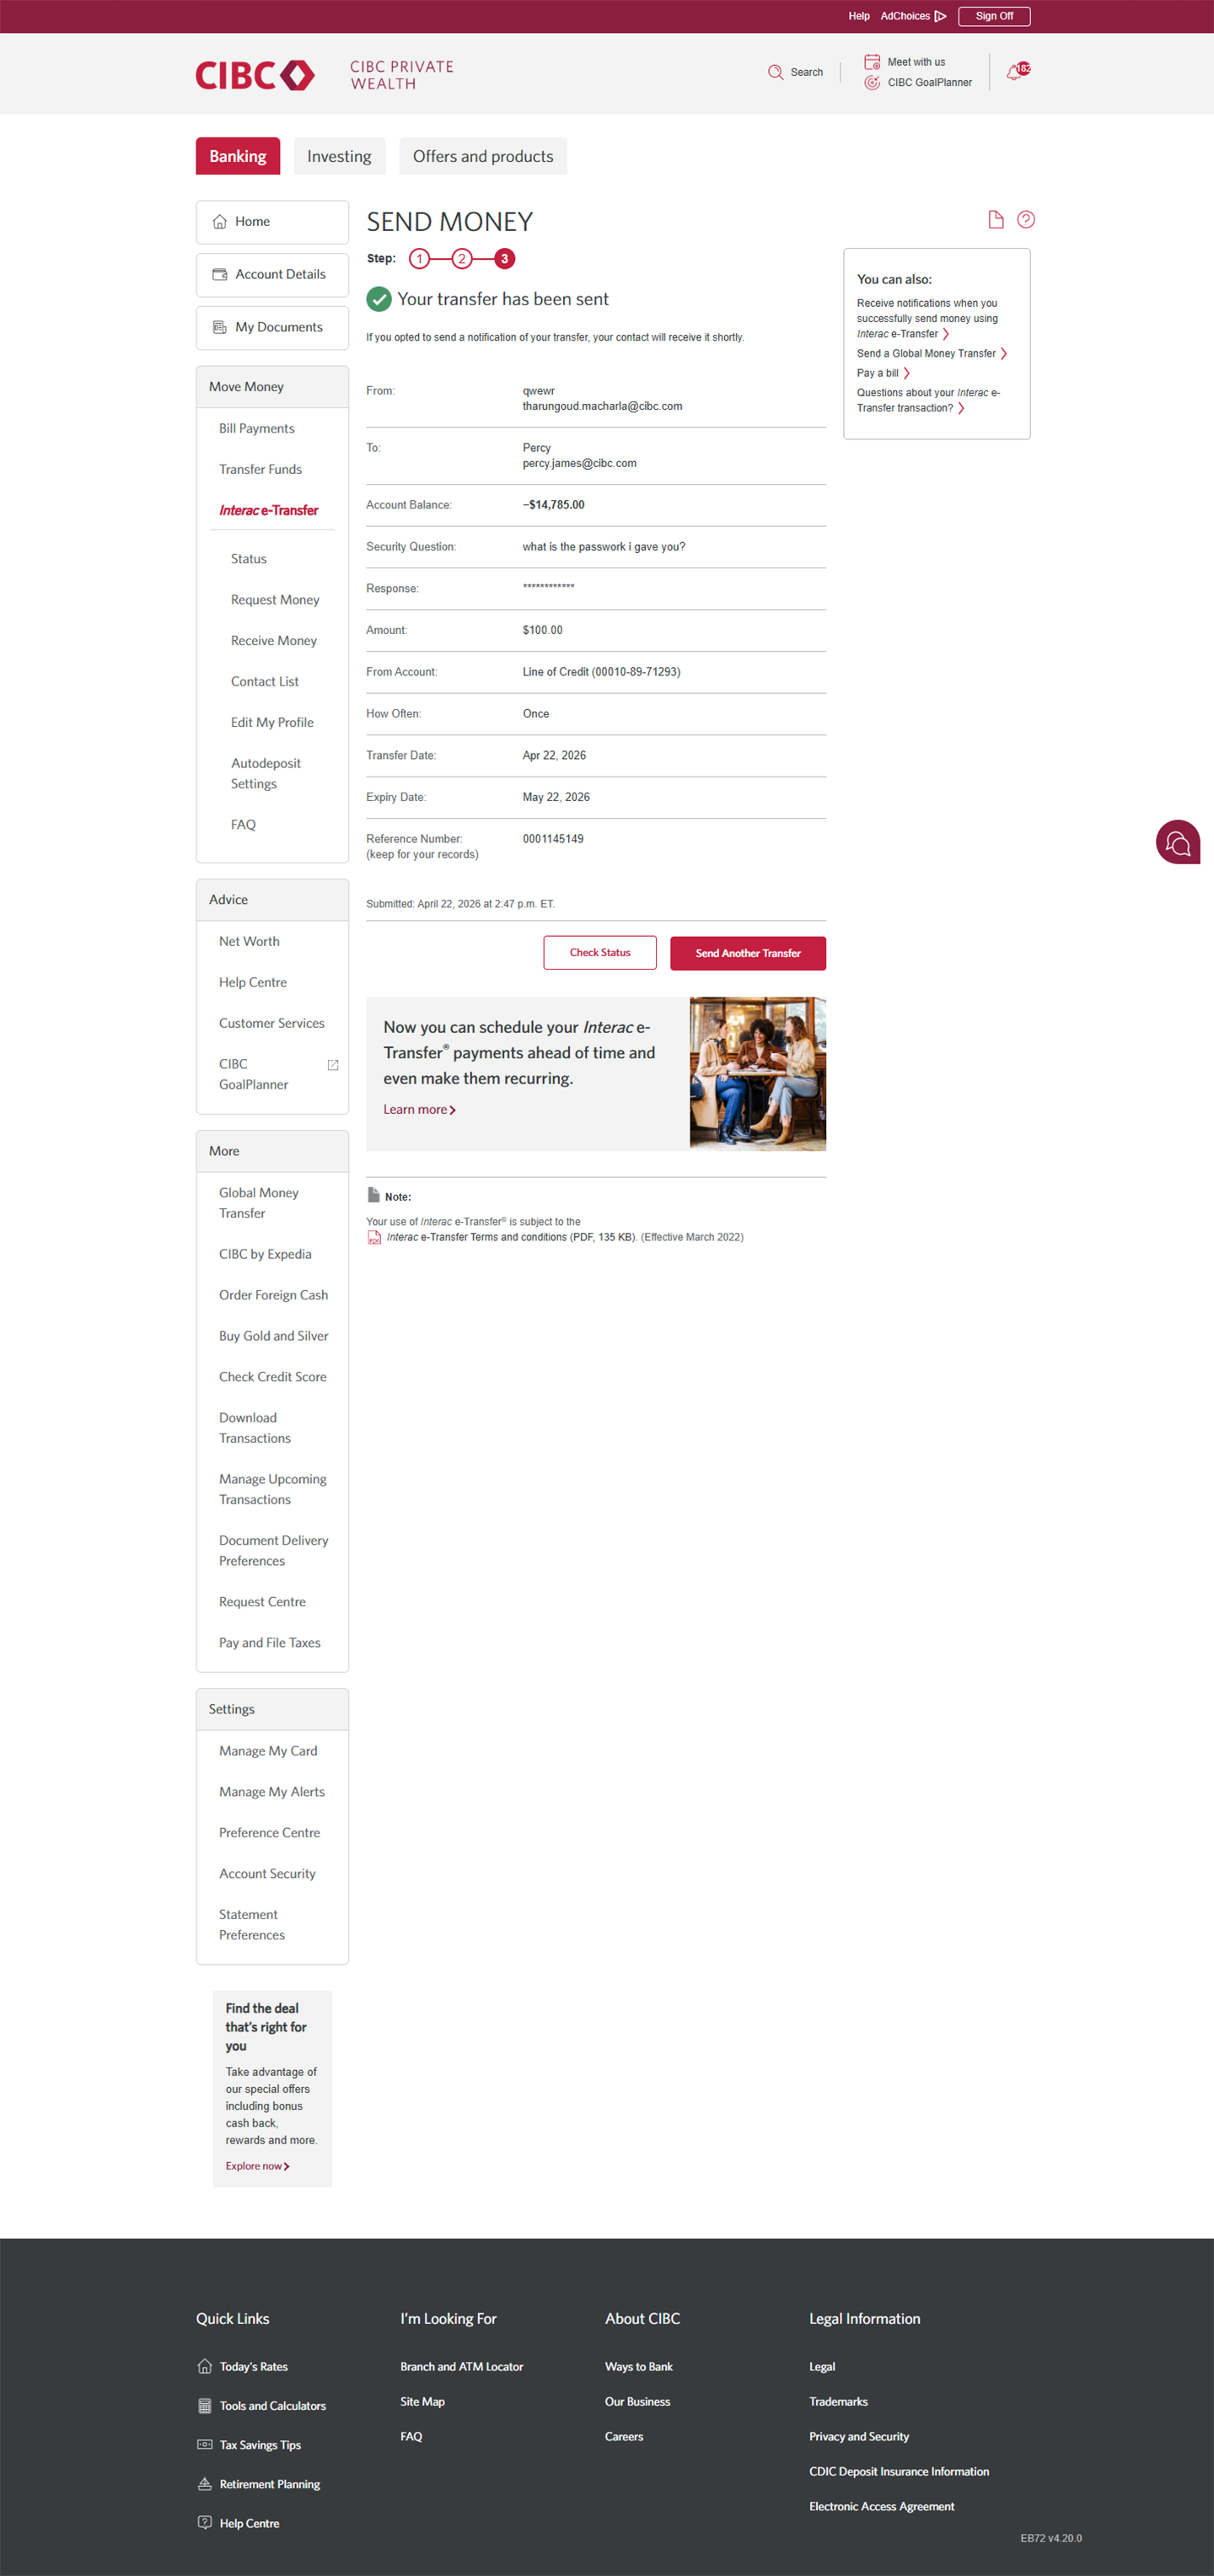
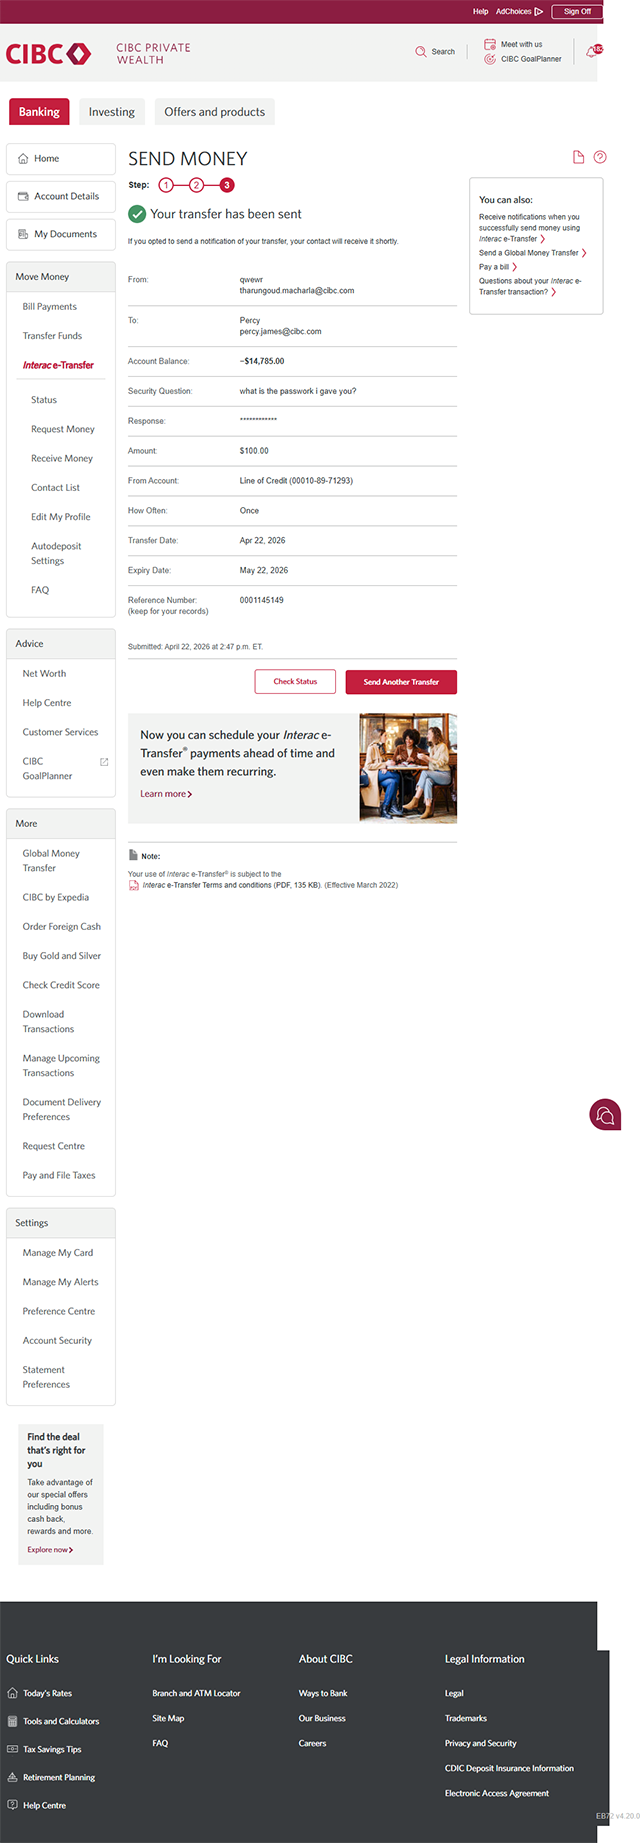
Demo screen 17: CIBC Online Banking send money step 3. No pulsing animation.
Your progress 1 of

Step 1 : Let's get started on your web browser

Select the "Sign on" button in the demo to continue.

Step 2 : Select "Interac e-Transfer"

From the homepage, go to the "Move Money" menu and select "Interac e-Transfer".

Step 3 : Create a new contact

Go to "Send Money To" and select "New Contact".

Step 4 : Review the terms for sending an Interac e-Transfer

Review the common warning signs of scams that involve requests for money, and CIBC's terms for sending an Interac e-Transfer.

Once you've finished reviewing, select "I understand" to continue.

Step 5 : Enter the contact's name

In the field provided, enter the name of the recipient you'll be sending an Interac e-Transfer payment to.

Step 6 : Choose a contact method

Choose how your new contact will be notified of the Interac e-Transfer payment. Select the checkbox for "email" or "mobile phone".

For this demo, we'll be selecting email and will add the contact's email address when prompted.

Step 7 : Add contact

Confirm the details of the contact's information. When you're ready, select the "Add Contact" button.

As an extra security measure, you may need to verify your identity with a one-time verification code before you can finish adding a new contact.

Depending on your chosen contact method, you'll receive either a phone call or a text message with the verification code. Enter the code to proceed to the next step.

Step 8 : Verify contact information

Verify that the contact's information is correct. When you're ready, select "Add Contact".

Step 9 : Send money to your contact

An on-screen message will confirm that your contact was successfully added.

Select "Send Money" to begin an Interac e-Transfer payment to your contact.

Step 10 : Select the contact from the dropdown menu

Go to the "Send Money To" dropdown menu and select your contact's name.

Step 11 : Enter the amount of your Interac e-Transfer payment

Use the field provided and enter the amount of money you'll be transferring to your contact.

Step 12 : Choose an account to withdraw the money from

Use the dropdown menu to select an account that you'll send the money from.

To set up a recurring Interac e-Transfer payment, you can select options from the "How Often" dropdown menu.

Step 13 : Schedule the transfer date

Today's date will be the default for your Interac e-Transfer payment.

If you want to schedule the transfer for a later date, go to "Transfer Date" and use the dropdown menus to select a future date, or select the calendar icon.

Step 14 : Enter a message

Enter a message to the recipient of your Interac e-Transfer payment. This step is optional.

Step 15 : Enter a security question

Enter a security question and response that only the recipient of your Interac e-Transfer payment can answer. You'll be prompted to enter the answer twice.

The recipient must correctly answer the question to complete the transfer. Any recipient who has registered for Interac e-Transfer Autodeposit will not be asked to complete this step.

Step 16 : Review the details of your Interac e-Transfer payment

Once you've reviewed the details and verified they're correct, select "Send Money" to proceed with the transfer.

Step 17 : Great job!

You've successfully added a contact and made an Interac e-Transfer payment on CIBC Online Banking.

An on-screen message will confirm that your money has been sent.
Demo screen 1: CIBC homepage. A pulsing animation highlights the "Sign on" button.
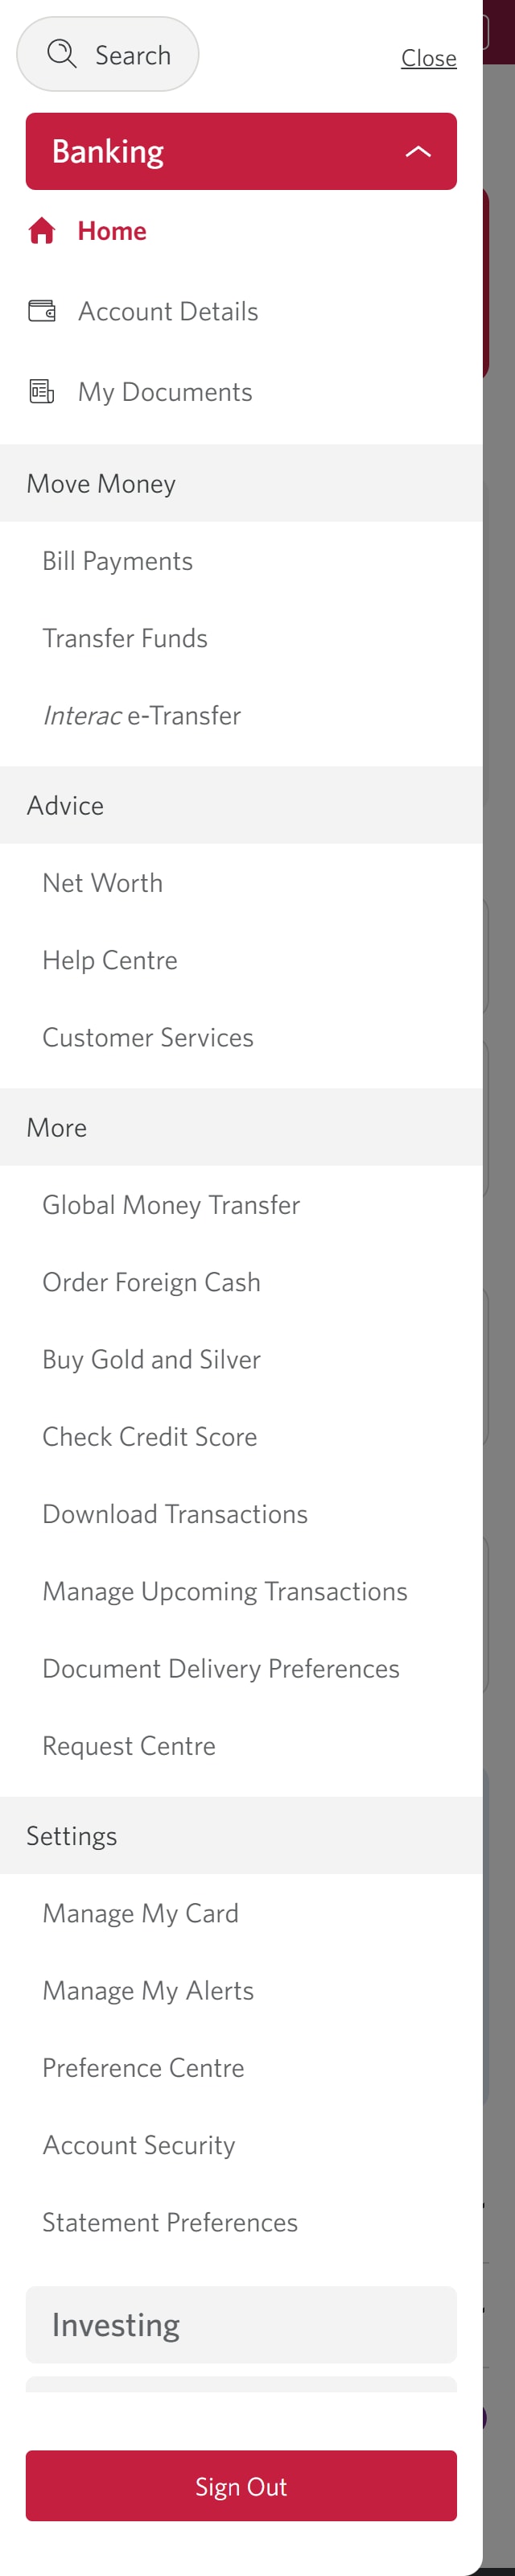
Demo screen 2: CIBC Online Banking homepage. A pulsing animation highlights the "More options" menu.
Demo screen 3: CIBC Online Banking navigation sidebar. A pulsing animation highlights the "Interac e-Transfer" link.
Demo screen 4: CIBC Online Banking send money step 1. A pulsing animation highlights the "New Contact" link.
Demo screen 5: CIBC Online Banking protect yourself from scams modal. A pulsing animation highlights the "I understand" button.
Demo screen 6: CIBC Online Banking add contact step 1. A pulsing animation highlights the Contact's Name field.
Demo screen 7: CIBC Online Banking add contact step 1. A pulsing animation highlights the contact details options buttons.
Demo screen 8: CIBC Online Banking add contact step 1. A pulsing animation highlights the "Add Contact" button.
Demo screen 9: CIBC Online Banking add contact step 1. A pulsing animation highlights the "Add Contact" button.
Demo screen 10: CIBC Online Banking add contact step 2. A pulsing animation highlights the "Send Money" button.
Demo screen 11: CIBC Online Banking send money step 1. A pulsing animation highlights the "Send Money To" combo box.
Demo screen 12: CIBC Online Banking send money step 1. A pulsing animation highlights the "amount" field.
Demo screen 13: CIBC Online Banking send money step 1. A pulsing animation highlights the "From Account" combo box.
Demo screen 14: CIBC Online Banking send money step 1. A pulsing animation highlights the "Transfer Date" combo box.
Demo screen 15: CIBC Online Banking send money step 1. A pulsing animation highlights the message field.
Demo screen 16: CIBC Online Banking send money step 1. A pulsing animation highlights the "Create a security question" button.
Demo screen 17: CIBC Online Banking send money verification. A pulsing animation highlights the "Send Money" button.
Demo screen 18: CIBC Online Banking send money step 3. No pulsing animation.
Your progress 1 of

Step 1 : Let's get started on your web browser

Select the "Sign on" button in the demo to continue.

Step 2 : Select the three-line menu icon to open the navigation bar

On the CIBC Online Banking homepage, find and select the three-line menu icon to open a navigation bar with more options.

Step 3 : Select "Interac e-Transfer"

Go to the "Move Money" section of the menu and select "Interac e-Transfer".

Step 4 : Create a new contact

Go to "Send Money To" and select "New Contact".

Step 5 : Review the terms for sending an Interac e-Transfer

Review the common warning signs of scams that involve requests for money, and CIBC's terms for sending an Interac e-Transfer.

Once you've finished reviewing, select "I understand" to continue.

Step 6 : Enter the contact's name

In the field provided, enter the name of the recipient you'll be sending an Interac e-Transfer payment to.

Step 7 : Choose a contact method

Choose how your new contact will be notified of the Interac e-Transfer payment. Select the checkbox for "email" or "mobile phone".

For this demo, we'll be selecting email and will add the contact's email address when prompted.

Step 8 : Add contact

Confirm the details of the contact's information. When you're ready, select the "Add Contact" button.

As an extra security measure, you may need to verify your identity with a one-time verification code before you can finish adding a new contact.

Depending on your chosen contact method, you'll receive either a phone call or a text message with the verification code. Enter the code to proceed to the next step.

Step 9 : Verify contact information

Verify that the contact's information is correct. When you're ready, select "Add Contact".

Step 10 : Send money to your contact

An on-screen message will confirm that your contact was successfully added.

Select "Send Money" to begin an Interac e-Transfer payment to your contact.

Step 11 : Select the contact from the dropdown menu

Go to the "Send Money To" dropdown menu and select your contact's name.

Step 12 : Enter the amount of your Interac e-Transfer payment

Use the field provided and enter the amount of money you'll be transferring to your contact.

Step 13 : Choose an account to withdraw the money from

Use the dropdown menu to select an account that you'll send the money from.

To set up a recurring Interac e-Transfer payment, you can select options from the "How Often" dropdown menu.

Step 14 : Schedule the transfer date

Today's date will be the default for your Interac e-Transfer payment.

If you want to schedule the transfer for a later date, go to "Transfer Date" and use the dropdown menus to select a future date, or select the calendar icon.

Step 15 : Enter a message

Enter a message to the recipient of your Interac e-Transfer payment. This step is optional.

Step 16 : Enter a security question

Enter a security question and response that only the recipient of your Interac e-Transfer payment can answer. You'll be prompted to enter the answer twice.

The recipient must correctly answer the question to complete the transfer. Any recipient who has registered for Interac e-Transfer Autodeposit will not be asked to complete this step.

Step 17 : Review the details of your Interac e-Transfer payment

Once you've reviewed the details and verified they're correct, select "Send Money" to proceed with the transfer.

Step 18 : Great job!

You've successfully added a contact and made an Interac e-Transfer payment on CIBC Online Banking.

An on-screen message will confirm that your money has been sent.

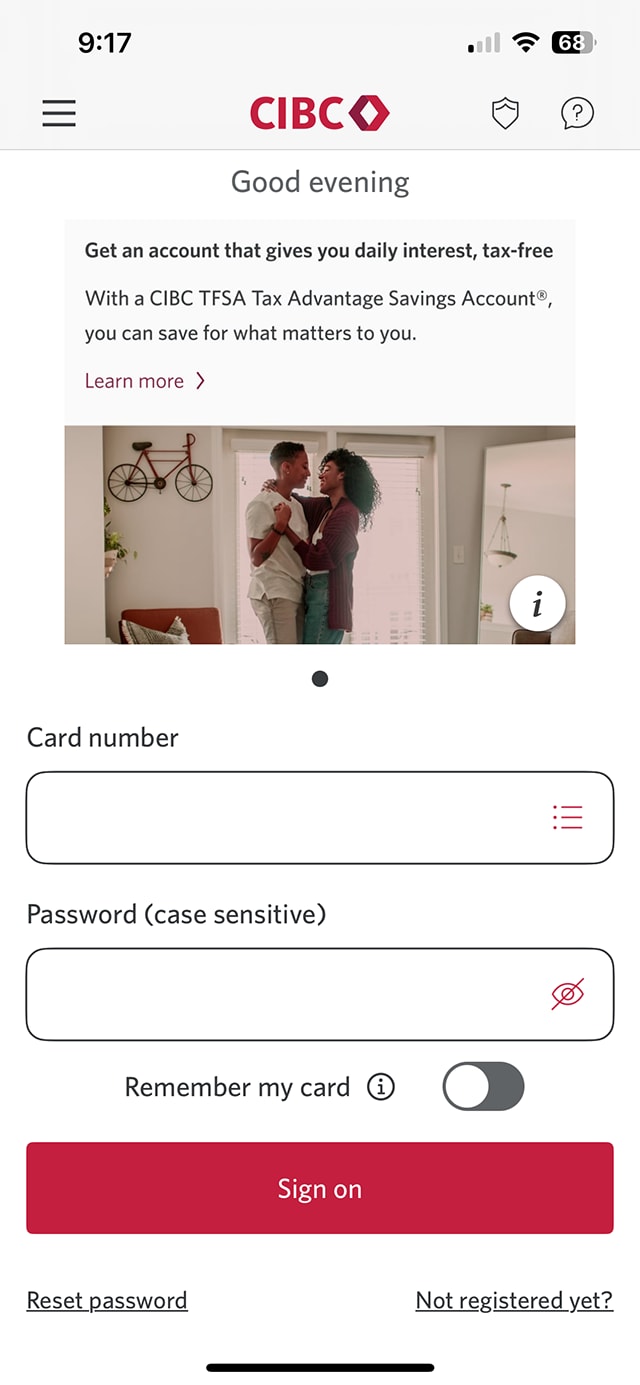
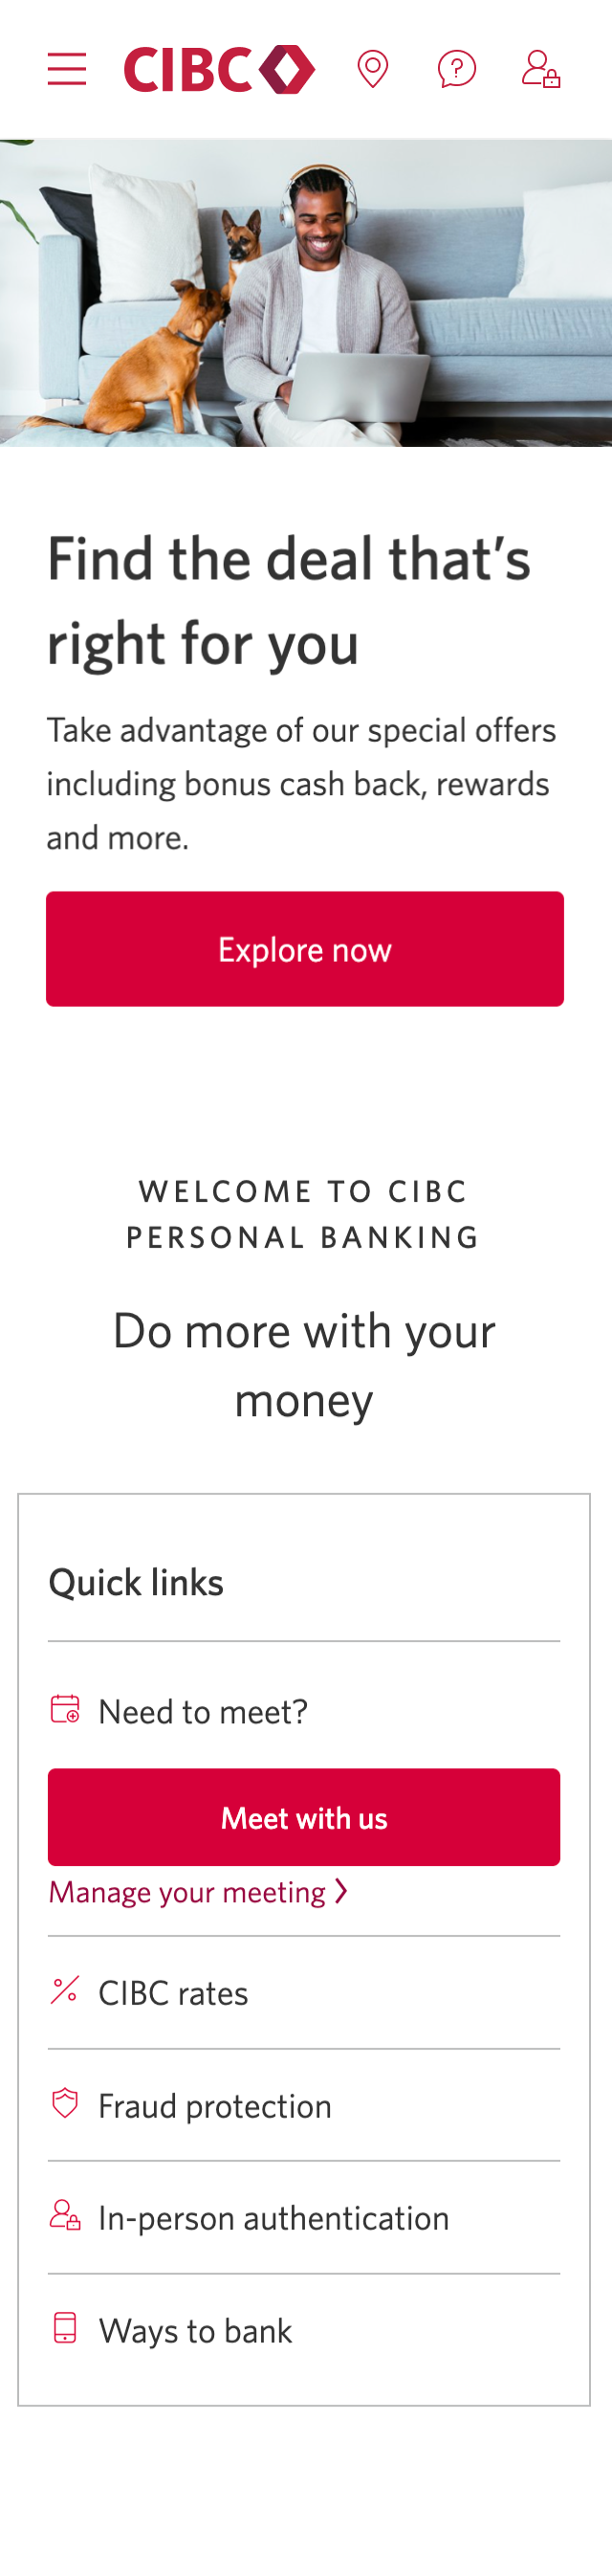
Demo screen 1: CIBC Mobile Banking App sign on screen. A pulsing animation highlights the "Sign on" button.
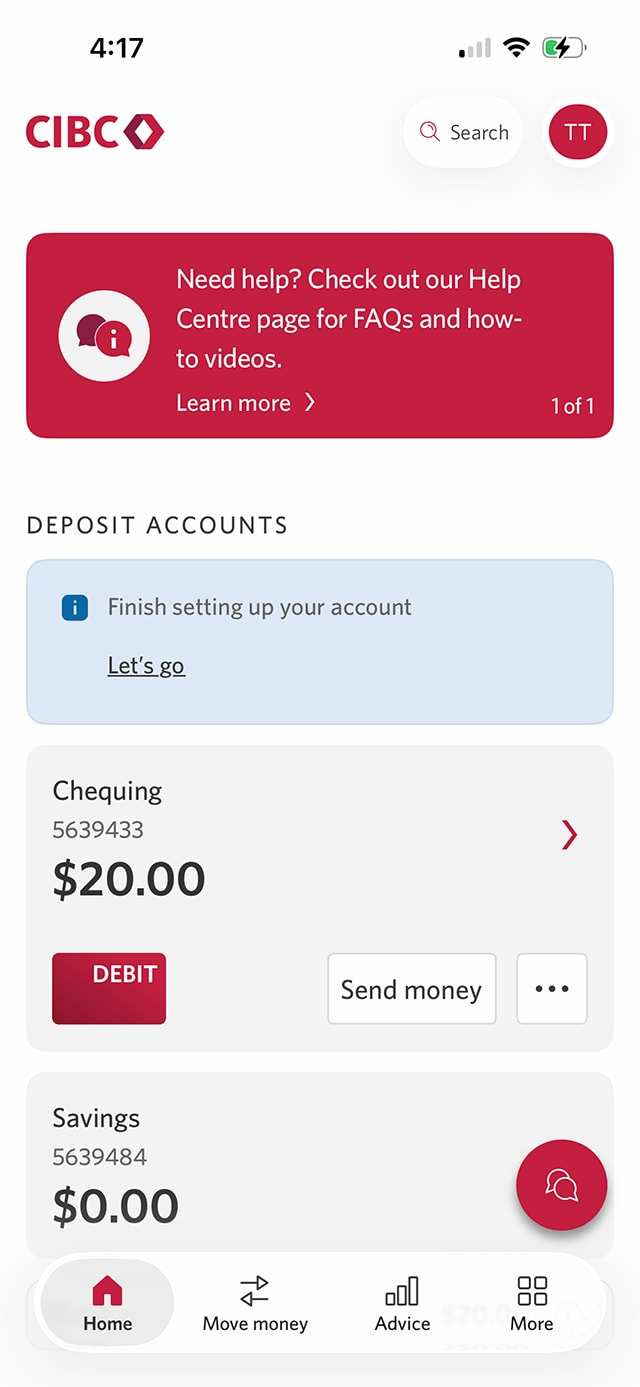
Demo screen 2: CIBC Mobile Banking App homepage. A pulsing animation highlights the "Send money" button.
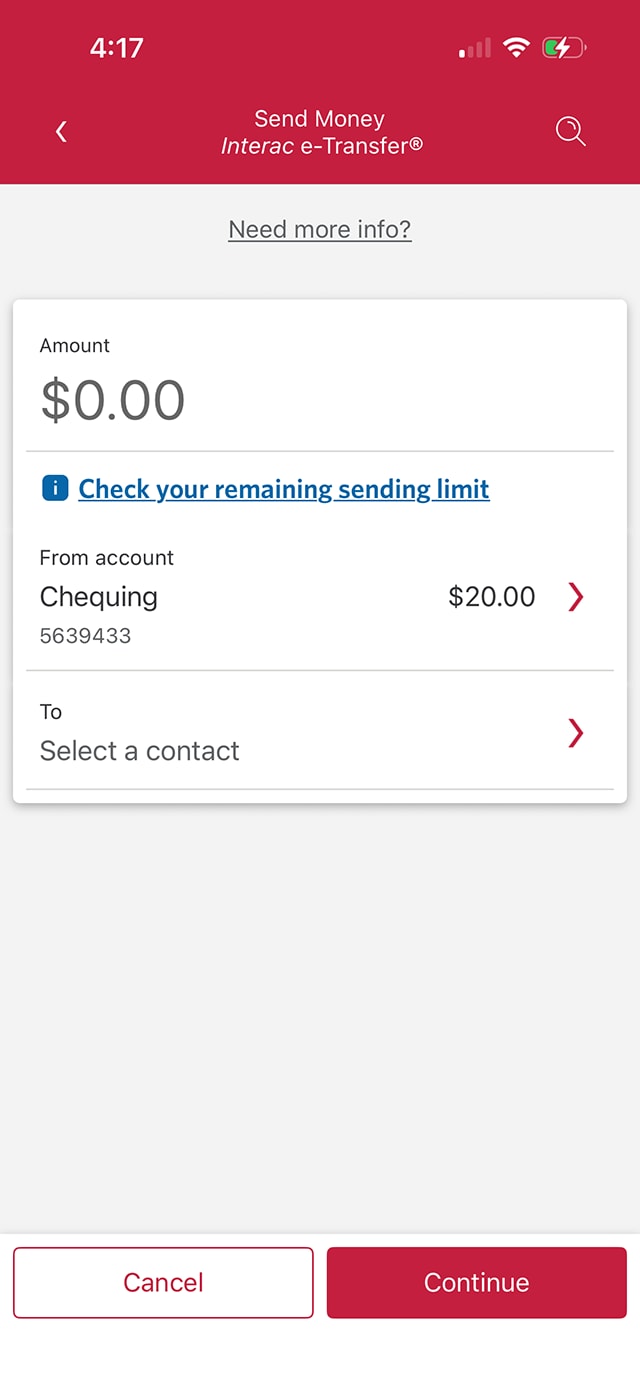
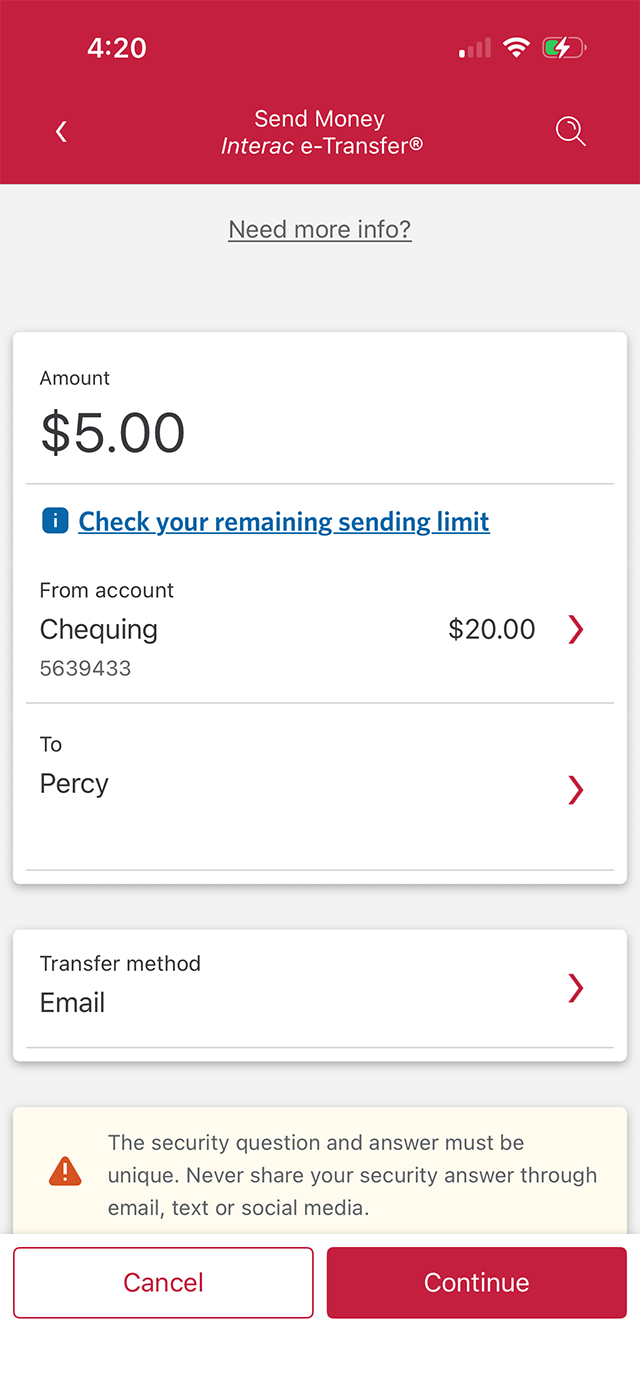
Demo screen 3: CIBC Mobile Banking App account page. A pulsing animation highlights the "To, Select a contact" button.
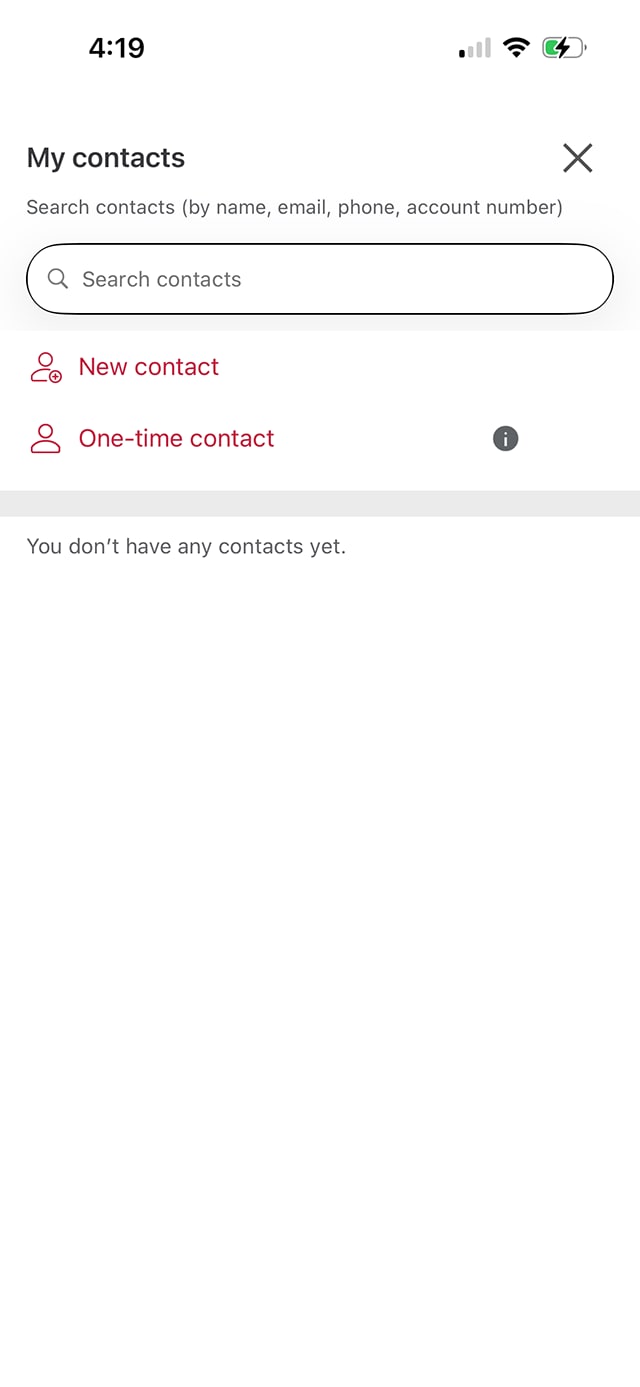
Demo screen 4: CIBC Mobile Banking App account page. A pulsing animation highlights the "New contact" button.
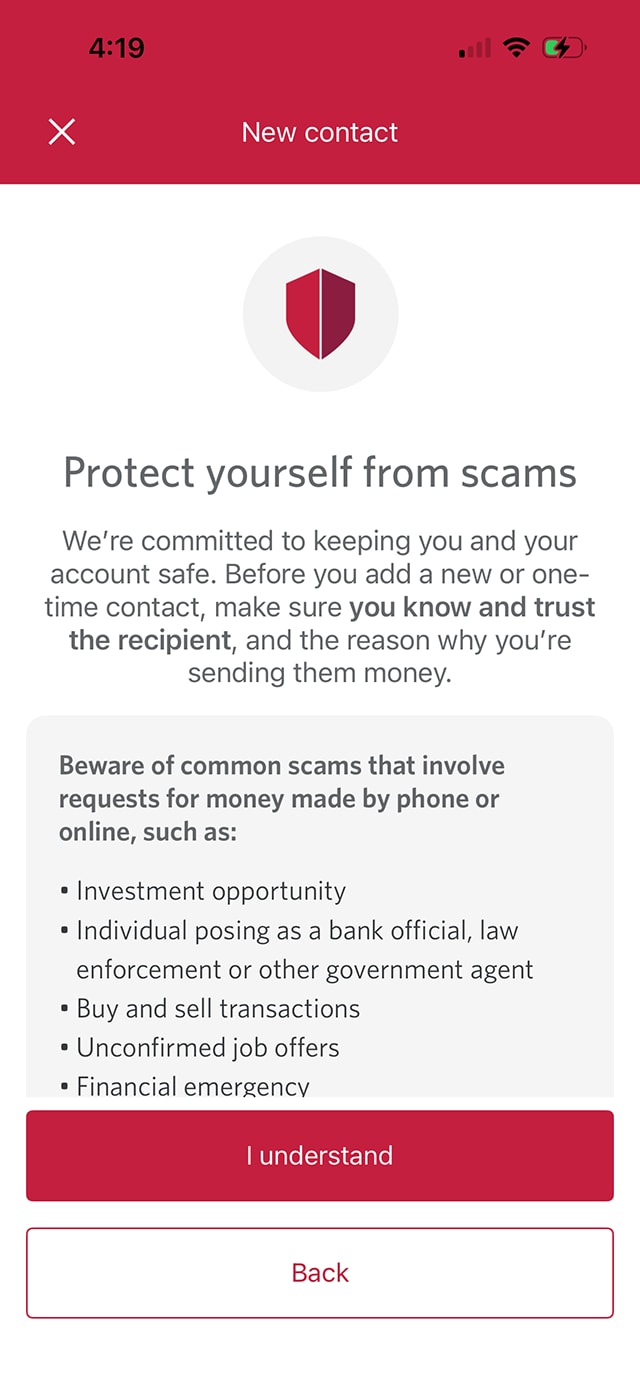
Demo screen 5: CIBC Mobile Banking App new contact page. A pulsing animation highlights the "I understand" button.
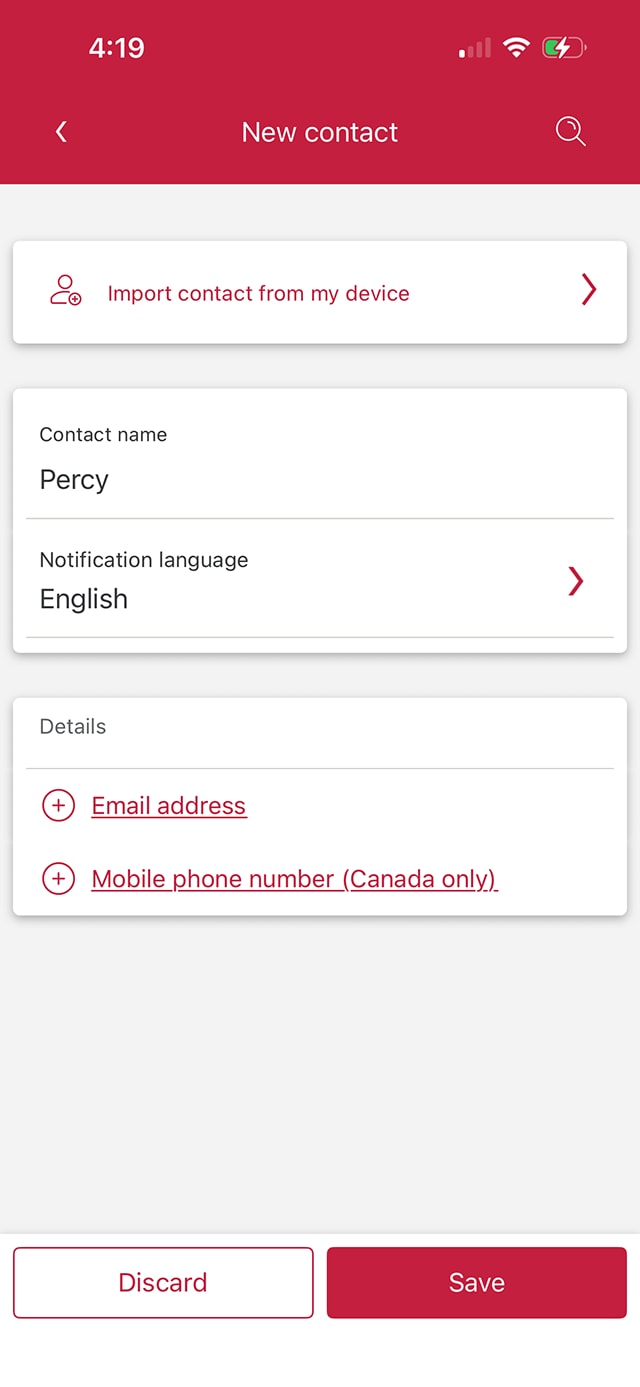
Demo screen 6: CIBC Mobile Banking App new contact page. A pulsing animation highlights the "Contact name" field.
Demo screen 7: CIBC Mobile Banking App new contact page. A pulsing animation highlights the "Save" button.
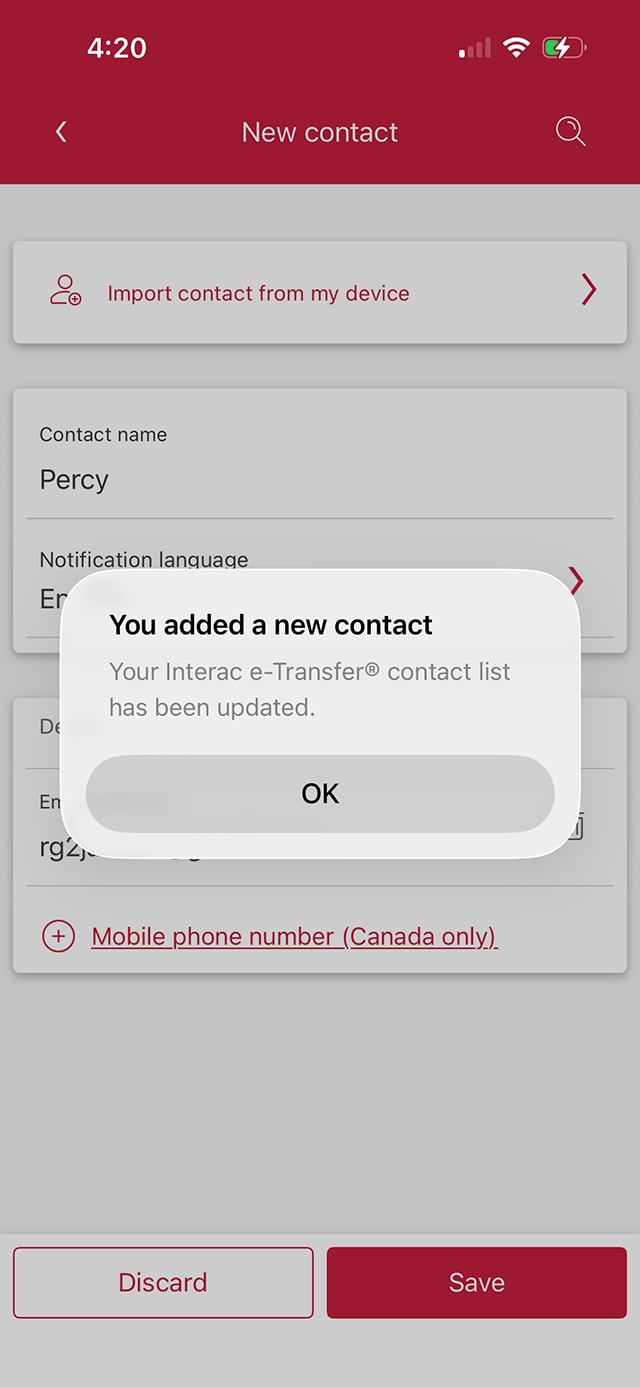
Demo screen 8: CIBC Mobile Banking App you added a new contact modal. A pulsing animation highlights the "OK" button.
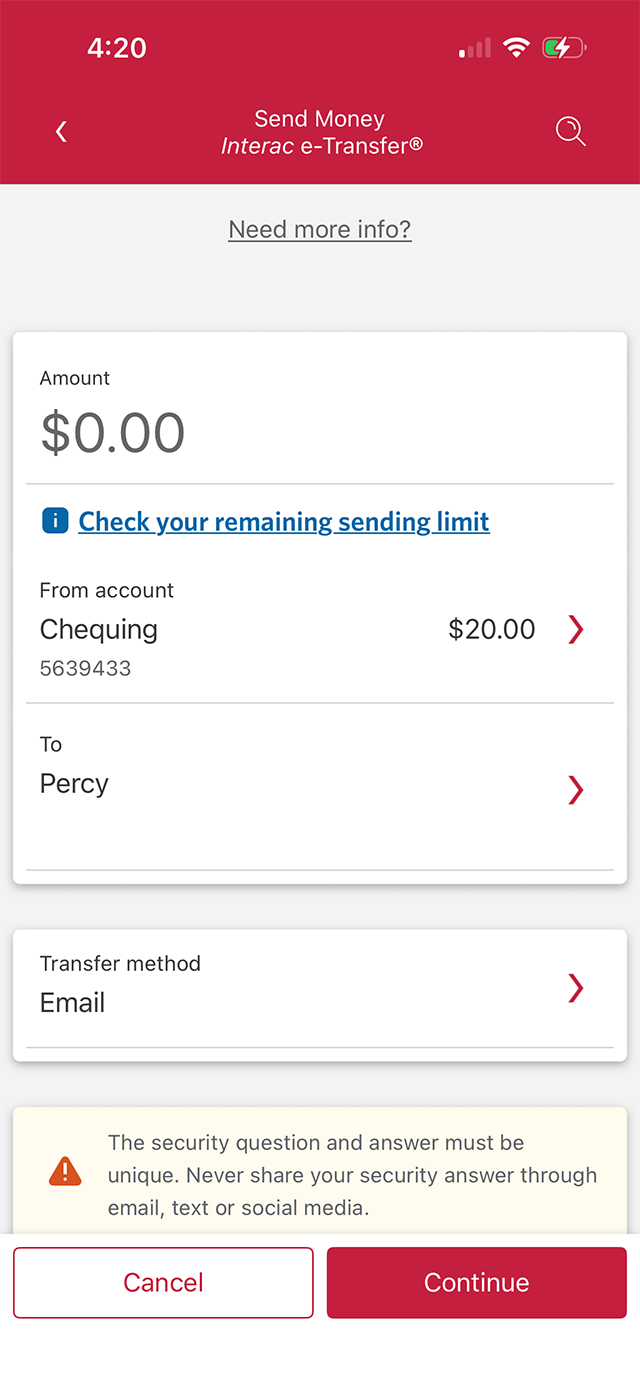
Demo screen 9: CIBC Mobile Banking App send money page. A pulsing animation highlights the amount field.
Demo screen 10: CIBC Mobile Banking App send money page. A pulsing animation highlights the "To" button.
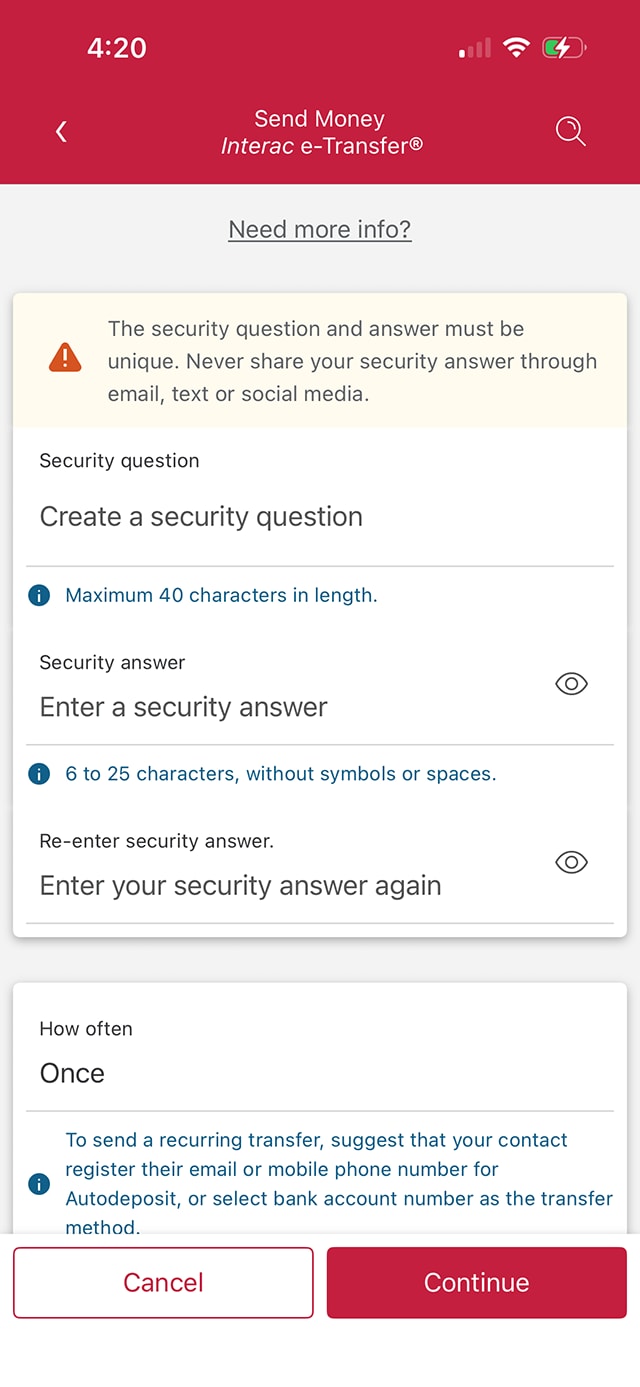
Demo screen 11: CIBC Mobile Banking App send money page. A pulsing animation highlights the security question field.
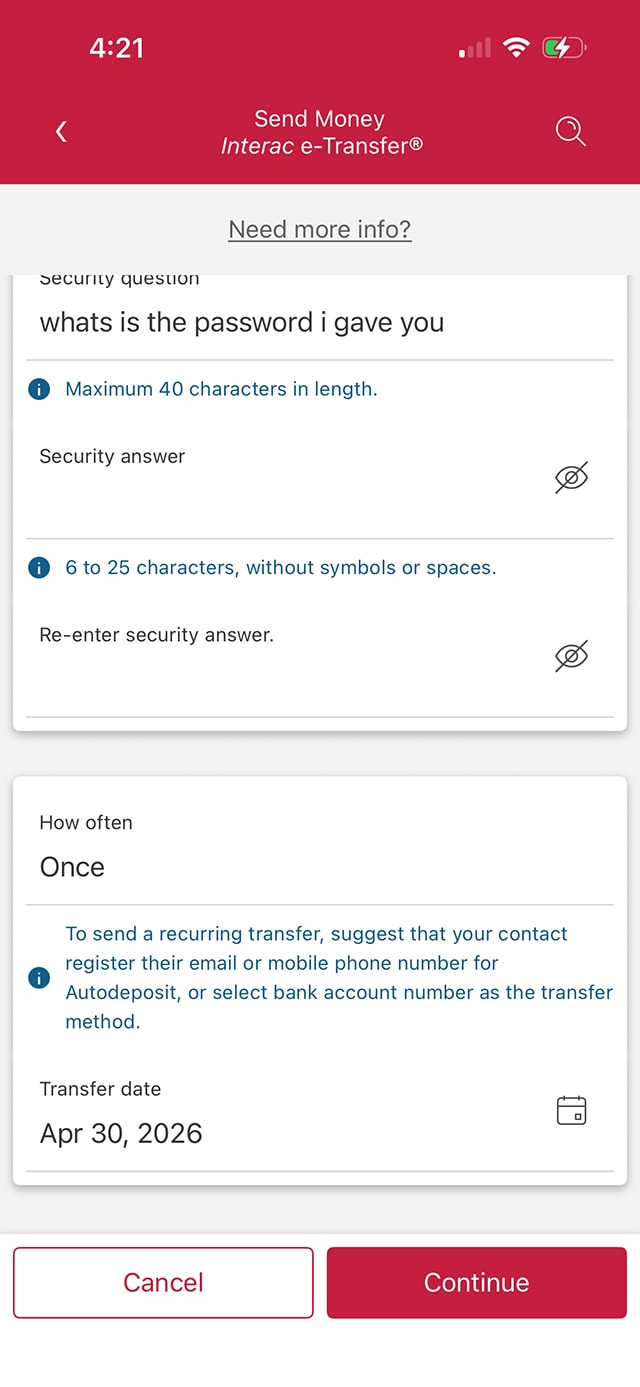
Demo screen 12: CIBC Mobile Banking App send money page. A pulsing animation highlights the "Continue" button.
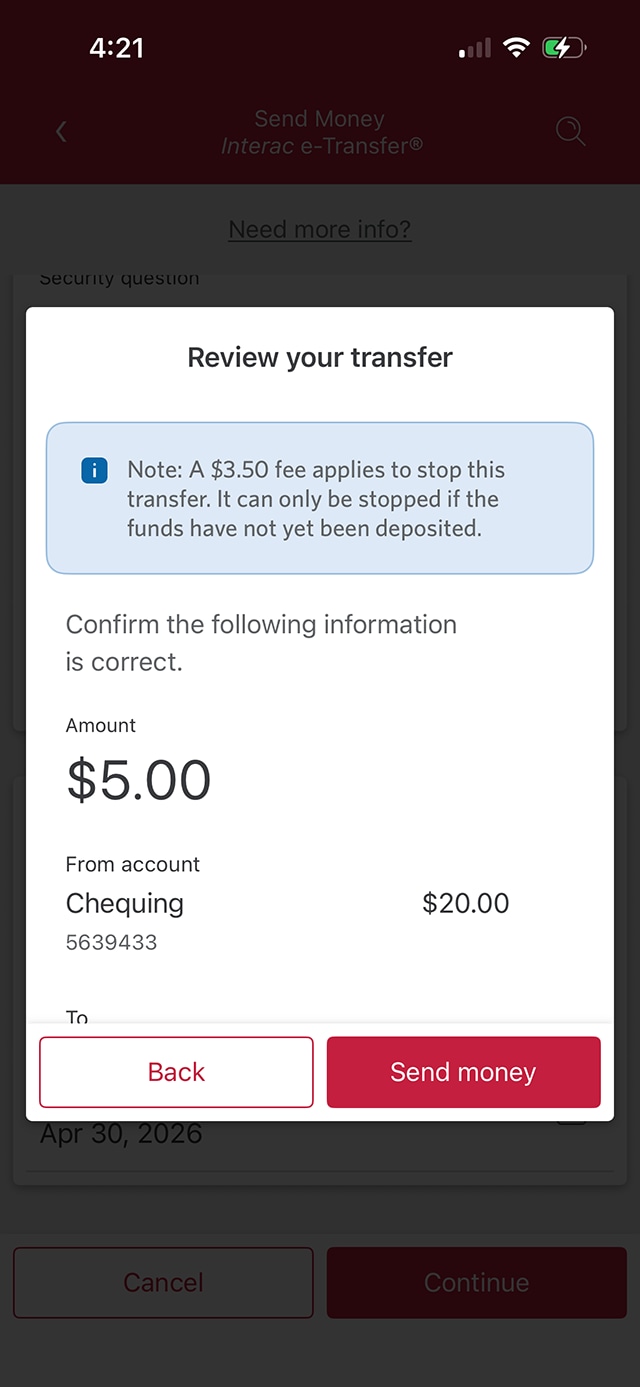
Demo screen 13: CIBC Mobile Banking App send money page. A pulsing animation highlights the "Send Money" button.
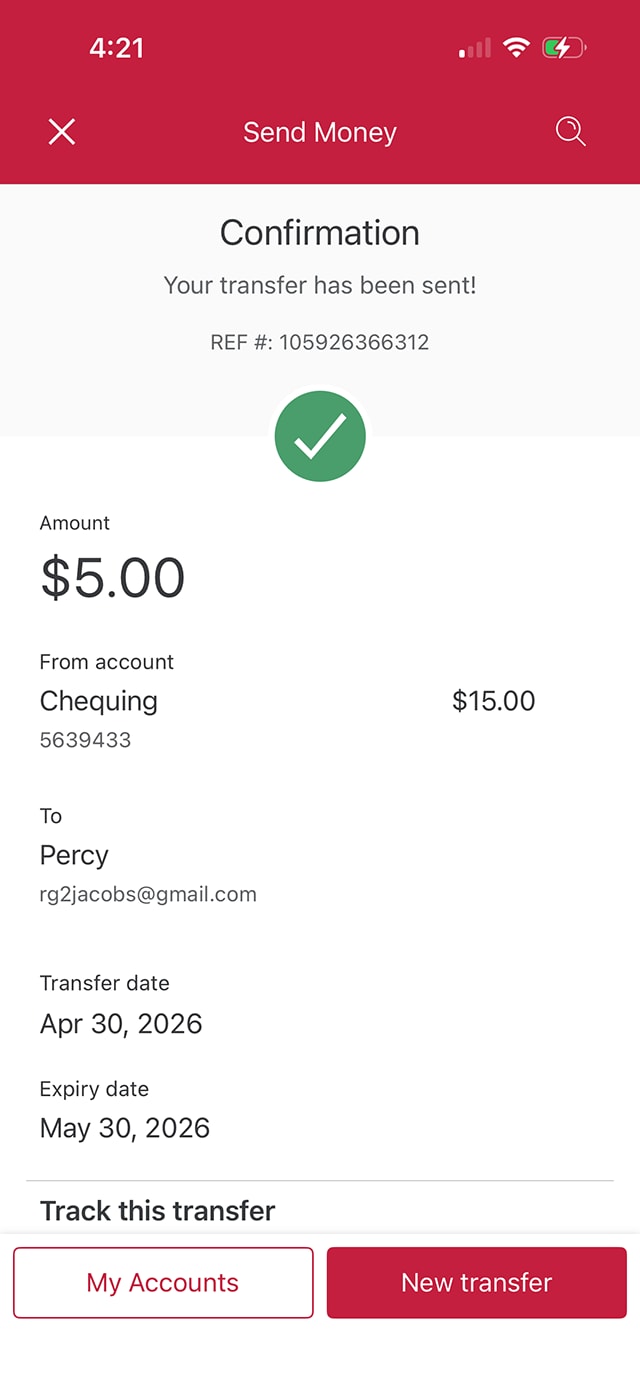
Demo screen 14: CIBC Mobile Banking App send money confirmation. No pulsing animation.
Your progress 1 of

Step 1 : Let's get started on the mobile app

Select the "Sign on" button in the demo to continue.

Step 2 : Select "Send money"

On the CIBC Mobile Banking App homepage, choose an account and select "Send money".

Step 3 : Select a contact to send an Interac e-Transfer payment to

Select "Select a contact" to continue.

Step 4 : Add a new contact

To add a new Interac e-Transfer payment recipient to your account, select "New contact".

Step 5 : Review the terms for sending an Interac e-Transfer payment

Review the common warning signs of scams that involve requests for money and CIBC's terms for sending an Interac e-Transfer payment.

Once you've finished reviewing, select "I understand" to continue.

Step 6 : Enter the contact's name

In the field provided, enter the name of the recipient you'll be sending an Interac e-Transfer payment to.

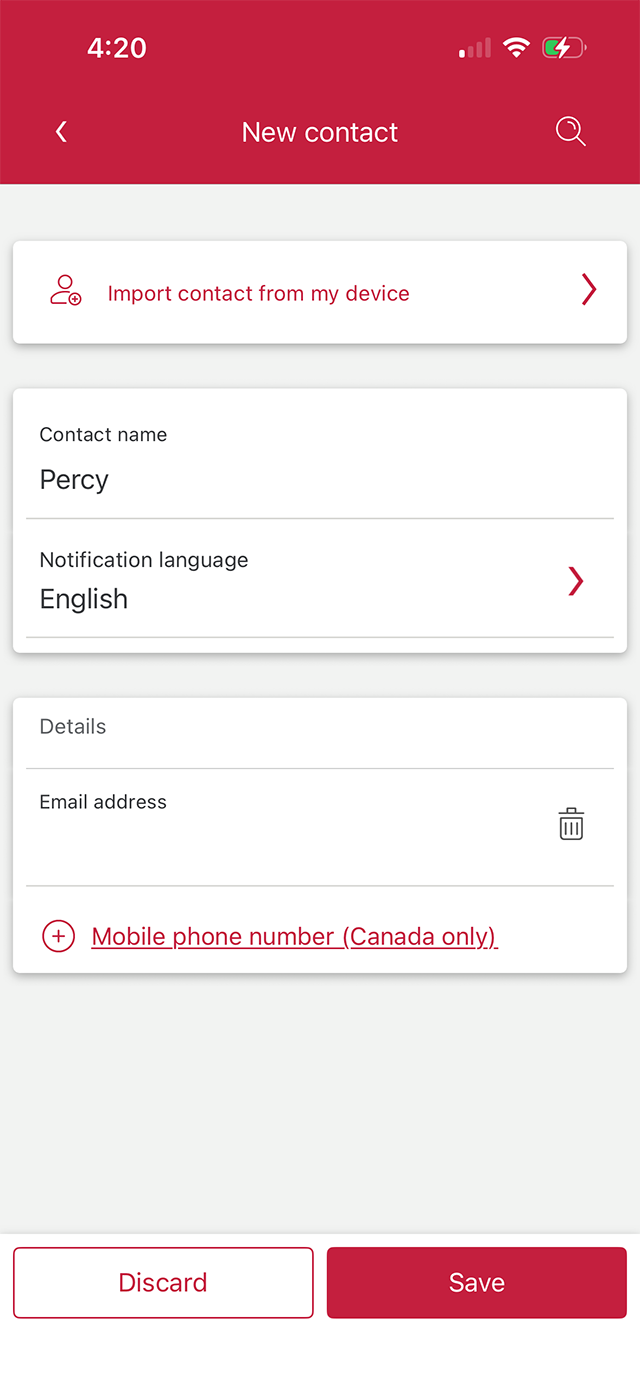
Step 7 : Choose a contact method

Choose how your new contact will be notified of the Interac e-Transfer payment.

For this demo, we'll be selecting email. Enter the email address in the field provided and select the "Save" button.

As an extra security measure, you may need to verify your identity with a one-time verification code before you can finish adding a new contact.

Step 8 : Select "OK"

An on-screen message will confirm that you've successfully added a new contact.

Select "OK" to begin an Interac e-Transfer payment.

Step 9 : Enter the amount of your Interac e-Transfer payment

Use the field provided and enter the amount of money you'll be transferring to your contact.

Step 10 : Select a contact

Select "To" to choose a contact for your Interac e-Transfer payment.

Step 11 : Enter a security question

Enter a security question and response that only the recipient of your Interac e-Transfer payment can answer. You'll be prompted to enter the answer twice.

The recipient must correctly answer the question to complete the transfer. Any recipient who has registered for Interac e-Transfer Autodeposit will not be asked to complete this step.

Step 12 : Schedule the transfer date

Today's date will be the default for your Interac e-Transfer payment.

If you want to schedule the transfer for a later date, go to "Transfer Date" and use the dropdown menus to select a future date, or select the calendar icon.

When you're ready, select the "Continue" button.

Step 13 : Review the details of your Interac e-Transfer payment

Once you've reviewed the details and verified they're correct, select "Send Money" to proceed with the transfer.

Step 14 : Great job!

You've successfully added a contact and made an Interac e-Transfer payment on the CIBC Mobile Banking App.

An on-screen message will confirm that your money has been sent.
Want an overview of all the steps?

For full instructions on how to send an Interac e-Transfer® payment, check out the step-by-step process all in one place.

Recommended digital banking demos

How to stop an Interac e-Transfer payment

Start demo on how to stop an Interac e-Transfer payment.

How to register for Interac e-Transfer Autodeposit

Start demo on how to register for Interac e-Transfer Autodeposit.

How to send a CIBC Global Money Transfer

Start demo on how to send a CIBC Global Money Transfer.

How to transfer money between accounts

Start demo on how to transfer money between accounts.

Get started

CIBC Online Banking®

Discover digital banking features that can help you bank easily online.
CIBC Mobile Banking® App

Stay connected to your finances on your mobile device, no matter where you are.